Easter Magic Cookie Bars – Your New Holiday Tradition
Hey there, friend! Isla here from BiteTide, waving a buttery, crumb-covered hand from my flour-dusted kitchen. Can we talk about holiday desserts for a second? Specifically, the kind that need to be incredible, feed a crowd, and—let’s be real—not add to the already impressive chaos of hosting an Easter gathering. I’m talking about a dessert that’s basically a one-pan wonder, a symphony of textures, and a guaranteed showstopper that requires exactly zero fancy piping skills.
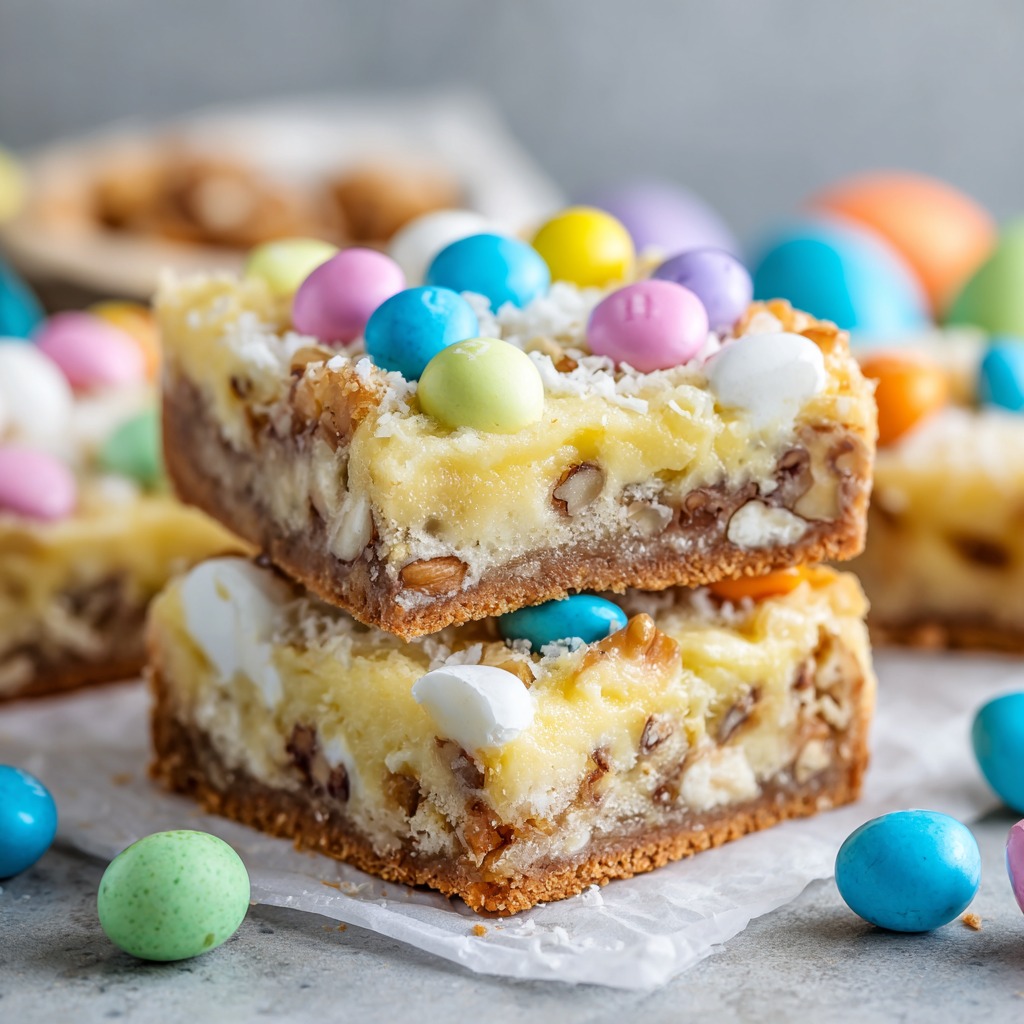
Enter these Easter Magic Cookie Bars. Imagine this: a buttery graham cracker crust holding a layer of luscious, gooey sweetened condensed milk. On top of that, a confetti of toasted coconut, creamy white chocolate chips, rich butterscotch chips, crunchy walnuts, and the star of the show—pastel Easter M&Ms that melt just enough in the oven to create beautiful, colorful swirls. Each bite is a perfect chaos of crunch, chew, cream, and melt-in-your-mouth magic. They’re nostalgic, they’re festive, and they are laughably easy. This is the dessert you make when you want everyone to think you slaved for hours, but you secretly know it came together in about 10 minutes of active time. Let’s make some magic together.
A Pan of Sunshine & Sticky Fingers
These bars always take me right back to my grandma’s linoleum kitchen, the one with the always-buzzing fluorescent light. Easter at her house wasn’t just a Sunday; it was a weekend-long festival of pastels, hidden eggs, and, most importantly, baking. While the “official” Easter dessert was often a tall, wobbly chiffon pie, my personal holiday always started with the bar cookies she’d let me make myself. Hers were the classic “magic” bars, but one year, when I was about eight, I had a brilliant, revolutionary idea. What if we used the pastel-coated chocolate candies from my Easter egg hunt stash?
Grandma, bless her, didn’t bat an eye. She helped me chop the candies (a perilous task with tiny, eager hands) and showed me how to sprinkle them in layers “so every slice gets a surprise.” The moment they came out of the oven, transformed into a shiny, mosaic-like pan of joy, I was hooked. That feeling of creating something spectacular from simple, colorful ingredients? That’s the exact joy I want to bring to your kitchen this Easter. It’s more than a recipe; it’s a permission slip to play with your food and create a sweet, sticky memory.
Print
Easter Magic Cookie Bars (Ooey Gooey Holiday Favorite)
- Total Time: 35 minutes
- Yield: 24 bars 1x
Description
These Easter Magic Cookie Bars are buttery, gooey, crunchy, and packed with festive color. A graham cracker crust is layered with sweetened condensed milk, coconut, white chocolate chips, walnuts, butterscotch chips, and pastel Easter M&Ms for the perfect holiday treat. They’re incredibly easy to make, feed a crowd, and are always the first dessert to disappear at Easter gatherings, potlucks, and bake sales.
Ingredients
1 stick (½ cup) butter, melted
1 ½ cups graham cracker crumbs
1 (15 oz) can sweetened condensed milk
1 ½ cups sweetened coconut flakes, divided
1 ½ cups white chocolate chips
1 cup butterscotch chips
1 ½ cups chopped walnuts
1 ½ cups pastel Easter M&Ms, divided
Instructions
1. Prep the Pan
Preheat oven to 350°F (175°C). Line a 9×13-inch pan with parchment paper.
2. Make the Crust
Mix melted butter and graham cracker crumbs until combined. Press firmly into the bottom of the prepared pan.
3. Add the Sweet Layer
Pour sweetened condensed milk evenly over the crust and gently spread.
4. Layer the Goodness
Sprinkle in this order:
Most of the coconut flakes
White chocolate chips
Walnuts
Butterscotch chips
Most of the Easter M&Ms
Lightly press layers into the condensed milk to help everything stick.
5. Bake
Bake for 25 minutes, until golden and bubbly.
6. Finish & Cool
Remove from oven and gently press remaining M&Ms on top for extra color. Cool completely before lifting from the pan and cutting into squares.
- Prep Time: 10 mins
- Cook Time: 25 mins
- Category: Dessert
Nutrition
- Calories: 260
- Fat: 14g
Gathering Your Flavor Party
Here’s the beautiful cast of characters for our 7-layer masterpiece. The beauty of this recipe is in its flexibility, so I’ve included my favorite chef-y insights and swaps to make it your own!
- 1 stick (½ cup) butter, melted: This is the rich, toasty foundation of our crust. I use unsalted so I control the salt level. For a deeper flavor, try browning your butter first—it adds a nutty, caramel note that’s *chef’s kiss*.
- 1 ½ cups graham cracker crumbs: The classic. You can buy crumbs or pulse whole crackers in a food processor. For a fun twist, ginger snap crumbs work amazingly well for a spicy kick!
- 1 (15 oz) can sweetened condensed milk: The magical “glue” that holds everything together and creates that iconic gooey layer. Do not substitute evaporated milk—it’s not the same! This is non-negotiable for the right texture.
- 1 ½ cups sweetened coconut flakes, divided: They toast up beautifully in the oven, adding chew and tropical sweetness. If you’re anti-coconut, swap for an extra ½ cup of oats or more nuts. No judgment here!
- 1 ½ cups white chocolate chips: They add creamy, vanilla sweetness. Look for good quality chips—they melt better. You can also use chopped white chocolate bars.
- 1 cup butterscotch chips: My secret weapon for depth. Their rich, buttery, almost caramel flavor balances the sweetness. If you can’t find them, more white chocolate or semi-sweet chips work.
- 1 ½ cups chopped walnuts: The essential crunch! Toasting them first in a dry pan for 5 minutes unlocks their oil and makes them 100x more flavorful. Pecans or almonds are fantastic substitutes.
- 1 ½ cups pastel Easter M&Ms, divided: The festive heart of the recipe! We use most in the bake, saving a handful to press on top after for maximum color pop. Any festive M&M variety works year-round!
Let’s Build Some Magic: Step-by-Step
Ready? Put on some fun music, clear a space, and let’s do this. It’s more assembly line than complicated baking, and I’ll be with you every step.
- Prep the Pan & Preheat: First, crank your oven to 350°F (175°C). Now, grab your 9×13-inch pan. Here’s my #1 pro-tip for clean cuts and easy removal: line it with parchment paper, letting the edges overhang like little handles. A quick spritz of baking spray on the paper guarantees a perfect release. No parchment? Foil works in a pinch, but grease it well.
- Make the Crust: In a medium bowl, pour your melted butter over the graham cracker crumbs. Stir until every last crumb is shimmering and moistened. It should feel like wet sand. Dump this into your prepared pan and use the bottom of a measuring cup or a glass to press it firmly and evenly into one solid layer. A good, tight pack here is what gives you a crust that holds its own against all that gooey goodness.
- Add the Sweet, Gooey Glue: Open that can of sweetened condensed milk and pour it slowly over the crust. Use an offset spatula or the back of a spoon to gently spread it into an even layer, all the way to the edges. Don’t go crazy stirring it into the crust—just a gentle coaxing.
- Layer the Goodness (The Fun Part!): Now, the confetti parade! Sprinkle in this order for the best structural integrity:
- Most of the coconut flakes (save a small handful).
- All the white chocolate chips.
- All the chopped walnuts.
- All the butterscotch chips.
- Most of the Easter M&Ms (save about ¼ cup for the top).
After sprinkling, take clean hands and gently press all the layers down into the condensed milk. This isn’t a smash—just a light, even pressure to help everything adhere.
- Bake to Golden Perfection: Slide the pan into your preheated oven. Bake for 23-28 minutes. You’re looking for the edges to be a deep golden brown and the center to be bubbly and set. The top will be beautifully toasted. Ovens vary, so start checking at 23!
- The Grand Finale – Cool Completely: This is the hardest but most crucial step. As soon as the bars come out, immediately press the reserved M&Ms onto the hot surface for that gorgeous top decoration. Then, walk away. Let them cool in the pan on a wire rack until they are completely, totally, 100% room temperature. I know it’s tempting, but cutting warm magic bars leads to a delicious but messy puddle. For super clean cuts, I sometimes pop the whole pan in the fridge for an hour after cooling.
How to Serve These Show-Stoppers
Once cooled and lifted from the pan using your parchment paper handles, place the giant slab on a cutting board. Use a sharp chef’s knife (wiping it clean between cuts) to slice into squares or bars. I like 24 generous rectangles for a crowd, but you can go smaller for bite-sized treats! Pile them high on a festive platter, maybe with a little spring greenery (edible flowers like pansies are stunning!) scattered around. They’re perfect with a cold glass of milk, a hot coffee, or as the sweet finale to your Easter feast. No extra garnish needed—they are the garnish!
Ride Your Own Flavor Wave: Fun Variations
The “magic” is in the customization! Here are a few of my favorite twists:
- Salty Sweet Supreme: Swap walnuts for pretzel pieces and use salted caramel chips instead of butterscotch. Sprinkle the top with flaky sea salt after baking.
- Tropical Escape: Use macadamia nuts instead of walnuts, add ½ cup chopped dried pineapple with the coconut, and swap the M&Ms for chopped dried mango.
- Double Chocolate Dream: For chocolate lovers, use chocolate graham crackers for the crust, swap white chocolate chips for semi-sweet, and use regular M&Ms.
- Nut-Free & Colorful: Replace walnuts with sunflower seeds or pumpkin seeds (pepitas). They add a fantastic crunch!
- Year-Round Fun: Change the M&M color for any holiday—red and green for Christmas, orange and black for Halloween, etc.
Isla’s Kitchen Notes & Stories
This recipe has been my trusty sidekick for years, and it’s evolved with me. The first time I made them for a big family potluck, my cousin’s toddler, mesmerized by the colors, tried to pick the M&Ms off the top of every single bar on the platter. We now call them “Finn’s Fingerprint Bars.” Lesson learned: the post-bake M&M press is key for security!
Over time, I’ve learned that toasting the coconut and walnuts separately before assembling adds an unbelievable depth of flavor—it’s an extra 10 minutes that pays off big time. Also, a metal pan gives you a crisper crust than glass. Most of all, this recipe is forgiving. Ran out of one chip? Toss in another. Don’t like nuts? Leave ‘em out. The condensed milk will hold it all together. It’s a recipe that wants you to succeed and have fun doing it.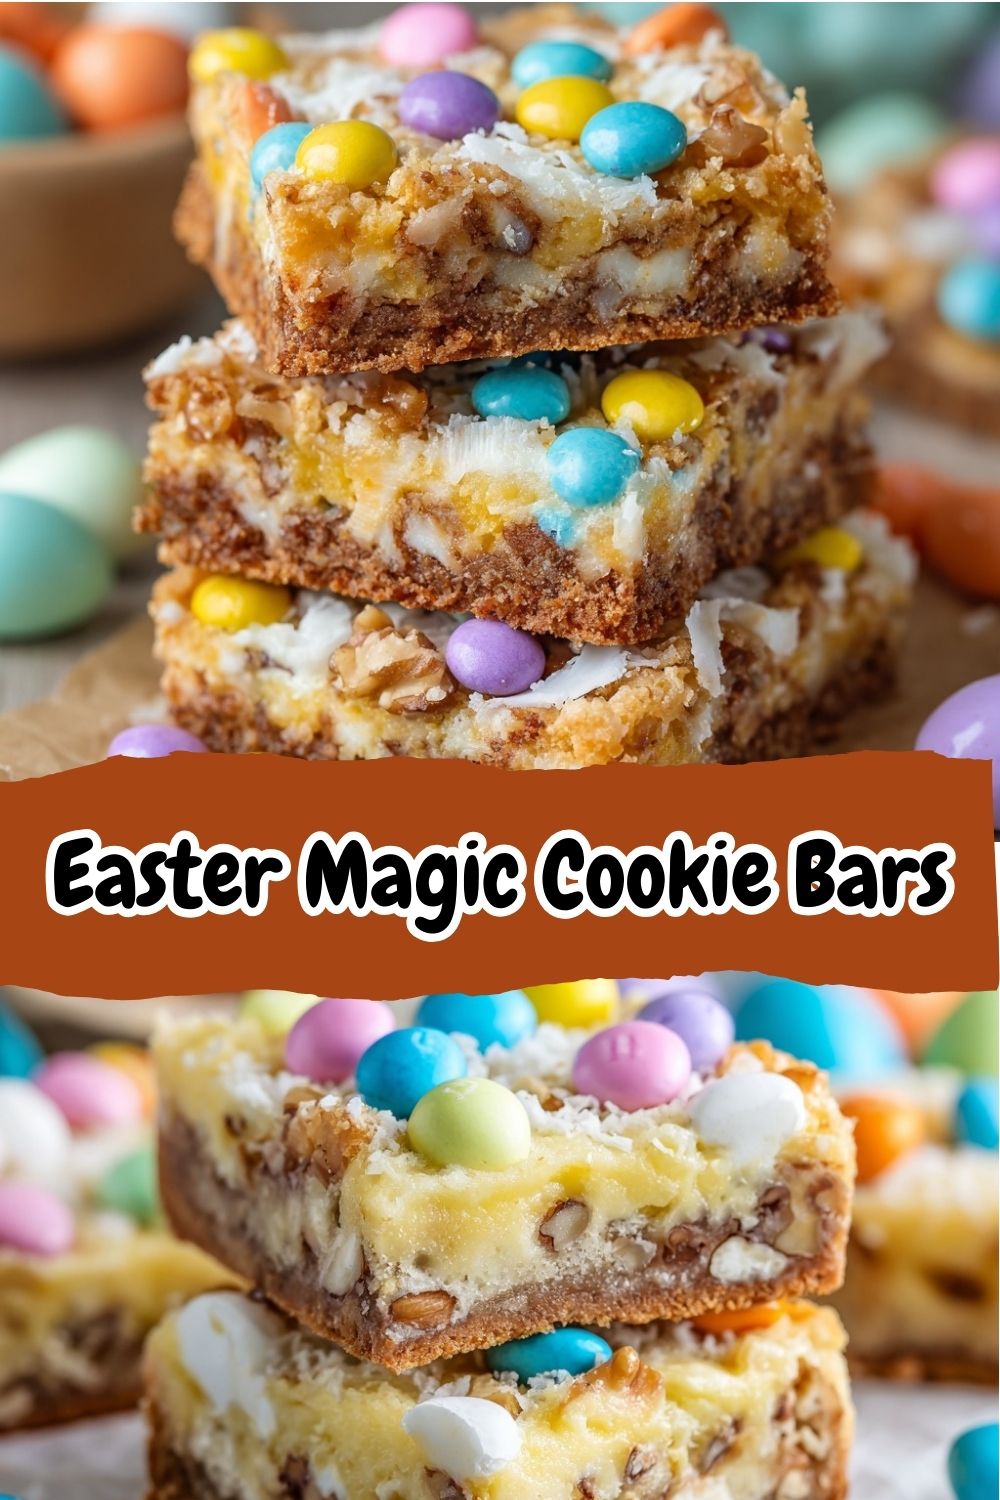
Your Questions, Answered!
Q: My crust is crumbly and doesn’t hold together when I cut. What happened?
A: This usually means the crust wasn’t pressed firmly enough into the pan. Really use some muscle with that measuring cup! Also, ensuring you’ve let the bars cool completely (even chilling them) is essential for clean cuts.
Q: Can I make these ahead of time?
A: Absolutely! They are arguably better the next day. Once cooled, store them in an airtight container at room temperature for up to 4 days, or in the fridge for up to a week. The flavors meld and the texture becomes even more perfect.
Q: My sweetened condensed milk bubbled up and looks weird. Is that okay?
A: Yes, totally normal! As it heats, the milk sugars caramelize and bubble, especially around the edges. This creates those delicious, chewy, toffee-like bits. It’s a feature, not a bug!
Q: Can I freeze Easter Magic Cookie Bars?
A> You bet. Freeze the whole uncut slab or individual bars wrapped tightly in plastic wrap and then in a freezer bag for up to 3 months. Thaw at room temperature.
Nutritional Information*
Yield: 24 bars | Prep Time: 10 mins | Bake Time: 25 mins | Total Time: 35 mins + cooling
*Estimated nutrition per bar: Calories: 260 | Carbohydrates: 30g | Fat: 14g | Protein: 3g
Thanks for baking with me today! I hope these bars bring as much joy to your table as they have to mine. Don’t forget to tag @BiteTide if you share a photo—seeing your creations is my favorite part! Happy Easter, and happy baking!
– Isla 💛