Greek Yogurt Bagels: Your Secret Weapon for Protein-Packed Mornings (No Yeast, No Fuss!)
Hey there, flavor adventurer! Isla here from BiteTide, waving my flour-dusted spatula at you. Ever had one of those mornings where you crave a chewy, satisfying bagel but the thought of wrestling with yeast, waiting hours for dough to rise, or braving the bakery line makes you want to crawl back into bed? Yeah, me too. That’s exactly why I’m SO pumped to share these Greek Yogurt Bagels with you today. Imagine: warm, golden-brown bagels with that iconic chewy bite, fresh from your oven in under 40 minutes—start to finish. No yeast, no proofing, no fancy equipment. Just four simple ingredients (seriously!) and a whole lot of protein-packed goodness thanks to trusty Greek yogurt. These little heroes are my weekday breakfast saviors, my post-workout fuel, and my “oops, I forgot snacks for the playdate” lifeline. They’re forgiving, endlessly customizable, and taste like you spent hours—when really, you spent more time choosing your Netflix show. Whether you’re a seasoned baker or someone who considers toast a culinary triumph, these bagels are your golden ticket to homemade baking confidence. Ready to make your kitchen smell like a New York deli (without the subway ride)? Let’s dive in and ride this delicious, doughy wave together! 💛
The Bagel That Saved Breakfast (And My Sanity!)
Picture this: It’s 6:45 AM. My kitchen looks like a tornado hit a flour factory. Two kiddos are chanting “baaay-gull, baaay-gull” like tiny, hangry seagulls, and my coffee’s gone cold. This was my reality most mornings until I stumbled upon the magic of Greek yogurt dough during a desperate pantry raid. It instantly whisked me back to my grandma’s sun-drenched kitchen in our little coastal town. She wasn’t a bagel baker (more of a fierce scone queen), but she had this uncanny knack for turning simple, humble ingredients into something magical—just like these bagels do. I remember her strong hands kneading dough on her worn wooden table, telling me, “Good food doesn’t need fuss, Isla girl, it just needs heart.” That chaotic morning, channeling her spirit, I mixed flour, yogurt, baking powder, and salt. Twenty minutes later? Warm, chewy bagels appeared, silencing the seagulls and sparking pure, unadulterated joy (and sticky high-fives). That messy, triumphant moment is baked right into every batch I make now. It’s proof that sometimes, the best kitchen memories—and the most delicious solutions—come from happy accidents and a little bit of grandma-inspired ingenuity.
Print
Greek Yogurt Bagels
- Total Time: 35 minutes
- Yield: 4 Bagels 1x
Description
These homemade bagels are soft, chewy, and made with just four ingredients—no yeast, no rise time! Greek yogurt gives them a protein boost, and you can top them sweet or savory to fit every craving.
Ingredients
1 cup all-purpose flour (or whole wheat)
2 tsp baking powder
¼ tsp salt
1 cup thick Greek yogurt
1 egg (for egg wash)
Optional Toppings: Everything seasoning, cinnamon, garlic, cheese, or chocolate chips
Instructions
Preheat oven to 375°F (190°C). Line a baking sheet with parchment paper.
In a bowl, mix flour, baking powder, and salt. Add yogurt and stir until a dough forms.
Lightly flour a surface and knead dough until smooth (about 1–2 mins).
Divide into 4 pieces, roll into ropes, and form each into a bagel shape.
Place on baking sheet, brush with egg wash, and add toppings.
Bake for 20–25 mins until golden brown. Cool before slicing.
- Prep Time: 10 mins
- Cook Time: 25 mins
- Category: breakfast
Nutrition
- Calories: ~150 per bagel
- Fat: 3g
- Carbohydrates: 20g
- Protein: 10g
🧾 Your Bagel Toolkit: Simple Ingredients, Big Flavor
Gather your squad! Here’s everything you need to create 4 glorious, chewy bagels. The beauty? You likely have most of this hanging out in your kitchen already. Pro tip: Measure your flour correctly! Spoon it lightly into your measuring cup and level it off. Packing it down leads to dense bagels.
- 1 cup (125g) All-Purpose Flour: The trusty foundation! It gives structure and that classic bagel chew. Chef’s Insight: For a nuttier, whole-grain vibe, swap in whole wheat flour 1:1. If gluten-free, a good 1:1 GF blend works (results vary slightly).
- 2 tsp Baking Powder: This is our yeast-free rising hero! It creates those lovely air pockets. Critical Tip: Make sure it’s fresh! Test it by stirring 1/2 tsp into 1/4 cup hot water – it should fizz vigorously.
- ¼ tsp Salt: Don’t skip it! It balances the tang of the yogurt and deepens all the flavors. Flavor Boost: If going savory, a pinch of garlic powder or onion powder whisked into the dry ingredients is divine.
- 1 cup (240g) Thick Greek Yogurt (Full Fat or 2%): The STAR player! It adds protein, moisture, and a subtle tang. Must-Use Tip: Drain any liquid and use thick yogurt (like Fage or Chobani). Thin yogurt makes sticky dough. For dairy-free, thick coconut yogurt (like Cocojune) can work, but expect a slightly different texture.
- 1 Egg (for egg wash): Gives that gorgeous golden shine and helps toppings stick. Easy Swap: Vegan? Brush with melted butter, olive oil, or plant-based milk instead.
- Optional Toppings Galore! This is where YOU shine! Savory Ideas: Everything seasoning, sesame seeds, poppy seeds, dried garlic/onion, grated Parmesan. Sweet Ideas: Cinnamon sugar, coarse sugar, mini chocolate chips, chopped dried fruit. Raid your pantry!
👩🍳 Let’s Get Baking: Your Foolproof Bagel Roadmap
Ready to transform those simple ingredients into bagel bliss? Follow these steps – I’ve packed them with all my favorite hacks to ensure your success!
- Preheat & Prep (Your Oven’s Wake-Up Call!): Crank that oven to 375°F (190°C). This high heat is key for the perfect rise and golden crust. Line a baking sheet with parchment paper – trust me, it’s the easiest cleanup ever. Chef’s Hack: Lightly spray the parchment with oil for extra non-stick insurance, especially if using sweet toppings.
- Dry Team Unite (The Whisking Waltz): In a medium bowl, whisk together the flour, baking powder, and salt like you mean it! Getting these evenly distributed is crucial for consistent rise and flavor. Pro Insight: Sifting isn’t necessary, but give it a good 30-second whisk to aerate.
- Yogurt Power (The Dough Comes Alive!): Add the thick Greek yogurt to the dry ingredients. Now, grab a sturdy spoon or spatula. Mix and stir! It’ll look shaggy and dry at first – don’t panic. Keep going until a rough dough forms and no dry flour patches remain. Texture Tip: If it feels impossibly dry, add yogurt 1 tsp at a time. If sticky, add flour 1 tbsp at a time. Humidity plays a role!
- Knead with Love (The 2-Minute Miracle): Lightly dust a clean countertop or cutting board with flour. Plop that dough ball onto it. Now, gently knead it for just 1-2 minutes. You’re not building gluten like yeast dough, just smoothing it out. Fold, push, turn. Aim for a soft, slightly tacky (but not sticky) ball that springs back lightly when poked. Chef’s Secret: Set a timer! Over-kneading makes tough bagels. Less is more here.
- Shape Your Dreams (The Bagel Circle Dance!): Divide the dough into 4 equal pieces (a kitchen scale helps, but eyeballing works!). Roll each piece into a smooth ball. Now, poke your thumb straight through the center of a ball. Gently twirl it around your finger, stretching the hole to about 1.5 inches wide. Place it on the parchment. Shape Hack: If ropes are easier, roll each ball into a 6-inch rope, then pinch the ends together firmly. Smooth the seam. Don’t stress perfection – rustic is charming!
- Egg Wash & Top It Off (The Flavor Bling!): Whisk the egg with a splash of water or milk in a small bowl. Generously brush this over the tops and sides of each bagel. This is your glue and gloss! Immediately sprinkle on your chosen toppings. Press them down lightly so they adhere during baking. Topping Tip: For cheese, add it in the last 5 minutes of baking to prevent burning.
- Bake to Golden Perfection (The Aroma Alert!): Slide your tray into the hot oven. Bake for 20-25 minutes. You’re looking for deeply golden brown tops and firm bottoms. Doneness Test: They should sound slightly hollow when tapped underneath. Rotate the tray halfway through for even browning if your oven has hot spots. Watch Closely: Ovens vary! Start checking at 20 minutes.
- The Crucial Cool Down (Patience, Grasshopper!): Transfer the bagels to a wire rack. Let them cool for at least 15-20 minutes before slicing. I know, it’s torture! But this lets the structure set, preventing a gummy interior. Resist the urge! Use this time to brew more coffee or admire your handiwork.
🍽️ Serving Up Your Homemade Glory
Okay, the wait is over! Slice that beauty in half. Admire the slightly dense, chewy crumb (that’s the Greek yogurt magic!). Now, the fun begins! For savory bagels, schmear generously with cream cheese, top with lox, red onion, capers, and fresh dill. Or go classic with butter melting into the warm nooks. Sweet bagels? Oh yes. Slather with peanut butter and banana slices, or cream cheese and a drizzle of honey. My personal favorite? Toasting them until just crispy on the edges and loading them up with smashed avocado, everything seasoning, and a fried egg. They’re sturdy enough for hefty sandwiches but delicate enough to enjoy simply. Serve them warm on a wooden board for that rustic cafe feel – instant brunch hero status achieved!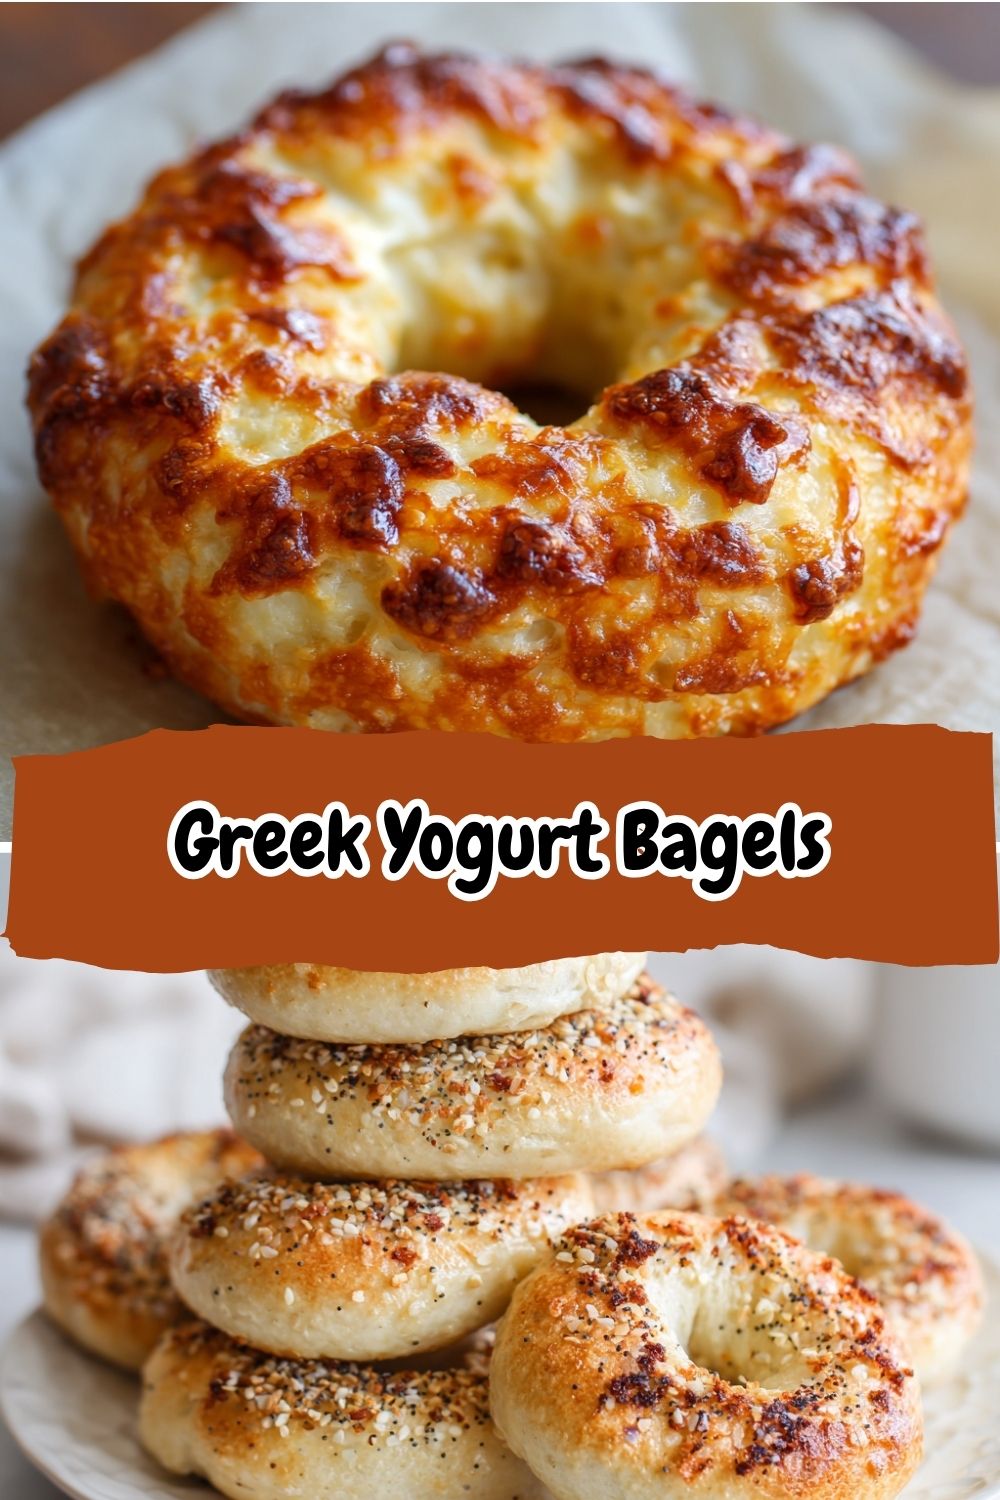
✨ Get Creative: Endless Flavor Waves!
One batch, infinite possibilities! Here’s how to ride the flavor tide:
- Cinnamon Raisin Swirl: Roll dough into a rectangle, sprinkle with cinnamon sugar and plump raisins, roll up, shape into bagel, top with cinnamon sugar.
- Cheesy Jalapeño Popper: Mix 1/4 cup shredded cheddar and 1 finely diced jalapeño into the dry ingredients. Top with more cheddar and everything seasoning. Bake as usual.
- Blueberry Lemon Zest: Gently fold 1/4 cup dried blueberries and 1 tbsp lemon zest into the dough. Top with coarse sugar before baking. Glaze with lemon icing after cooling.
- Everything Pretzel Power: After egg wash, dip tops in coarse salt and pretzel salt. Boil bagels for 30 seconds per side in water mixed with 1 tbsp baking soda before baking (adds chew!).
- Gluten-Free & Vegan: Use 1:1 GF flour blend and thick coconut yogurt. Skip egg wash, use plant-based milk or oil. Top with seeds or spices.
💛 Isla’s Kitchen Confessions
This recipe feels like an old friend now, but it’s had its share of kitchen drama! Batch #1? Let’s just say hockey pucks were involved (turns out expired baking powder is NOT a myth!). Batch #3 saw my attempt at “swirled” chocolate chip – it looked more like a bagel crime scene. But that’s the joy! These bagels are incredibly forgiving. Over the years, I’ve learned: Don’t fear a slightly sticky dough (a dusting of flour fixes it!), embrace the rustic shape (perfection is overrated), and ALWAYS drain that yogurt. The biggest evolution? Realizing how versatile they are. My kids now demand “pizza bagels” (topped with marinara and mozzarella post-bake) weekly. They’ve been breakfast, lunch, dinner, and even impromptu party appetizers (mini bagel bites, anyone?). The best part? Seeing YOUR creations. Tag me @BiteTide with your flavor experiments – the crazier, the better! Remember, good food is about joy, not judgment. If your bagel has character, wear it proud!
❓ Bagel SOS: Your Questions, Answered!
Let’s tackle those common kitchen hiccups before they happen:
- “My dough is SO sticky! Help!” Don’t panic! This usually means your yogurt had extra liquid or humidity is high. Sprinkle your work surface and hands lightly with flour (1 tbsp at a time) and gently knead it in until just manageable. Avoid adding too much flour, or you’ll get dense bagels. Sticky dough often bakes up beautifully moist!
- “Why are my bagels dense/heavy?” Three likely culprits: 1) Over-kneading: Remember, just 1-2 minutes! 2) Old Baking Powder: Test it! If it doesn’t fizz, replace it. 3) Over-measuring Flour: Spoon and level, don’t scoop! Packed flour adds excess weight.
- “Can I double (or halve) this recipe?” Absolutely! Doubling works great – just ensure your bowl is big enough for mixing. Halving is perfect for a solo treat. Keep an eye on bake time for smaller batches; they might cook slightly faster.
- “The bagels spread/flattened a lot. What happened?” Likely causes: 1) Dough too wet: Ensure thick yogurt, drain well, add flour sparingly if needed. 2) Insufficient kneading: The dough needs that brief knead to develop enough structure to hold its shape. 3) Oven temp too low: Use an oven thermometer to verify 375°F is accurate. A hot oven sets the shape quickly.
- “Can I make these ahead?” Yes! Shape the bagels, place them on the parchment-lined sheet, and freeze UNBAKED until solid. Transfer to a freezer bag. Bake straight from frozen, adding 3-5 extra minutes. You can also freeze baked bagels – just thaw and toast to revive!
📊 Quick Nutrition & Storage Notes
These bagels are a protein powerhouse thanks to the Greek yogurt! Here’s the skinny per plain bagel (without toppings):
- Calories: ~150
- Protein: ~10g (Hooray!)
- Carbohydrates: ~20g
- Fat: ~3g
And just like that, you’ve got a batch of perfectly chewy, golden bagels with none of the hassle! These Greek Yogurt Bagels are a total game-changer—quick, easy, and packed with protein to fuel your mornings. Whether you go savory or sweet, the possibilities are endless. Plus, they freeze like a charm, so you can have homemade bagels ready whenever the craving strikes. Give them a try and watch your mornings go from meh to wow. Enjoy every bite, and remember, these bagels don’t need to be perfect to be delicious—they just need a little heart, just like grandma always said! 💛🥯