 A Colorful Easter Swiss Roll: Your New Favorite Spring Showstopper
Hey there, friend! Isla here, from my flour-dusted kitchen to yours. Can you feel it? That shift in the air? The days are getting longer, the first brave flowers are pushing through the soil, and there’s a certain… *lift* in our spirits. That’s spring, whispering promises of fresh starts and, of course, seriously good food. And for me, no season sings sweeter than when Easter rolls around. It’s a holiday built around gathering, gratitude, and let’s be real, the most epic dessert table of the season.
But here’s the thing. I know what it’s like to stare down a holiday menu and feel that familiar tug between “I want to make something jaw-droppingly beautiful” and “I do not have the bandwidth for a 4-hour kitchen project.” That’s where this magical, pastel-hued creation comes in. This Colorful Easter Swiss Roll is my answer to that dilemma. Imagine a cake so light it practically floats off the plate—a soft, cloud-like meringue cake swirled with whispers of lavender, mint, lemon, and blush. It hugs a filling so creamy and dreamy (hello, cream cheese and whipped cream!), with a playful crunch of crushed Easter candies that’ll make everyone, from the littlest bunny to the grown-ups, grin with delight.
Print
Colorful Easter Swiss Roll : Light Meringue Cake with Cream Cheese Filling
- Total Time: 1 hour 30 minutes
- Yield: 8 servings 1x
Description
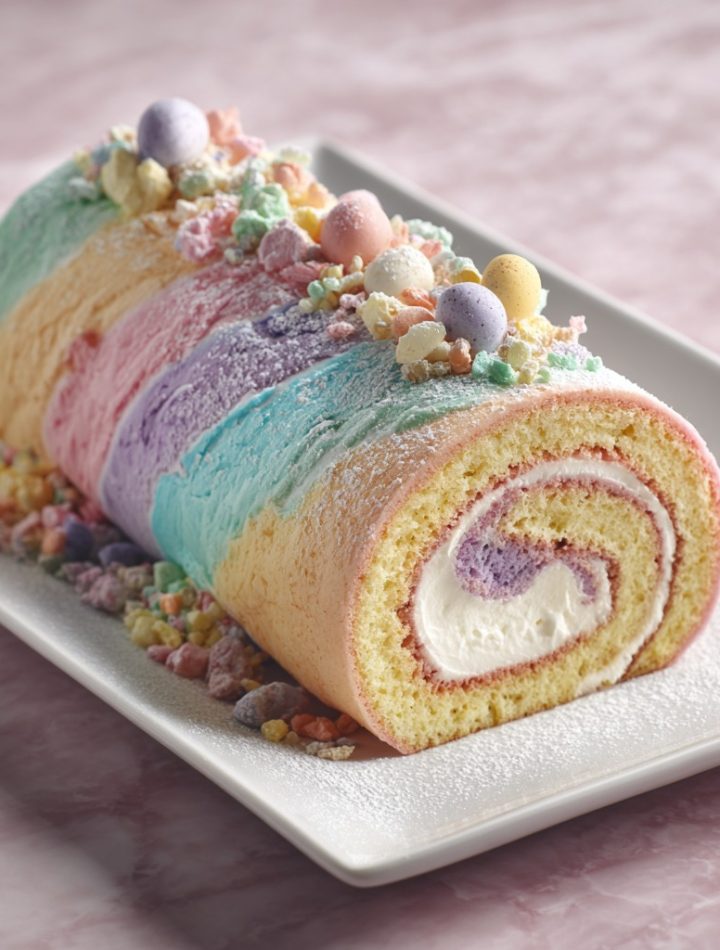
This Easter Swiss Roll is a light, airy meringue-style cake swirled with soft pastel colors and rolled around a creamy, dreamy cream cheese filling. Finished with crushed Easter candies for a playful crunch, it’s the ultimate spring centerpiece dessert. Elegant yet fun, this rainbow-inspired roll brings bakery-style beauty right to your Easter table — and it’s easier than you think once you master the technique!
Ingredients
6 large egg whites
1 tsp lemon juice
¼ tsp salt
¼ cup sugar
½ cup + 1 tbsp sifted cake flour
Gel food coloring (pastel shades)
Powdered sugar (for dusting)
For the Filling:
4 oz cream cheese, softened
¾ cup heavy cream
1 tbsp sugar
Dash of vanilla extract
½ cup crushed Easter candies (optional)
Instructions
Preheat oven to 350°F (175°C). Lightly spray a 14×9-inch jelly roll pan and line with parchment paper.
Beat egg whites, lemon juice, and salt until foamy. Gradually add sugar and beat until soft peaks form.
Gently fold in sifted cake flour using a spatula, keeping batter light and airy.
Divide batter into bowls, tint with pastel gel colors, then lightly swirl together.
Spread evenly in prepared pan. Bake 12–15 minutes until cake springs back lightly. Do not overbake.
Flip onto fresh parchment, remove paper, and roll cake tightly while warm. Cool completely.
Whip cream cheese, heavy cream, sugar, and vanilla until smooth and fluffy.
Unroll cooled cake, spread filling evenly, sprinkle with crushed candies, and roll back into a tight spiral.
Dust with powdered sugar before slicing.
Notes
Difficulty: Intermediate
Storage: Refrigerate up to 3 days
- Prep Time: 30 minutes
- Cook Time: 15 mins
- Category: Dessert
Nutrition
- Sugar: 11g
- Carbohydrates: 17g
- Protein: 6g
It looks like you spent all day in a fancy patisserie. But the secret? It’s a wonderfully forgiving, fun project that’s absolutely achievable in your own kitchen. Think of this as our little kitchen adventure together. We’re going to master the gentle art of the roll, play with color like edible painters, and create a centerpiece that’s as joyful to make as it is to eat. So tie on your favorite apron, put on a feel-good playlist, and let’s ride this flavor wave straight into spring. Your Easter table is about to get a major upgrade!
The Spring I Learned to Roll With It (Literally)
My love for this particular dessert goes way back, before BiteTide was even a twinkle in my eye. Picture a tiny, sun-drenched kitchen in my coastal hometown, the scent of salt air mixing with sweet vanilla. Every spring, my Grandma Mae would declare it “Swiss Roll Season.” Her version was a simple chocolate number, but to my wide eyes, it was pure magic. She’d pull this impossibly thin, hot cake from the oven, and with a flick of her wrists and a shower of powdered sugar that looked like spring snow, she’d roll it up in a clean tea towel. I’d watch, mesmerized, convinced she’d just broken every law of physics. “It’s all about confidence, Isla-bug,” she’d say, winking. “The cake is more brave than you think.”
One year, maybe when I was ten, she let me be in charge of the rolling. My hands were shaking. I was so sure I’d crack it, ruin our beautiful dessert. But I took a deep breath, thought of her steady hands, and just… went for it. And you know what? It worked. That first successful roll felt like unlocking a secret level in a video game. It taught me that sometimes in the kitchen (and in life!), you just have to trust the process, be a little brave, and roll with it. This Easter Swiss Roll is my colorful, cream cheese-filled homage to that lesson. It’s for anyone who’s ever looked at a jelly roll pan and thought, “I can’t.” Spoiler: You absolutely can. And I’m here to guide you through every fluffy, pastel-perfect step.
Gathering Your Rainbow: Ingredients & Why They Work
Let’s gather our cast of characters! The beauty of this recipe is in its simplicity. Each ingredient has a very specific job in creating that ethereal texture and flavor. Here’s what you’ll need and my little chef insights on each one.
For the Light-as-Air Cake:
- 6 large egg whites: These are the star of the show, providing the structure and incredible lift for our cake. Make sure they are at room temperature—they whip up to a much greater volume! Pro tip: Save those yolks for a rich pastry cream, carbonara, or to brush on bread for a gorgeous golden bake.
- 1 tsp lemon juice: This isn’t for flavor, but for science! The acid from the lemon juice (you could use white vinegar or cream of tartar) helps stabilize the egg whites, giving us those lovely, stiff peaks that won’t collapse on us. Think of it as the reliable friend who holds everything together.
- ¼ tsp salt: A tiny pinch to balance and enhance all the sweetness. It makes the flavors pop!
- ¼ cup sugar: We use just enough sugar to sweeten and further stabilize the meringue. We’re not making a super-sweet meringue cookie here, just a gently sweetened cake base.
- ½ cup + 1 tbsp sifted cake flour: Cake flour is key! It has a lower protein content than all-purpose flour, which means less gluten formation. Less gluten = a more tender, delicate cake that’s flexible enough to roll. Must sift it! This keeps the batter light and prevents lumps.
- Gel food coloring (pastel shades): Gel is the way to go! It’s highly concentrated, so you need just a tiny drop for vibrant color without adding extra liquid that could deflate our precious batter. I love a mix of soft pink, lavender, mint green, and pale yellow for Easter.
- Powdered sugar (for dusting): Our trusty tool for preventing sticking and giving that final, snowy, professional-looking finish.

For the Dreamy Cream Cheese Filling:
- 4 oz cream cheese, softened: The tangy backbone of our filling. Full-fat is best for stability and flavor. Let it sit out for a good 30-60 minutes until it’s perfectly soft to the touch. This ensures a lump-free, silky filling.
- ¾ cup heavy cream (also called heavy whipping cream): This is what we whip to create that fluffy, cloud-like texture. Make sure it’s very cold—I sometimes even chill my bowl and beaters for extra success.
- 1 tbsp sugar: Just a touch to sweeten the deal. The cream cheese brings the tang, and this subtle sweetness balances it perfectly.
- Dash of vanilla extract: The flavor fairy dust. A splash adds a warm, comforting depth.
- ½ cup crushed Easter candies (optional but so fun!): Mini eggs, pastel M&M’s, or even chopped robin’s eggs! They add a delightful crunch and a burst of festive color. This is where you can really personalize your roll!
Let’s Bake! Your Step-by-Step Guide to Swiss Roll Success
Okay, team. Ready to create some magic? Follow these steps, read my little hacks along the way, and you’ll have a stunning roll in no time. Remember: confidence is your secret ingredient!
- Prep Like a Pro: Preheat your oven to 350°F (175°C). Now, take your 14×9-inch jelly roll pan (a half-sheet pan works too). Lightly spray it with baking spray, then line it with parchment paper, leaving a slight overhang on the short sides. The spray acts like glue, holding the parchment perfectly in place. This is your insurance policy for a flawless release later!
- Whip It Good: In a scrupulously clean, dry bowl (any trace of grease can sabotage meringue!), combine your room-temperature egg whites, lemon juice, and salt. Using a hand mixer or stand mixer fitted with the whisk attachment, beat on medium speed until the mixture is foamy and looks like sea foam. Now, with the mixer running, gradually add the ¼ cup of sugar, about a tablespoon at a time. Once it’s all in, crank the speed to medium-high and beat until you get soft, glossy peaks. This means when you lift the beaters, the peak of meringue will curl over gently at the tip. Don’t go to stiff peaks—we want pillowy, not rocky.
- The Gentle Fold: Sift your cake flour over the beautiful meringue in two or three additions. Here’s the most important technique: use a large, flexible spatula and fold. Cut down through the center, scrape along the bottom, and fold up and over. Rotate the bowl a quarter turn and repeat. Be patient and gentle. We want to incorporate the flour while deflating as little of that precious air as possible. The batter will still be light and airy when done.
- Paint Your Pastel Palette: Now for the fun part! Divide the batter evenly between 3 or 4 small bowls. Using a toothpick, add a tiny dab of gel food coloring to each bowl—one color per bowl. Gently fold each until the color is just swirled through; you don’t need it perfectly uniform. A little marbling is beautiful!
- Swirl & Spread: Using separate spoons, dollop the different colored batters randomly all over your prepared pan. Then, using an offset spatula or the back of a spoon, very gently spread and swirl the batters together into one even layer. Don’t over-mix them on the pan—just a few light strokes to create a marbled, tie-dye effect. Smooth the top.
- Bake with Care: Pop the pan into the preheated oven and bake for 12-15 minutes. The cake is done when the top is dry, looks matte (not glossy), and springs back lightly when you touch it. Do not overbake! Overbaking leads to a dry cake that’s prone to cracking. Set a timer for 12 minutes and keep an eye on it.
- The Critical Roll (While Warm!): As soon as the cake comes out, dust the top liberally with powdered sugar. Lay a fresh, clean piece of parchment paper (or a thin, lint-free kitchen towel) over the top. Place a large cutting board or another flat pan over the parchment. With confidence (channel Grandma Mae!), flip the whole thing over. Carefully peel off the parchment paper that’s now on top (the one you baked on). Now, starting at one of the short ends, use the new parchment to help you tightly roll the cake into a spiral. Roll it all the way up. Let it cool completely, seam-side down, in this rolled-up state. This “trains” the cake to remember its coiled shape and prevents cracking later.
- Make the Filling: While the cake cools, make your dreamy filling. In a bowl, beat the softened cream cheese and 1 tbsp sugar until smooth. Add the cold heavy cream and vanilla. Whip on medium-high speed until the mixture is thick, spreadable, and holds stiff peaks. It will be luscious and fluffy!
- Assemble Your Masterpiece: Once the cake is completely cool (patience is a virtue here!), carefully unroll it. It will lay flat beautifully. Spread the cream cheese filling evenly over the entire surface, leaving a tiny bare margin at the far edge. Sprinkle the crushed Easter candies over the filling. Now, using the parchment to assist you, re-roll the cake forward, this time without the parchment inside, into a tight spiral. Don’t worry if it cracks a tiny bit—it adds character and will be covered in sugar!
- The Final Flourish: Transfer your beautiful roll to a serving platter, seam-side down. Give it a generous, snowy dusting of powdered sugar right before serving. Slice with a sharp, serrated knife wiped clean between cuts for perfect slices.
How to Serve Your Easter Showstopper
Presentation is the final layer of flavor! Place your finished roll on a long, elegant platter or a rustic wooden board. For a true Easter vibe, scatter a few whole pastel candies, edible flowers, or fresh mint leaves around the base. When slicing, use that sharp knife and wipe it clean after each cut to keep the layers pristine. Serve each slice on its own little plate—this dessert deserves to be the star. Pair it with a cup of fresh coffee, herbal tea, or a glass of cold milk for the ultimate spring treat. Watch as it disappears and the smiles appear!
Mix It Up! Creative Twists on the Classic
This recipe is a wonderful canvas for your creativity! Here are a few fun ways to ride a different flavor wave:
- Lemon Berry Bliss: Add 1 tsp of lemon zest to the cake batter. For the filling, fold in ¼ cup of finely mashed raspberries or chopped strawberries after whipping.
- Tropical Escape: Tint the cake in shades of coral, yellow, and white. Fold ¼ cup of toasted, finely chopped coconut into the whipped filling.
- Chocolate Hazelnut: For a non-pastel option, sift 2 tbsp of unsweetened cocoa powder with the cake flour. Fill with a mixture of whipped cream and ¼ cup of chocolate-hazelnut spread.
- Dairy-Free Dream: Use a vegan cream cheese alternative and full-fat coconut cream (chilled overnight) in place of the heavy cream for the filling.
- “Confetti” Funfetti: Skip the pastel gels and fold 2-3 tbsp of rainbow sprinkles into the plain batter before baking. Use a vanilla buttercream filling for a birthday-party vibe!
Isla’s Kitchen Confessions & Notes
This recipe has been a journey of joyful experimentation in my kitchen. The first time I tried it, I was so nervous about the roll that I… didn’t roll it while warm. I let it cool flat. Big mistake! Let’s just say I ended up with a beautiful, marbled cake that I had to “repurpose” into a trifle (which was still delicious, no fail here!). That’s how I learned the warm-roll step is non-negotiable. Now, it’s my favorite part of the process—that moment of faith where you just go for it. Another confession? I’ve been known to “test” the candies for the topping… extensively. Quality control is important, people! Over time, I’ve learned that this cake is incredibly forgiving. A small crack just adds to its homemade charm, and a heavy dusting of powdered sugar is like culinary photoshop. So relax, have fun, and remember: you’re not just baking a dessert, you’re making a memory.
Your Questions, Answered!
Q: My cake cracked when I rolled/unrolled it! What did I do wrong?
A: Don’t panic! A few small cracks are normal and often hidden in the final roll. Major cracking usually stems from two things: 1) Overbaking: Even an extra minute or two can dry out the edges. Next time, pull it the second the top springs back. 2) Cooling completely before the initial roll: The warm-roll step is crucial for flexibility. If it cracked, just roll it up tightly anyway—the filling will glue it together, and powdered sugar covers a multitude of sins!
Q: Can I make this ahead of time?
A: Absolutely! This is a fantastic make-ahead dessert. You can bake and cool the rolled-up cake a day in advance. Wrap the cooled, unfilled roll tightly in plastic wrap and store at room temperature. Make the filling the day of, assemble, and chill for at least an hour before serving. The assembled roll keeps beautifully in the fridge for up to 3 days.
Q: My colors turned out muddy or too dark. How do I get soft pastels?
A> Gel colors are powerful! The key is to use a tiny, tiny amount—just a dot on the end of a toothpick for each bowl of batter. You can always add more, but you can’t take it away.
This pastel Easter Swiss Roll is more than just a dessert—it’s a celebration of creativity, confidence, and cozy kitchen memories. From the airy, marbled sponge to the luscious cream cheese filling and crunchy candy surprises, every bite feels special. With a little patience and the warm-roll technique, you’ll master this impressive treat with ease. Whether you customize it with fruity, tropical, or chocolatey twists, this recipe is designed to grow with your style and traditions. Serve it proudly, share it generously, and let it become a joyful centerpiece of your Easter table for years to come.