 Easter Brunch Charcuterie Board: Your No-Stress, All-Fun Spring Centerpiece
Hey there, friend! Isla here from BiteTide. Can you feel it? That little shift in the air, the longer days, the pop of color in the flower beds? Spring is finally whispering its arrival, and with it comes one of my absolute favorite weekends of the year: Easter.
Now, I don’t know about you, but while I love the idea of a big, beautiful holiday meal, the reality of juggling a dozen hot dishes while also trying to be present with family? It can be… a lot. That’s why, a few years ago, I declared a revolution in my own kitchen: Easter Brunch would be beautiful, bountiful, and blissfully low-stress. Enter the hero we all deserve: The Epic Easter Brunch Charcuterie Board.
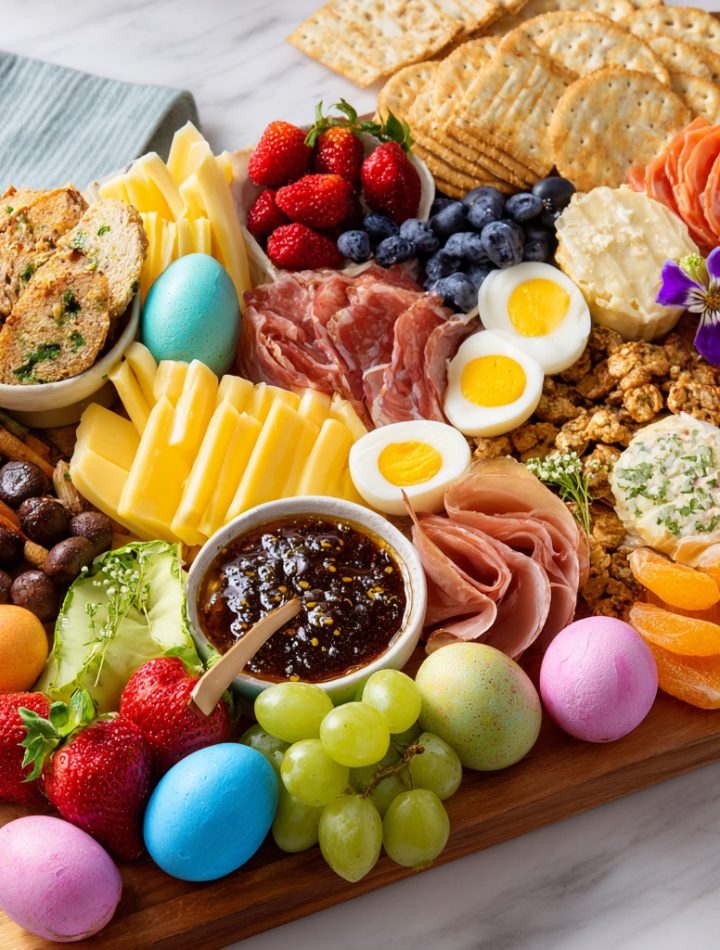
This isn’t just a platter of cheese and meat. Oh no. This is a sprawling, edible spring garden. A canvas where pastel colors, fresh flavors, and little festive surprises come together to create the ultimate centerpiece. It’s interactive, it’s gorgeous, and the best part? Zero cooking required. You get to be the artist, not the short-order cook. Imagine a table where guests can graze, chat, and build their perfect bite, while you actually get to sip your mimosa and enjoy the conversation. Sounds like a dream, right? Let’s turn that dream into your delicious reality. Grab your biggest board or platter, and let’s create some edible magic together!
Print
Easter Brunch Charcuterie Board : A Colorful Centerpiece for Spring Gathering
- Total Time: 43 minute
- Yield: 6–10 (adjust quantities as needed)
Description
An Easter Brunch Charcuterie Board brings bright flavors and festive vibes to your spring table. Packed with seasonal fruits, cured meats, cheeses, mini pastries, and fun extras like dyed eggs or chocolate bunnies, it’s a beautiful and delicious way to feed a crowd—no cooking required.
Ingredients
Proteins and Cheeses
Sliced prosciutto, ham, or salami
Hard-boiled or dyed Easter eggs
Brie, cheddar, gouda, or goat cheese
Fresh and Dried Fruits
Strawberries, blueberries, grapes
Kiwi, pineapple, or melon
Dried apricots or figs
Carbs and Crunch
Mini croissants or bagels
Toast points, crackers, or breadsticks
Granola clusters
Sweet Extras
Honey or jam
Chocolate eggs or bunnies
Mini muffins or scones
Fresh Touches
Baby carrots, cucumbers, cherry tomatoes
Edible flowers or fresh herbs for garnish
Instructions
Start by placing cheeses and bowls of dips/jam on the board first.
Arrange meats folded or rolled near the cheeses.
Fill in with fruits, crackers, and pastries, alternating colors and textures.
Tuck in sweet treats and Easter candies throughout.
Add garnishes like herbs or edible flowers for a fresh, festive look. Serve immediately.
- Prep Time: 20–30 minutes
- Category: Snack
The Lazy Sunday That Sparked a Tradition
This whole giant-board-for-brunch obsession started on a lazy, sunny Sunday a few Easters back. My family was visiting—a glorious, chaotic mix of parents, siblings, and little nieces with boundless energy. I had ambitiously planned a full sit-down frittata-and-pancake situation.
Well, the frittata stuck to the pan, someone used the salt instead of sugar in the pancake batter (a tragedy we now laugh about), and I was sweating over the stove while everyone else was laughing in the living room. In a moment of desperation, I yanked open the fridge and pantry. I started throwing things on our big wooden cutting board: leftover berries, some salami, the good cheddar, a jar of honey, a handful of almonds, and the last few hot cross buns. I artfully arranged it all (read: frantically piled it) and called it “brunch.”
The result was a revelation. The kids loved picking their own colorful plates. My dad built elaborate cracker stacks. My mom relaxed. And I finally got to sit down. It was fun, it was communal, and it was utterly stress-free. That messy, improvised board became our happiest Easter memory. Now, I plan it with joy, but the spirit remains the same: gathering around delicious food, without the fuss. That’s the BiteTide way.
Gathering Your Spring Flavor Palette: Ingredients & Insights
Think of this like shopping for a masterpiece. We want color, texture, variety, and a whole lot of yummy. Don’t treat this list as a strict mandate—it’s your inspiration! Use what you love and what looks good at the market. Here’s my go-all-in shopping list, complete with my chef-y tips and easy swaps.
- Proteins & Cheeses (The Savory Anchor):
- Prosciutto & Salami: Prosciutto, with its silky texture, is a star. Roll it into loose “roses” for elegance. Hard salami adds a wonderful, peppery bite. Chef’s Insight: If you have vegetarians, skip the meats and double down on marinated mozzarella balls, smoked tofu slices, or a rich white bean dip.
- Hard-Boiled Eggs (Dyed or Natural): The Easter essential! I love using natural dyes (like turmeric for yellow, beet juice for pink) for a gorgeous, subtle look. Pro Tip: Slice them in half and sprinkle with a pinch of paprika or everything bagel seasoning for instant flavor.
- Cheese Trio: Go for a mix of textures. A creamy Brie (let it come to room temperature for oozy perfection), a sharp White Cheddar (cube some, leave a block for cutting), and a tangy Goat Cheese (roll it in chopped herbs or cracked pepper for prettiness).
- Fresh & Dried Fruits (The Sweet & Bright Pop):
- Strawberries, Blueberries, Raspberries: The red, white, and blue (perfect for spring!). They add juiciness and vital pops of color.
- Green Grapes & Sliced Kiwi: Grapes are classic board fare for a reason—easy, sweet, no prep. Kiwi adds a stunning green hue and tropical zing. Substitution: Honeydew melon balls or green apple slices work great too!
- Dried Apricots & Figs: These are your chewy, sweet-concentrate elements. They pair magically with goat cheese and nuts. A total flavor powerhouse.
- Carbs & Crunch (The Vehicle for Everything Good):
- Assorted Crackers & Breadsticks: Mix it up! Have some plain water crackers, a few seeded or multi-grain ones, and something fun like rosemary crisps. Breadsticks add height.
- Mini Croissants or Biscuits: Warm these slightly before serving! They feel indulgent and are perfect for making tiny sandwiches with ham and cheese.
- Granola Clusters or Toasted Nuts: For texture! Salty-sweet granola clusters or simple toasted almonds/walnuts add a crucial crunch element.
- Sweet Extras & Dips (The Happy Ending):
- Local Honey & Raspberry Jam: Serve in little bowls or jars. Honey drizzled over brie and a cracker? Heaven. Jam is perfect with cheese and pastries.
- Dark Chocolate Eggs & Mini Pastries: Easter candy is non-negotiable for the festive vibe! Scatter a few chocolate eggs. Mini muffins, lemon poppyseed scones, or store-bought palmiers are fabulous additions.
- Fresh Touches & Garnishes (The “Wow” Factor):
- Baby Carrots with Tops & Radishes: They look so rustic and spring-like! The green tops are beautiful.
- Fresh Herbs: My secret weapon! Use whole sprigs of rosemary, thyme, or dill to fill empty spaces. It makes the board smell amazing and look professionally styled.
- Edible Flowers (Optional but Gorgeous): Nasturtiums, pansies, or violets. A total showstopper. Find them at specialty grocers or farmers markets.
Building Your Edible Masterpiece: Step-by-Step
Okay, artiste! Clear a big space on your counter. Grab your board (a large platter, a clean cutting board, even a baking sheet lined with parchment works!). Let’s build from the ground up.
- Anchor Your Bowls & Cheeses First. This is your foundation. Place your small bowls or jars of honey, jam, or mustard where you want them—often slightly off-center looks great. Then, place your cheeses (the brie wheel, the bowl of goat cheese, the pile of cheddar cubes) around the board. Give them space! Chef Hack: If your board is very large, you can create multiple “zones” (a cheese zone, a fruit zone) for a cohesive look.
- Roll and Drape Your Meats. Next, add your proteins. Roll prosciutto into loose cones or fold salami slices into quarters. Drape them near the cheeses they pair well with (prosciutto loves melon or brie, salami is great with sharp cheddar). This adds lovely, organic shapes.
- Place Your Hard-Boiled Eggs & Mini Pastries. Tuck your halved or whole dyed eggs into a few spots. Cluster your mini croissants or muffins together—it looks more intentional than scattering them. These are larger items that help fill space beautifully.
- Create “Rivers” of Crackers & Breadsticks. Fan out crackers in a few different areas or create a line of breadsticks. This makes them accessible from multiple sides of the board. Don’t hide them!
- Go All In with the Fruits & Veggies. Now, let’s add color! Wash and dry your berries. Place strawberries in a lush pile. Scatter blueberries and raspberries in empty nooks. Create small bunches of grapes. Add your baby carrots and radishes. This is where the board truly comes to life. Pro Tip: Slice a few strawberries or kiwis and fan them out for a professional touch.
- Fill Every Last Gap with Goodies. Look for any empty spaces. Fill them with your dried fruits, granola clusters, chocolate eggs, and nuts. This is called the “crowding” technique—a full board is an inviting board! No one wants to see empty wood.
- The Grand Finale: Garnish! This is my favorite part. Take your fresh herb sprigs and tuck them into gaps. It’s like adding a bouquet. If you have edible flowers, sprinkle them over the top for that final, jaw-dropping touch. Stand back and admire your work!
How to Serve & Savor the Moment
Place your finished board in the center of the table with a stack of small plates, napkins, and a few cheese knives or spreaders. The beauty of this is that it serves itself! Encourage everyone to dig in, create wild combinations, and try something new. I love putting out tiny appetizer plates—it encourages multiple trips and experimentation. Pair it with a sparkling mimosa bar, fresh coffee, or a big pitcher of iced tea. Then, do the most important step: join your guests, grab a plate, and enjoy the fruit of your (very minimal) labor. You made this beautiful thing!
Make It Your Own: 5 Creative Twists
- The “No-Cook Vegetarian” Board: Swap meats for marinated artichoke hearts, olives, hummus, spiced nuts, and extra veggie sticks like bell peppers and sugar snap peas.
- The “Sweet Spring” Board: Focus on desserts! Include mini cupcakes, macarons, chocolate-dipped strawberries, marshmallow Peeps, cookies, and sweet whipped cream dips.
- The “Southern Brunch” Board: Feature mini biscuits, pimento cheese, pepper jelly, smoked sausage links, pickled okra, and benne seed crackers.
- The “Gluten-Free” Gatherer: Use gluten-free crackers, breadsticks, and granola. Focus on naturally GF foods like cheeses, meats, fruits, nuts, and deviled eggs.
- The “Seafood Lover’s” Coastline: Add smoked salmon, cooked shrimp with cocktail sauce, a lemon-dill cream cheese spread, and capers. So elegant!
Isla’s Kitchen Confidential Notes
This recipe has evolved from my panic-pile into my most-requested holiday contribution. One year, my then-toddler nephew “helped” by rearranging all the chocolate eggs into one giant pile in the center. It was adorable, and honestly, the guests went straight for it—so now I often create a dedicated “candy corner!” The real magic is in the personal touches. Maybe you add your grandma’s famous jam or a cheese from your local farmer’s market. That’s what makes it special. Over time, I’ve learned not to stress about symmetry. Nature isn’t symmetrical, and your board shouldn’t be either. Embrace the lush, abundant, slightly wild look. It’s more inviting! And remember, even if it’s just for you and your immediate family, building a beautiful board is an act of celebration. You deserve it.
Your Questions, Answered!
Q: How far in advance can I assemble this?
A: You can do 90% of the work 2-3 hours ahead! Prep all your components: wash/dry fruit, slice cheese, roll meats, hard-boil eggs. Keep everything wrapped/covered in the fridge. About 30-45 minutes before serving, take your cheeses out to come to room temperature (this is KEY for flavor and texture). Then, assemble your board on the counter. If you add berries and herbs too early, they can wilt, so add those last-minute.
Q: Help! My board looks sparse and not “full.”
A: This is the most common hiccup! The secret is crowding and height. Use small bowls for dips to take up space. Roll and fold meats instead of laying them flat. Pile berries in mounds, don’t just scatter them. Use bunches of grapes. And those fresh herbs? They are filler GOLD. Tuck sprigs everywhere. A full board is a happy board.
Q: What if I don’t have a fancy board?
A> No problem at all! Use a large, clean baking sheet, a big platter, a marble slab, or even a piece of clean, food-safe wood from the craft store. You can line it with parchment paper or pretty lettuce leaves (like butter lettuce) for a fresh base.
Q: How do I keep crackers from getting soggy?
A> Strategic placement! Keep cracker piles away from direct contact with super juicy fruits like watermelon or orange slices. You can also serve crackers in a separate bowl or basket on the side if you’re worried. But honestly, on a grazing board, they tend to get eaten quickly!
A Note on Nourishment
This is a choose-your-own-adventure feast, so nutritional value varies wildly per bite! The beauty is you can load up on vitamin-rich fruits and veggies, get protein from cheeses, eggs, and meats, and find fiber in whole-grain crackers and nuts. It’s a balanced, intuitive way to eat—listen to your cravings and enjoy a little bit of everything wonderful.