 Bunny-Shaped Fruit Platter: Your Secret Weapon for a Stunning, No-Stress Easter
Hey there, friend! Isla here, waving a pineapple chunk from my kitchen at yours. So, you’re staring down an Easter menu, a family brunch, or maybe just a serious case of spring fever, and you want something that screams “celebration” without you having to scream into a mixing bowl. I hear you. We all want that magical centerpiece—the thing that makes everyone’s eyes go wide and their phones come out. But between cooking the main event, setting the table, and possibly herding small, sugar-fueled humans, who has the energy for fussy, complicated food art?
Enter your new best friend: the All-Fruit, No-Candy, Total Wow Factor Bunny-Shaped Fruit Platter. This is the recipe (though it feels more like joyful assembly) that I turn to year after year when I need maximum delight with minimum stress. It’s pure, juicy, vibrant happiness on a platter. Kids adore it because it’s a bunny made of their favorite snacks. Adults appreciate it because it’s a refreshing, light counterpoint to all the rich, indulgent foods of the season. And you, my brilliant host, will love it because it comes together in under 20 minutes, requires zero cooking, and looks like you hired a food stylist.
This isn’t about perfection. It’s about playful creativity. We’re using Mother Nature’s candy—the sweet berries, the tangy citrus, the tropical pineapple—to paint a picture that’s as delicious as it is darling. Forget complicated sculpting; we’re using simple shapes and bold colors to create an illusion that’s utterly charming. So, grab your favorite large platter, take a deep breath of that spring air, and let’s create a centerpiece that’s guaranteed to be the life of the party. Get ready for the compliments to roll in faster than you can say, “More blueberries, please!”
Print
Bunny-Shaped Fruit Platter (All Fruit, No Candy, Total Wow Factor)
- Total Time: 20 minutes
- Yield: 8–10 servings
Description
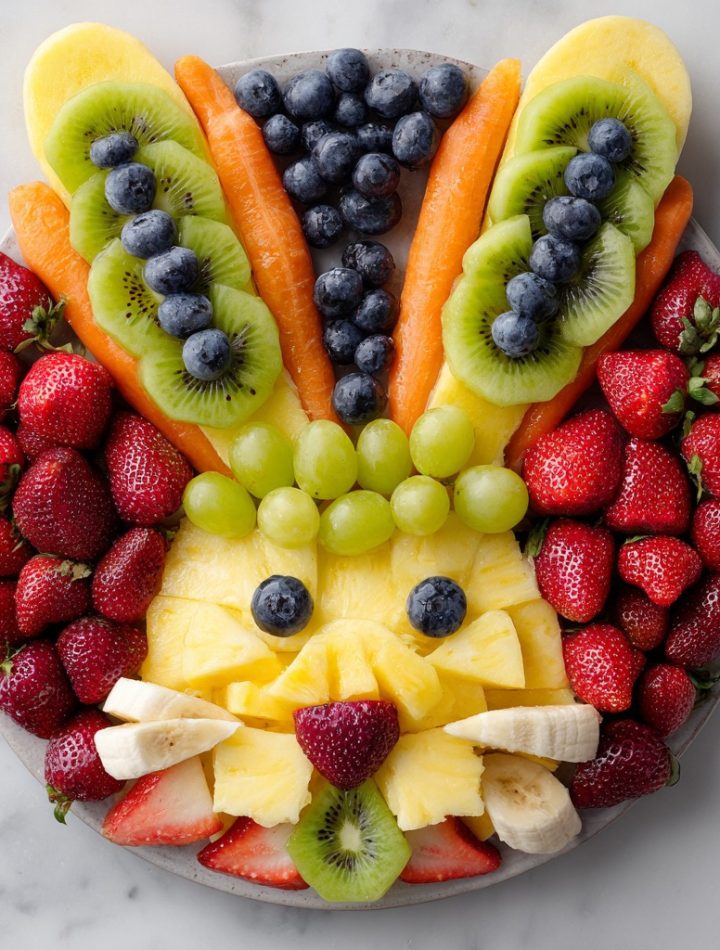
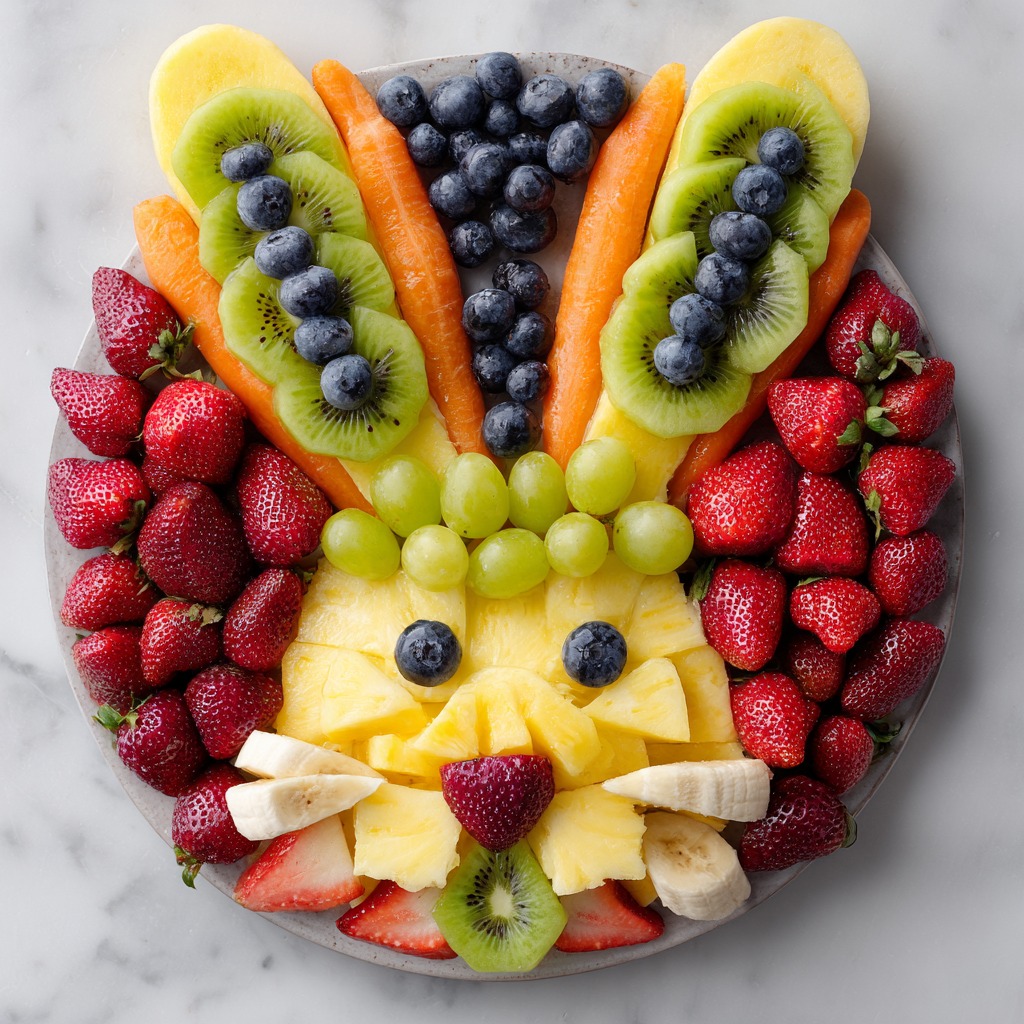
This Bunny-Shaped Fruit Platter is Easter fun at its freshest. Made entirely from colorful, juicy fruit, it delivers maximum visual impact without a single piece of candy. Playful enough for kids, polished enough for guests, and light enough to enjoy before or after brunch—this is the kind of centerpiece that disappears fast and gets photographed even faster.
Ingredients
Strawberries, halved
Grapes (green and/or red)
Pineapple chunks
Blueberries
Kiwi slices
Mandarin orange segments
Banana slices (optional, brush with lemon juice)
For Details
Blueberries or grapes (eyes)
Strawberry slice or raspberry (nose)
Apple slices or strawberries (ears)
Instructions
Start with a large platter or board.
Create the bunny face using grapes or pineapple in a large oval.
Shape ears above the head using strawberries, apple slices, or kiwi.
Fill the center of the face with lighter fruit like pineapple or melon for contrast.
Use blueberries or grapes for eyes and a strawberry for the nose.
Add mandarin segments or banana slices around the edges to finish the look.
Chill until ready to serve.
- Prep Time: 20 minutes
- Cook Time: None
- Category: Dessert
Nutrition
- Calories: 85
- Carbohydrates: 22g
- Fiber: 3g
The Great Easter Bunny Rescue of ‘98
My love for this kind of playful, edible art absolutely comes from my grandma. Picture a tiny, sun-drenched kitchen in our coastal town, the smell of yeast rolls in the oven, and a determined 8-year-old me armed with a butter knife. My grandma was the queen of “making do,” and one Easter, the fancy bunny-shaped cake mold she’d ordered didn’t arrive in time. You’d think it was a culinary crisis! But Nana just winked, pulled out her biggest blue platter, and said, “Well, sugar, we’ll just have to build our own bunny, won’t we?”
We raided the fruit bowl. Cantaloupe became a round face. Apple slices turned into long, floppy ears. Raisins (her choice for eyes) gave our fruity friend a slightly mischievous look. I remember the intense concentration of placing each piece, the pride swelling in my chest as the bunny took shape. When we brought it to the table, my cousins gasped. It wasn’t a fancy cake; it was something we made, together. That moment—the collaboration, the problem-solving, the sheer joy of creating something beautiful from simple ingredients—is the heart and soul of this platter. Every time I make it, I think of her, and I hope this recipe gives you a little slice of that same happy, connected feeling.
Your Fruit Basket Brigade: Ingredients & Smart Swaps
Here’s the beautiful part: this “recipe” is more of a guideline. Use what looks good at the market, what’s on sale, or what your people love most. The goal is a mix of colors, textures, and sizes. Here’s my classic lineup, with plenty of room for your own creativity.
- Strawberries, halved: The MVP of red color and heart-shaped goodness. They’re perfect for ears or filling. Chef’s Insight: Hull and slice them just before assembling to keep them juicy and bright. If strawberries aren’t great, use thin slices of red apple (soaked in a little lemon water to prevent browning) or whole raspberries.
- Grapes (green and/or red): My go-to for outlining the bunny’s face. They’re round, uniform, and create a clean, bold line. Substitution Tip: Blueberries work just as beautifully for a darker outline, or use small melon balls for a pastel look.
- Pineapple Chunks: These are the sunshine! Their bright yellow color is essential for contrast, and their sturdy texture holds up well. Chef’s Insight: Fresh is fantastic, but well-drained canned pineapple chunks in juice (not syrup!) are a total time-saver and work perfectly.
- Blueberries: Little bursts of deep blue-purple. They’re ideal for eyes, but also fantastic as filler. Substitution Tip: Blackberries can be halved for a similar effect, or use dark sweet cherries (pitted and halved) for a different flavor profile.
- Kiwi Slices: That pop of green is so fresh and spring-like! Peel and slice into rounds, then halve or quarter them for “scales” or filler. Chef’s Insight: Kiwi can be slippery; pat the slices dry with a paper towel so they stick to other fruit pieces better.
- Mandarin Orange Segments or Clementines: These little citrus hugs add a gorgeous orange hue and a tangy kick. Substitution Tip: Fresh orange segments, peach slices, or even apricot halves would be lovely here.
- Banana Slices (optional): A creamy, sweet addition. CRITICAL HACK: Toss them in a tiny bowl with a squeeze of lemon or orange juice immediately after slicing. This creates a barrier and prevents them from turning brown before your guests arrive.
Step-by-Step Instructions
Building Your Bountiful Bunny: A Step-by-Step Guide
Okay, let’s get our hands fruity! Clear a big space on your counter. Put on some happy music. This is the fun part.
- Stage Your Supplies. Wash and dry all your fruit thoroughly. A salad spinner is your best friend for the berries and grapes. Have everything pre-cut and arranged in little bowls around your platter. This is your “artist’s palette,” and it makes the assembly process flow like a calm, tasty river. Pro Tip: Place a few damp paper towels under your platter to keep it from sliding around while you work.
- Sketch the Face. Take your grapes (or whatever outline fruit you chose) and create a large, gentle oval in the center of your platter. This is your bunny’s head. Don’t stress about it being geometrically perfect—a slightly irregular oval looks more organic and cute! If you’re nervous, you can even lightly trace a shape with a toothpick first.
- Give Him Ears. Above the head, create two long ear shapes. I love using strawberry halves placed cut-side down, pointing upward and slightly outward. You can also use overlapping apple slices (remember the lemon juice!), two long kiwi slices, or even lengths of pineapple. Get creative! Leave a little space between the ears and the head outline.
- Fill That Sweet Face. Inside your grape outline, start filling with your lighter-colored “face” fruit. Pineapple chunks are my favorite here—they create a bright, cheerful base. Press them gently together so they fill the space nicely. You could also use melon balls, banana slices, or more green grapes.
- Create a Personality. Time for the features! For the eyes, place two blueberries (or halved grapes) towards the top third of the face. For the nose, a single strawberry tip, a raspberry, or a small cluster of 3-4 blueberries works perfectly. Want a smile? Take a few dark berries (blueberries or halved blackberries) and curve them gently under the nose. Suddenly, your bunny has expression!
- Frame and Flourish. Now, use the remaining fruit to create a beautiful “frame” or “grass” around the bunny. Scatter kiwi slices like clovers, tuck mandarin segments like flowers, and let blueberries and grapes spill around the edges. This makes the platter look abundant and finished. Pro Tip: If using banana slices, add them at the very end, after the lemon juice bath, and tuck them in just before serving.
- The Chill Factor. Once your masterpiece is complete, cover it loosely with plastic wrap or place it in a large, clean reusable bag and pop it in the fridge. This keeps everything crisp and cool. Assemble it no more than an hour or two before serving for the absolute freshest look.
Serving Suggestions
Serving Your Springtime Star
Presentation is the final sprinkle of magic! Place your platter in the center of the table where everyone can see it. I like to put a small bowl of vanilla yogurt or a light honey-lime drizzle (just mix a tablespoon of honey with the juice of half a lime) on the side for those who love a little dip. Offer some cute cocktail picks or small tongs to make grabbing fruit easy. Then, watch the magic happen. This bunny doesn’t just sit there looking pretty—it invites conversation, laughter, and communal grazing. It’s the edible equivalent of a warm welcome.
Recipe Variations
Ride Your Own Flavor Wave: 5 Fun Twists
The basic bunny blueprint is just the beginning. Here’s how to make it your own:
- Tropical Bunny: Use mango chunks for the face, starfruit slices for ears, passion fruit seeds sprinkled for “freckles,” and surround with kiwi and pineapple.
- Berry Bunny: An all-berry delight! Use a mix of strawberries, raspberries, and blackberries for the outline and ears. Fill the face with white or golden raspberries and blueberries. So gorgeous and antioxidant-rich.
- Melon Bunny: Super hydrating and sweet. Use a ring of watermelon balls for the outline, cantaloupe for the face, and long, thin slices of honeydew for the ears.
- Savory-ish Bunny (for a cheese board twist): Create the bunny outline with mini mozzarella balls (ciliegine). Use thin slices of salami or prosciutto for the ears. Fill the face with yellow pear tomatoes. Use olives for eyes and a nose. Game changer for an appetizer spread!
- Mini Bunnies: Make individual servings on small plates or in lunchboxes! Use a cookie cutter for a perfect fruit face base and let each person decorate their own. Kids go wild for this.
Chef’s Notes
Isla’s Kitchen Confidential
Over the years, this platter has seen it all. One year, my dog tried to sneak a blueberry eye when I turned my back. Another year, I was so rushed I used pre-cut fruit from the grocery store, and you know what? It was a huge hit and saved my sanity. The “recipe” has evolved from my grandma’s raisin-eyed creation to this colorful version, often influenced by what my local farmer has overflowing in his stall.
The biggest lesson? Let go of the pressure. The first time you make it, it might feel a little awkward. That’s okay! Fruit is forgiving. If a piece doesn’t look right, you (or a helpful little helper) can just eat the “mistake” and try again. The goal isn’t a museum piece; it’s a joyful, shared experience that ends with everyone eating more fruit. That’s always a win in my book. Some of my favorite photos are of slightly lopsided bunnies made with tiny, earnest hands—they have more soul than any perfectly symmetrical platter ever could.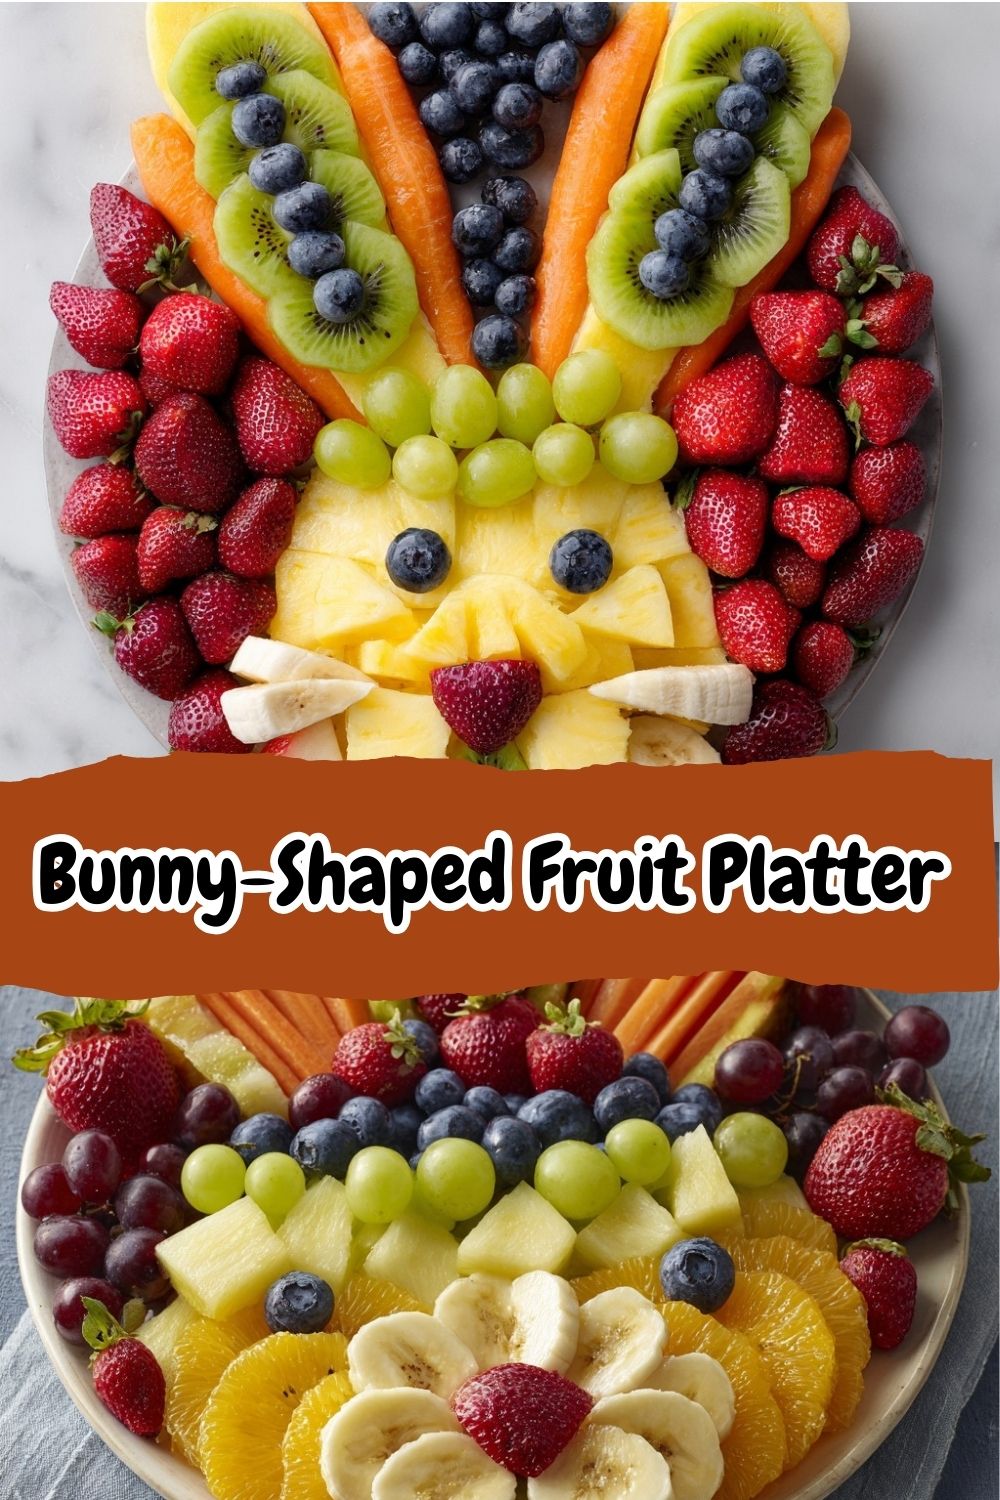
FAQs and Troubleshooting
Your Questions, Answered!
Q: Can I make this ahead of time?
A: You can do 90% of the work ahead! Wash, dry, and cut all your fruit the night before. Store each type in separate airtight containers or zip-top bags in the fridge. Then, simply assemble on the platter 1-2 hours before your event. This keeps everything super fresh and prevents sogginess.
Q: My bananas always brown! How do I prevent it?
A: This is the #1 question! The lemon (or orange, lime, or even pineapple) juice trick is non-negotiable. The citric acid creates a barrier against oxygen. Slice your bananas, give them a gentle toss in a bowl with a big squeeze of juice, and they’ll stay lovely and pale for hours. Add them as the very last step before serving.
Q: What’s the best platter to use?
A: A large, flat surface is key. A big wooden cutting board, a white ceramic platter (makes the colors pop!), a marble slab, or even a clean baking sheet lined with parchment paper works wonderfully. Just make sure it has a slight lip or rim to catch any juiciness.
Q: Help! My bunny looks a little… abstract. Any tips?
A: First, take a step back and look from a distance—it often looks better than you think! Second, use the “frame” of extra fruit around the edges to camouflage any areas you’re unsure about. A generous, abundant frame solves most aesthetic worries. And remember, it’s a bunny made of fruit—its charm is in its whimsy, not its photorealism!
Nutritional Info
The Light & Bright Breakdown
This is a feel-good food celebration! The approximate nutrition per serving (based on 10 servings) is a wonderful bonus:
- Calories: ~85
- Carbohydrates: 22g
- Fiber: 3g (Hello, digestion!)
- Sugar: 15g (All naturally occurring from the fruit)
- Fat: 0g
- Protein: 1g
It’s packed with vitamins, antioxidants, and hydration—the perfect way to balance out all the other delicious treats on your holiday table.