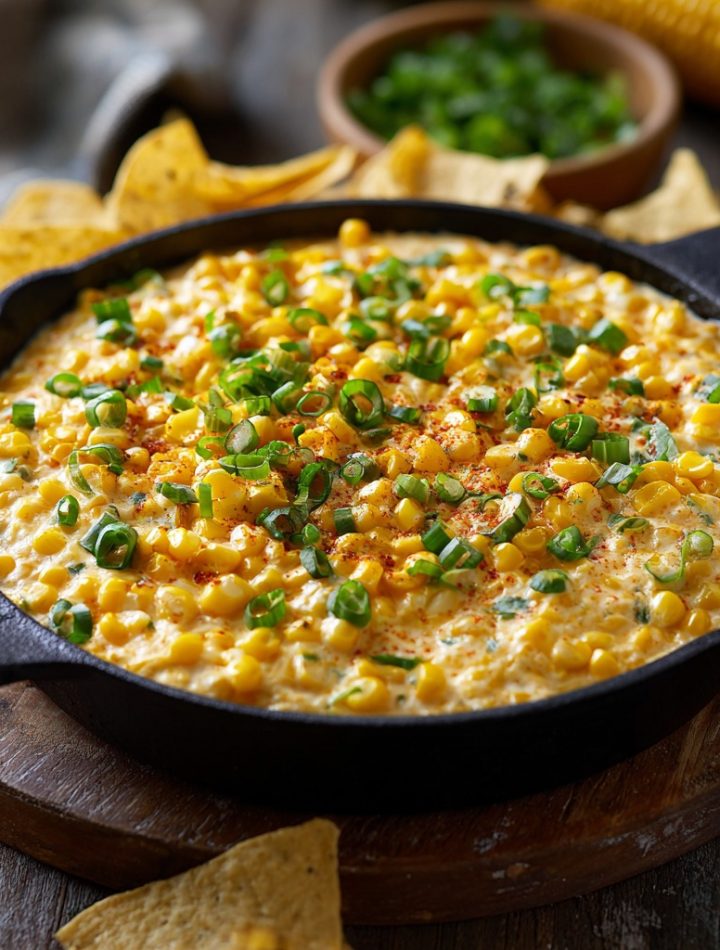
Creamy Corn Dip: The Sweet, Spicy, Totally Addictive Party Hero
Hey there, flavor friends! Isla here from BiteTide. Let’s talk about that magical moment at any gathering. You know the one. You’re chatting, maybe sipping something refreshing, and then someone places that dish on the table. The one that makes conversation pause for a second. Eyes widen. Hands reach in almost simultaneously. And just like that, a quiet chorus of “Oh my gosh, what IS this?” and “This is SO good” ripples through the room. That, my friends, is the power of a truly legendary dip.
Today, I’m handing you the keys to that kingdom with my Creamy Corn Dip. This isn’t just any dip; it’s a flavor TEXTURE dream. We’re talking sweet pops of corn, a creamy, tangy base, the gentle heat of green chiles, and a blanket of gooey, melted cheese (if you choose the warm route, which, trust me, you often will). It’s comfort food in chip-form. It’s the perfect balance of cozy and craveable, and it comes together so fast you’ll have more time for the fun part: eating it.
Whether you’re wrangling kids before a game, hosting a last-minute BBQ, or just need a spectacularly easy treat for yourself (no judgment here!), this dip is your new best friend. It plays equally well hot out of the oven or chilled from the fridge. So, grab your favorite mixing bowl and let’s make some magic happen. This is the dip that disappears first, and you’re going to love every bite.
Print
Creamy Corn Dip : Sweet, Spicy, and Totally Addictive
- Total Time: 35 minutes
- Yield: 8 servings 1x
Description
This Corn Dip is a creamy, cheesy, and flavor-packed party favorite that disappears fast. Made with sweet corn, zesty green chiles, and melty cheese, it’s the perfect combo of comfort and crunch. Serve it hot or cold with tortilla chips, crackers, or fresh veggies—it’s always a hit at game nights, BBQs, and potlucks.
Ingredients
2 cups corn (fresh, canned, or frozen and thawed)
1 cup shredded cheddar cheese
1/2 cup sour cream
1/2 cup mayonnaise
1 can (4 oz) diced green chiles
1/4 cup chopped green onions
1/4 teaspoon garlic powder
Salt and pepper to taste
Optional: 1/2 teaspoon chili powder or hot sauce for a spicy kick
Instructions
For Cold Dip:
In a large bowl, mix corn, cheese, sour cream, mayo, green chiles, green onions, and spices until well combined.
Chill for at least 30 minutes before serving.
Serve with tortilla chips or fresh veggies.
For Hot Dip:
Preheat oven to 375°F (190°C).
Mix all ingredients in an oven-safe dish.
Bake for 20–25 minutes until hot and bubbly.
Top with extra cheese or green onions, if desired. Serve warm.
- Prep Time: 10 minutes
- Cook Time: 25 mins
- Category: Snack
The Beach Picnic That Started It All
My love for this dip is deeply rooted in sandy toes and salt air. Growing up in my little coastal town, summer wasn’t summer without massive, impromptu beach picnics. Everyone would bring something—my grandma’s potato salad, a neighbor’s grilled chicken, my dad’s famous (slightly charred) fish. One blistering August afternoon, our friend Maria showed up with a big, slightly foggy glass dish. “It’s just something I threw together,” she said, shrugging.
That humble dish was a cold version of this corn dip. We circled around it like seagulls, tortilla chips crunching in unison against the plastic bowls we’d brought. The cool, creamy dip was a revelation against the heat of the sun. The sweet corn tasted like summer itself, and the green chiles gave it this playful kick that had us all going back for “just one more scoop.” We ate it until the container shone clean, laughing as we tried to scrape the last bits from the edges. It wasn’t fancy. It wasn’t complicated. It was just pure, unadulterated joy in a bowl. That’s the spirit I try to bottle in every batch I make now—the taste of easy laughter, shared sunsets, and food that brings people together without any fuss at all.
Gathering Your Flavor Crew: The Ingredients
Here’s the beautiful part: this dip is a master of simplicity. You probably have half of this in your kitchen right now! Let’s break down the team players and why they work so well together.
- 2 cups corn (fresh, canned, or frozen and thawed): The sunny, sweet star of the show! Chef’s Insight: In summer, fresh off the cob is divine (about 3-4 ears). But the beauty of this recipe is its year-round appeal. A good-quality canned corn (drained) or frozen corn (thawed) works PERFECTLY. No stress!
- 1 cup shredded sharp cheddar cheese: Our creamy, salty, melty best friend. Pro Tip: Shred it yourself! Pre-shredded bags have anti-caking agents that can make the texture a little grainy when melted. Freshly shredded melts into silky, glorious pools.
- 1/2 cup sour cream & 1/2 cup mayonnaise: The dynamic duo of dip creaminess. Sour cream brings tang, mayo brings rich body. Together, they create that perfect, scoopable base. For a lighter twist, you can use Greek yogurt in place of sour cream.
- 1 can (4 oz) diced green chiles: The secret weapon! These aren’t usually super spicy; they add a fantastic, mild zest and authentic Southwestern flavor. Don’t drain them—that little bit of liquid adds moisture and flavor.
- 1/4 cup chopped green onions: A fresh, peppery crunch and a pop of gorgeous green color. We use both the white and green parts for maximum flavor.
- 1/4 teaspoon garlic powder: We’re using powder here instead of fresh because it distributes its mellow, savory flavor evenly throughout the cold or hot dip without any sharp, raw bite.
- Salt and pepper to taste: Always, always taste and season! The cheese and mayo have salt, so start with a pinch and build from there.
- Optional: 1/2 teaspoon chili powder or a few dashes of hot sauce: For my fellow heat-seekers! This is your playground. A smoky chipotle powder or a vinegar-forward hot sauce like Cholula can add another fantastic dimension.
Let’s Make It: Your Foolproof Roadmap to Dip Heaven
Ready? This is where the fun begins. We’ll walk through both the no-cook chill method and the baked-to-perfection version. Choose your own adventure!
For the Classic Cold & Creamy Dip:
Step 1: The Big Mix. Grab your biggest, most festive mixing bowl. Dump in the corn, shredded cheese, sour cream, mayo, the entire can of green chiles (juice and all!), green onions, garlic powder, and your optional spices. Now, take a sturdy spoon or spatula and GENTLY fold everything together. Chef’s Hack: I like to mix until it’s just combined. You want to keep some texture and avoid beating the corn into mush. A few streaks are totally fine!
Step 2: The Flavor Nap. This step is non-negotiable for cold dip glory. Cover the bowl with plastic wrap and pop it in the fridge for at least 30 minutes. Why? This chill time lets the flavors get to know each other. The sharp cheddar mellows into the creamy base, the garlic powder infuses, and everything harmonizes into one incredible bite. Honestly, if you can make it an hour ahead, it’s even better.
Step 3: Serve & Celebrate! Give it a quick stir, taste for seasoning (add a touch more salt or pepper if needed), and transfer to a serving bowl. Surround it with a mountain of sturdy tortilla chips, crispy pita chips, or a rainbow of fresh veggie sticks. Watch it disappear.
For the Hot, Bubbly, Cheese-Pull Version:
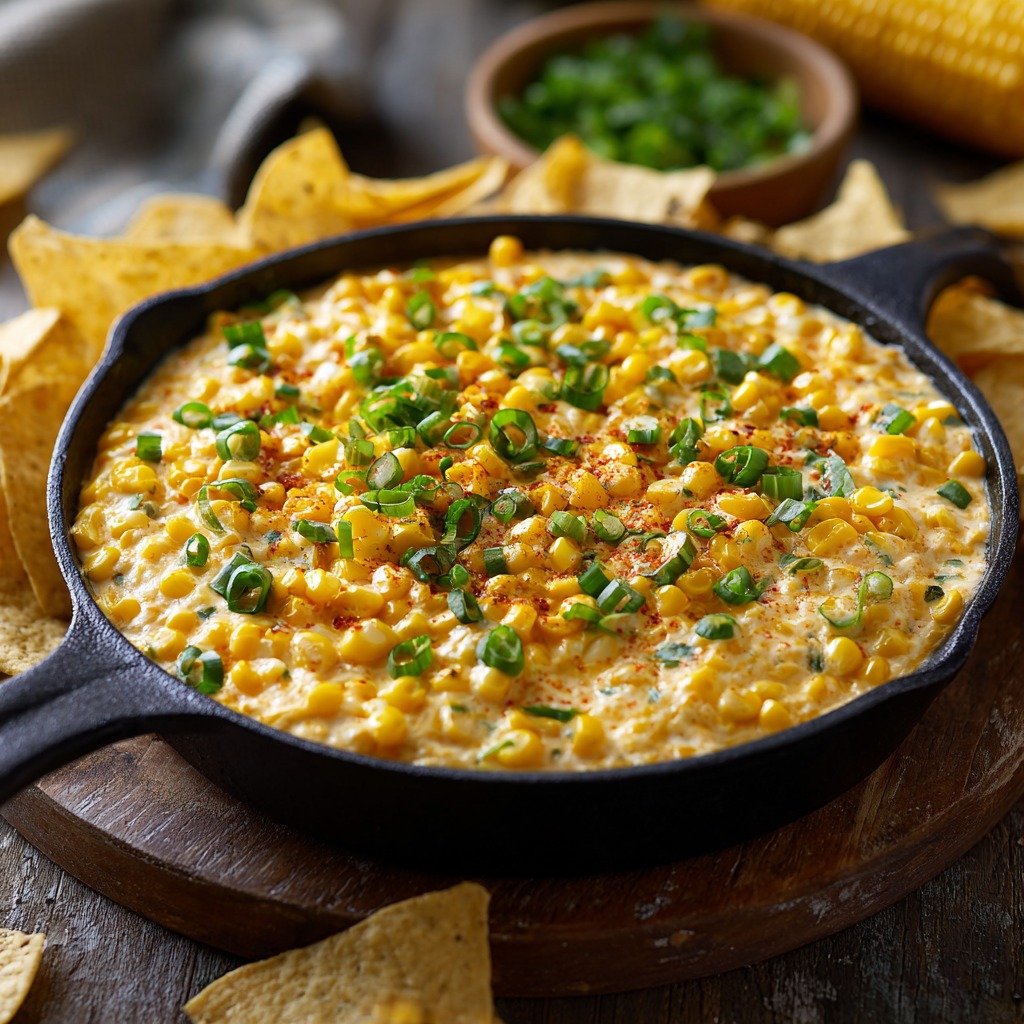
Step 1: Preheat & Prep. Fire up your oven to 375°F (190°C). This is the perfect temperature to get everything hot, bubbly, and beautifully melted without burning the edges. While it heats, grab an oven-safe dish—a pie plate, a small cast-iron skillet, or an 8×8 baking dish are all perfect.
Step 2: Mix Directly in the Dish (Less Cleanup!). Here’s my favorite lazy-genius tip: add all your ingredients directly to the oven-safe dish! Mix everything right in there until evenly combined. Smooth the top with your spatula. Pro Tip: For an extra gorgeous finish, sprinkle a little extra handful of cheese on top before it goes in the oven. It creates that irresistible golden-brown crust.
Step 3: Bake to Bubbly Perfection. Slide your dish into the preheated oven. Bake for 20-25 minutes. You’re looking for the entire dip to be hot through, the edges to be gently bubbling, and the top to be gloriously melted and maybe just starting to speckle with golden brown spots. Your kitchen will smell INCREDIBLE.
Step 4: Garnish & Serve Immediately. Carefully remove it from the oven (it’s hot!). Let it cool for just 2-3 minutes—this helps it set slightly so your first chip dive doesn’t result in a lava-like cheese burn. Scatter some freshly chopped green onions over the top for a fresh contrast. Serve it warm right from the dish with lots of chips for dipping!
How to Serve Your Masterpiece
Presentation is part of the fun! For the cold dip, a wide, shallow bowl is perfect for easy scooping. For the hot version, lean into the rustic charm and serve it right from the baking dish or skillet (just remember to warn everyone it’s hot!). Pile high a variety of dippers: sturdy restaurant-style tortilla chips are a must, but don’t forget crispy baguette slices, ruffled potato chips for salt lovers, or cool cucumber rounds and bell pepper strips for a fresh crunch. I love putting out a few different hot sauces on the side so everyone can customize their heat level!
Ride the Flavor Wave: Fun Variations to Try
Once you’ve mastered the base, the ocean of creativity is yours to explore! Here are a few of my favorite twists:
- Bacon & Jalapeño Fiesta: Fold in 1/2 cup of crispy, crumbled bacon and 1-2 finely diced fresh jalapeños (seeds removed for less heat) for a smoky, spicy upgrade.
- Southwest Style: Add 1 teaspoon ground cumin, 1/2 teaspoon smoked paprika, and a can of rinsed black beans for a heartier, fiber-packed dip that’s almost a meal.
- Everything Bagel Twist: Swap the garlic powder for 2 tablespoons of Everything Bagel seasoning and use half cream cheese, half sour cream. It’s unreal.
- Lighter & Brighter: Use full-fat Greek yogurt instead of sour cream, light mayo, and reduce the cheese to 3/4 cup. The flavor is still fantastic!
- “Elote” Style: After baking, drizzle with a little crema or lime crema (sour cream mixed with lime juice), and sprinkle with crumbled cotija cheese and a dusting of chili powder. Taste of street corn, right in your dip!
Isla’s Chef Notes & Kitchen Stories
This recipe has been my trusty plus-one to more parties than I can count. It’s evolved from Maria’s original beach version—I started adding the garlic powder for depth and playing with the cheese blends (sometimes I do half pepper jack for more kick!). The biggest laugh came when I once accidentally used a can of diced jalapeños instead of green chiles for a potluck. Let’s just say it was a VERY popular dip with a very select, brave audience. My husband, who claimed he “doesn’t like dips,” is now its chief quality controller, always “testing” it straight from the oven with a spoon. The recipe is forgiving, flexible, and full of love. Make it yours!
Your Questions, Answered!
Q: Can I make this dip ahead of time?
A: Absolutely! For the cold version, it’s actually better made 1-3 hours ahead so the flavors can marry. Keep it covered in the fridge. For the hot version, you can mix everything in the baking dish, cover tightly, and refrigerate for up to 24 hours before baking. You may need to add 5-10 extra minutes to the bake time since you’re starting with a cold dish.
Q: My baked dip seems a little watery/oily when it comes out. What happened?
A: Don’t panic! This can happen if there’s a lot of moisture in your corn or if your mayo separates slightly. First, make sure your canned corn is well-drained or your frozen corn is fully thawed and patted dry. For the baked version, a brief rest after it comes out of the oven lets everything reabsorb and set up nicely. If it’s a persistent issue, you can reduce the mayo by a tablespoon or two next time.
Q: Can I use different cheeses?
A: YES! The cheese world is your oyster. Pepper Jack is a fantastic spicy swap. A Mexican cheese blend adds authenticity. For a sharper bite, try Gruyère or Monterey Jack. Just stick to a cheese that melts well for the hot version.
Q: How long do leftovers last?
A: Store any leftovers (lucky you!) in an airtight container in the fridge for 3-4 days. The cold dip is ready to eat. Reheat the baked dip in the microwave in 30-second bursts, stirring in between, until warm. It might not be as perfectly smooth as the first bake, but it’ll still taste delicious!
Nutritional Information*
*This is an approximate estimate per serving (based on 8 servings, using full-fat dairy, and does not include dippers).
- Calories: 190
- Fat: 15g
- Carbohydrates: 8g
- Protein: 5g
- Sugar: 2g
- Fiber: 1g