 Easy One Pot “Fried” Rice – 15-Minute Weeknight Dinner
Your New Favorite Weeknight Shortcut Is Here!
Picture this: It’s 6 PM. Your stomach is doing its best impression of a grumpy tiger, the kids (or your inner child) are officially hangry, and the idea of juggling three pans, a wok, and a mountain of dishes makes you want to just… order takeout. I’ve been there. More times than I’d like to admit! But what if I told you that all the crave-worthy, savory, slightly-spicy magic of perfect fried rice could be yours in just 15 minutes, using just one pot?
Yes, you read that right. This isn’t a drill, my friend. This is your ticket to a kitchen victory dance on a random Wednesday. This One Pot “Fried” Rice recipe is my absolute go-to when life is moving at warp speed but my taste buds are demanding something spectacular. It’s packed with fluffy rice, pops of sweet veggies, that irreplaceable umami punch, and a kick of sriracha heat, all cooked together in a single, trusty pot. The best part? The cleanup is as effortless as the cooking. This recipe is the very definition of what BiteTide is all about: maximum flavor, zero fuss. So, tie on your apron (or don’t, I won’t tell), and let’s turn a hectic weeknight into a delicious one.
A Tale of Two Fried Rices: My Takeout Epiphany
My love affair with fried rice started, ironically, with a minor kitchen disaster. Years ago, in my first tiny apartment with a stove that had exactly one reliable burner, I tried to make *authentic* fried rice. I had day-old rice! I had a wok (sort of)! I had ambition! What followed was a symphony of splattered oil, rice stuck to every surface, and veggies that flew out of the pan like they were trying to escape. The result was… edible, but the cleanup was a scene from a foodie horror movie.
It was after one particularly long shift at my first restaurant job, craving that comforting takeout flavor but too tired to even dial the phone, that I had my “aha!” moment. What if I could build all those flavors together? What if the rice absorbed the savory broth and spices as it cooked, becoming infused with flavor in every single grain? One experimental, desperate, and miraculously successful pot later, this recipe was born. It’s not trying to be traditional stir-fried rice. It’s something even better: it’s the spirit of takeout comfort, reimagined for real, tired, busy life. It tastes like a hug from your favorite Chinese food spot, but it comes with the proud satisfaction of knowing you made it yourself, fast.
Print
Easy One Pot “Fried” Rice : 15-Minute Weeknight Dinner
- Total Time: 20 minutes
- Yield: 3–4 servings 1x
- Diet: Vegetarian
Description
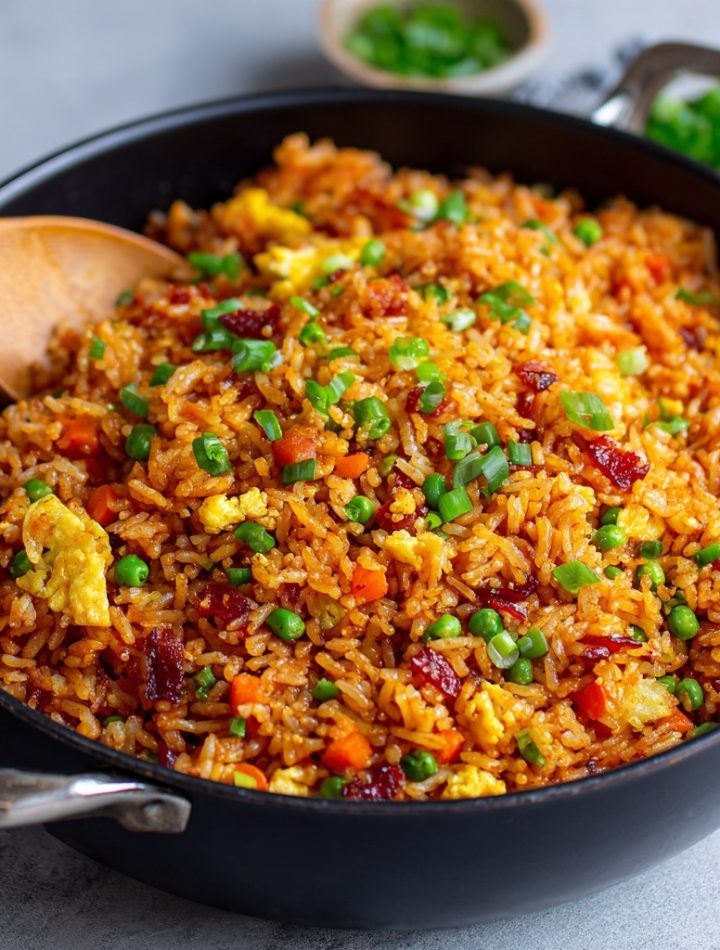
Easy one pot ‘fried’ rice is a quick, flavor-packed dish that brings the taste of takeout to your kitchen with minimal cleanup. Made with rice, veggies, eggs, and savory seasonings, it’s stir-fried-style comfort food cooked all in one pan.
Ingredients
- 2 cups cooked rice (preferably day-old)
- 2 tbsp vegetable oil or sesame oil
- 2 eggs, lightly beaten
- 1 cup frozen mixed vegetables (peas, carrots, corn)
- 2 green onions, chopped
- 2–3 tbsp soy sauce
- 1 tsp garlic powder or 1 clove garlic, minced
- 1/2 tsp ground ginger (optional)
- Salt and pepper, to taste
- Optional: cooked chicken, shrimp, or tofu for added protein
Instructions
- Heat 1 tbsp oil in a large skillet or pot over medium heat. Add beaten eggs and scramble until fully cooked. Remove eggs from the pan and set aside.
- Add remaining oil to the pan. Stir in garlic and frozen veggies. Cook for 2–3 minutes until heated through.
- Add the rice, breaking up any clumps. Stir-fry with veggies for another 3–4 minutes until everything is hot.
- Return scrambled eggs to the pot. Stir in soy sauce, green onions, ginger (if using), and season with salt and pepper to taste.
- Cook for another 1–2 minutes, then remove from heat and serve warm.
Notes
- Use cold, day-old rice for the best texture.
- Customize with your favorite proteins or additional veggies.
- Add a splash of toasted sesame oil at the end for extra flavor.
- Great as a side dish or stand-alone meal.
- Double the recipe for meal prep—leftovers reheat well!
- Prep Time: 10 minutes
- Cook Time: 10 minutes
- Category: Main Course or Side
- Method: Stovetop
- Cuisine: Asian-Inspired
Nutrition
- Serving Size: 1 cup
- Calories: 280
- Sugar: 2g
- Sodium: 520mg
- Fat: 10g
- Saturated Fat: 2g
- Unsaturated Fat: 7g
- Trans Fat: 0g
- Carbohydrates: 38g
- Fiber: 3g
- Protein: 8g
- Cholesterol: 90mg
Gathering Your Flavor Crew
Here’s everything you’ll need to make this flavor wave happen. I’ve included my best chef-y notes and swaps so you can make this recipe work with what you’ve got!
- 3 cups quick-cooking rice (like Minute Rice): This is our secret weapon for speed! Using quick-cook rice means it absorbs the broth and cooks perfectly in sync with our veggies. Chef’s Insight: If you only have regular long-grain white rice, you can use it! Just increase the broth by about 1/2 cup and the cook time by 5-7 minutes.
- 3 1/2 cups chicken broth: This is the foundation of our flavor. Using broth instead of water gives the rice an incredible savory depth. Easy Swap: Vegetable broth keeps it vegetarian, or use water + 2 extra tablespoons of soy sauce in a pinch.
- 1 cup frozen green peas & 1/2 cup frozen diced carrots: Frozen veggies are the ultimate weeknight heroes—they’re pre-chopped, nutrient-rich, and add color and sweetness. No need to thaw!
- 1/2 diced onion & 4 cloves garlic, minced: Our aromatic dream team. They create that irresistible base scent that makes your whole kitchen smell like a restaurant.
- 3 tbsp soy sauce: Our main source of salty, umami goodness. Pro Tip: For a richer, less salty flavor, try using tamari or a splash of dark soy sauce for color.
- 2 tsp sesame oil: Don’t skip this! That nutty, toasty aroma is the soul of so many Asian-inspired dishes. We add it in with the broth so its flavor infuses the whole pot.
- 2 tbsp sriracha (adjust to taste): This is where we bring the heat! Start with 1 tbsp if you’re sensitive, or go wild and add more at the end. It also gives the rice a gorgeous rosy hue.
- 2 eggs: Our protein pack! We’ll cook them right in the pot for incredible ease and texture.
- 2 tbsp butter: Stirred in at the end, this adds a layer of luxurious richness and helps make the rice glisten. Dairy-Free? Use a plant-based butter or another tablespoon of sesame oil.
- Chopped green onions for garnish: The fresh, crisp finishing touch that makes everything look and taste brighter.
Let’s Build That Flavor, One Step at a Time!
Grab your largest, heaviest-bottomed pot or Dutch oven. A good, thick pot distributes heat evenly and prevents any scorching—our best friend for a one-pot wonder!
- The Big Dump & Simmer. Seriously, this is as hard as it gets. In your pot, combine the rice, broth, peas, onion, carrots, garlic, soy sauce, sesame oil, and sriracha. Give it a good stir to make sure the rice is submerged. Now, crank the heat to high and bring it to a lively boil. Chef Hack: As soon as you see big bubbles breaking the surface, give it one more stir, then immediately reduce the heat to low and pop the lid on tightly. This traps the steam, which is what will cook our rice to fluffy perfection.
- The Patient (10-Minute) Wait. Set your timer for 10 minutes and do not lift that lid! I know it’s tempting, but letting the steam work its magic is crucial. We’re essentially steaming the rice in a flavored sauna. After 10 minutes, peek—the liquid should be absorbed and the rice should be tender. If it looks a bit wet, let it cook, lid on, for another 2-3 minutes off the heat.
- The Egg Pocket. This is my favorite part! Use a spoon to carve a well in the center of the rice, exposing the bottom of the pot. Crack the two eggs right into this little crater. Now, gently stir the eggs with a fork or spoon, scrambling them right there in the center. They’ll cook quickly from the residual heat of the pot and rice. Once they’re mostly set, start folding them into the rest of the rice. Texture Tip: For more distinct ribbons of egg, scramble them in a separate tiny skillet and stir in at the end. But for true one-pot glory, the in-pot method is unbeatable.
- The Butter Finish. Turn off the heat. Add the butter to the pot and stir everything until it’s melted and beautifully coating every grain of rice. This step adds a silky mouthfeel and brings all the flavors together in a glossy, gorgeous harmony.
- The Grand Finale. Sprinkle a generous handful of chopped green onions over the top. I always save a few extra for a pretty garnish on each bowl. Give it one final, gentle fold, and you’re done!
Dishing Up Your Masterpiece
I love serving this family-style right out of the pot—it feels so cozy and inviting! Scoop it into shallow bowls for the full effect. For a complete meal, I’ll often add a simple side: a quick cucumber salad tossed with rice vinegar, a few potstickers warmed in the air fryer, or just some extra sriracha and soy sauce on the table for those who want to amp it up. It’s a standalone star, but it plays well with others, too.
Ride Your Own Flavor Wave: Creative Twists!
The beauty of this recipe is its flexibility. Make it yours with these easy swaps:
- Protein Power-Up: Stir in 1-2 cups of cooked, shredded chicken, diced ham, chopped shrimp, or crumbled tofu in the last 2 minutes of cooking just to warm through.
- Veggie Blast: Swap or add frozen corn, edamame, or chopped broccoli florets. For fresh veggies like bell pepper or zucchini, sauté them with the onion at the start for a minute before adding everything else.
- The “Leftover Magic” Version: Have some cooked pork chops or roast veggies? Chop them up and stir them in at the end!
- Flavor Mood Swings: Swap sriracha for gochujang (Korean chili paste) for a deeper, fermented kick, or use oyster sauce (1 tbsp) for a more complex umami note.
- Low-Carb Twist: Replace the quick-cook rice with 4 cups of riced cauliflower. Use only 1/2 cup of broth and reduce the simmer time to 5-7 minutes.
Isla’s Kitchen Confessions & Notes
This recipe has evolved more than my music taste since high school (goodbye, pop-punk phase). The original test involved me forgetting the sesame oil and it was… sad. A flatliner. That one teaspoon is non-negotiable for soul! I’ve also learned that the type of pot matters. A thin pot might give you a slightly scorched bottom—which, honestly, I sometimes fight my husband for because that crispy bit is chef’s gold. If you’re nervous, the lowest heat setting is your friend.
The biggest laugh came when I first tried the “egg well” method and my dog sat directly at my feet, staring with more intensity than a food critic, hoping for a flying egg scrap. Now it’s our ritual. This recipe isn’t just about food; it’s about creating a new, easy kitchen tradition in your own home. Don’t stress over perfection. If your egg mixes in completely, it’s still delicious. If you use three cups of broccoli because it’s what you have, you’re a genius. Make it work for you.
Your Questions, Answered!
Q: My rice turned out a bit mushy. What happened?
A: The most common culprit is lifting the lid too often during the simmer, which lets the essential steam escape. Also, make sure you’re using quick-cook rice (not instant *porridge* or overcooked rice) and measuring your broth accurately. If it’s still too wet after the cook time, just let it sit with the lid off for a few minutes—the excess moisture will evaporate.
Q: Can I make this ahead for meal prep?
A: Absolutely! It stores and reheats like a dream. Let it cool completely, then store in an airtight container in the fridge for up to 4 days. Reheat in the microwave with a sprinkle of water, or in a skillet over medium heat with a tiny bit of oil to refresh the texture.
Q: It tastes a little bland to me. How can I boost the flavor?
A: No problem! Seasoning is personal. At the end, try adding an extra splash of soy sauce or a teaspoon of fish sauce for umami depth. A squeeze of fresh lime juice can brighten everything up, and a drizzle of chili crisp or more sriracha will bring the heat. Toasting the dry rice in the empty pot for a minute before adding the broth can also add a nutty flavor layer.
Q: Is this recipe freezer-friendly?
A> It can be, but with a note. Freezing can change the texture of the cooked rice and veggies, making them a bit softer when thawed. If you do freeze it, store in a freezer-safe bag for up to 2 months. Thaw overnight in the fridge and reheat thoroughly in a skillet, breaking up any clumps, for the best possible result.
Nutritional Information (Per Serving)
Calories: ~360 | Protein: 12g | Carbs: 45g | Fat: 14g | Fiber: 3g
Please note: This is an estimate generated using a nutrition calculator. Values can vary based on specific ingredient brands and substitutions used.
There you have it! Your new secret weapon against boring, stressful weeknights. I hope this recipe brings as much joy and ease to your kitchen as it has to mine. Now go on, make it, tag me @BiteTide so I can see your creation, and don’t forget the happy dance when you take that first bite!
With love and a full pot,
Isla 💛