 Strawberry Poke Cake: The No-Fuss Dessert That Steals Every Show
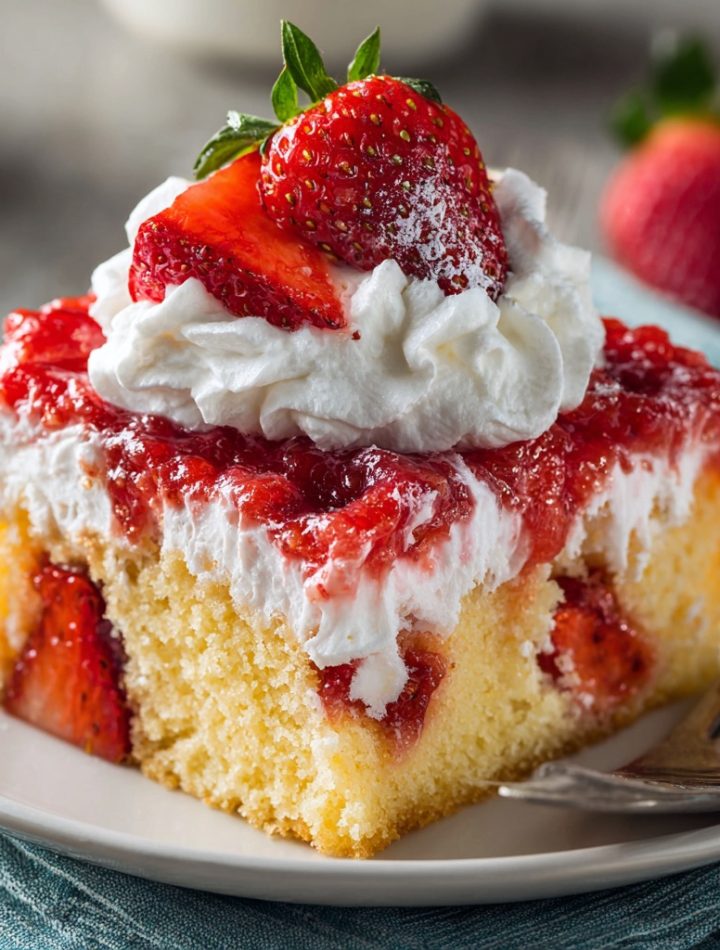
Hey there, friend! Isla here, from BiteTide. Let’s talk about a dessert that’s more than just a treat—it’s a vibe. Imagine this: you’re at a backyard barbecue, a family potluck, or just tackling a serious case of the Sunday scaries. The sun is shining, people are laughing, and then someone places a dish on the table. It’s not fussy or towering with intricate decorations. It’s a humble 9×13-inch pan, but the moment the lid comes off, a collective “Ooooh” ripples through the crowd. That, my friend, is the magic of Strawberry Poke Cake.
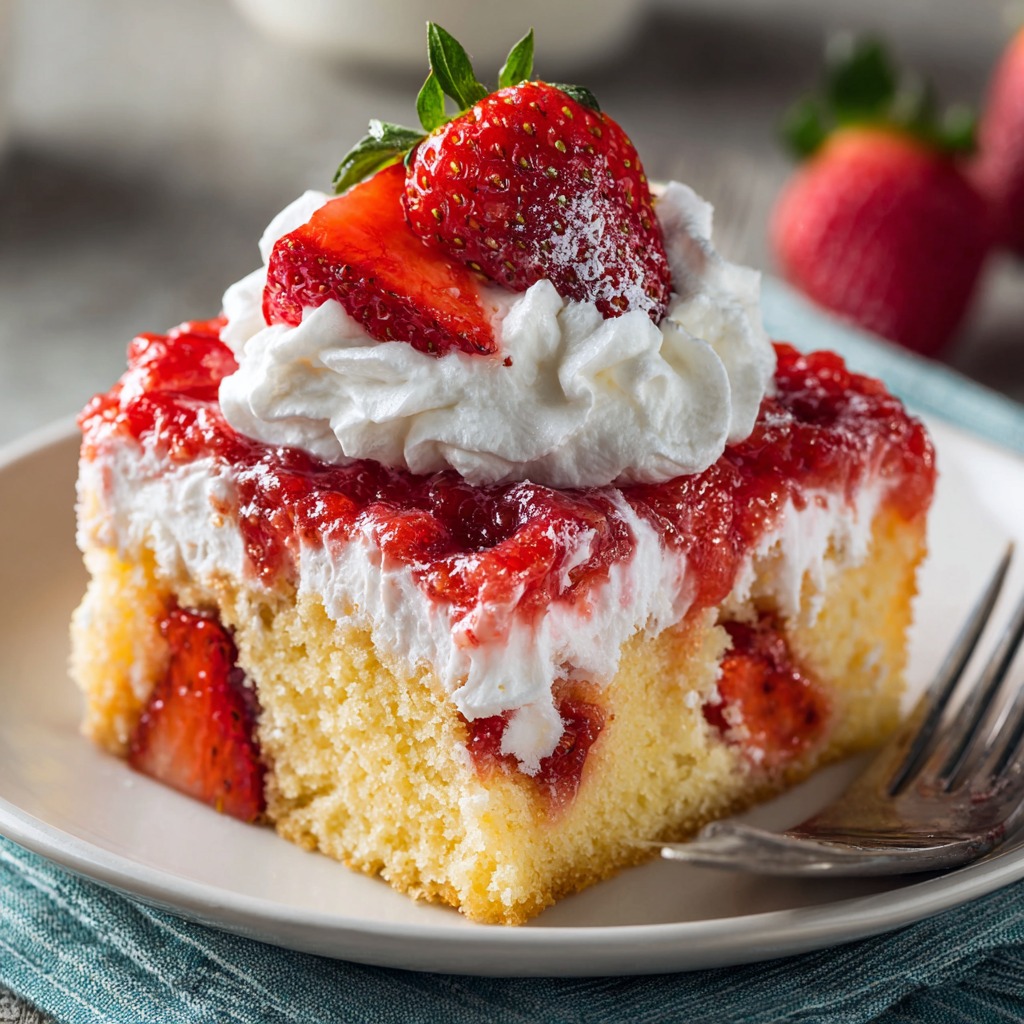
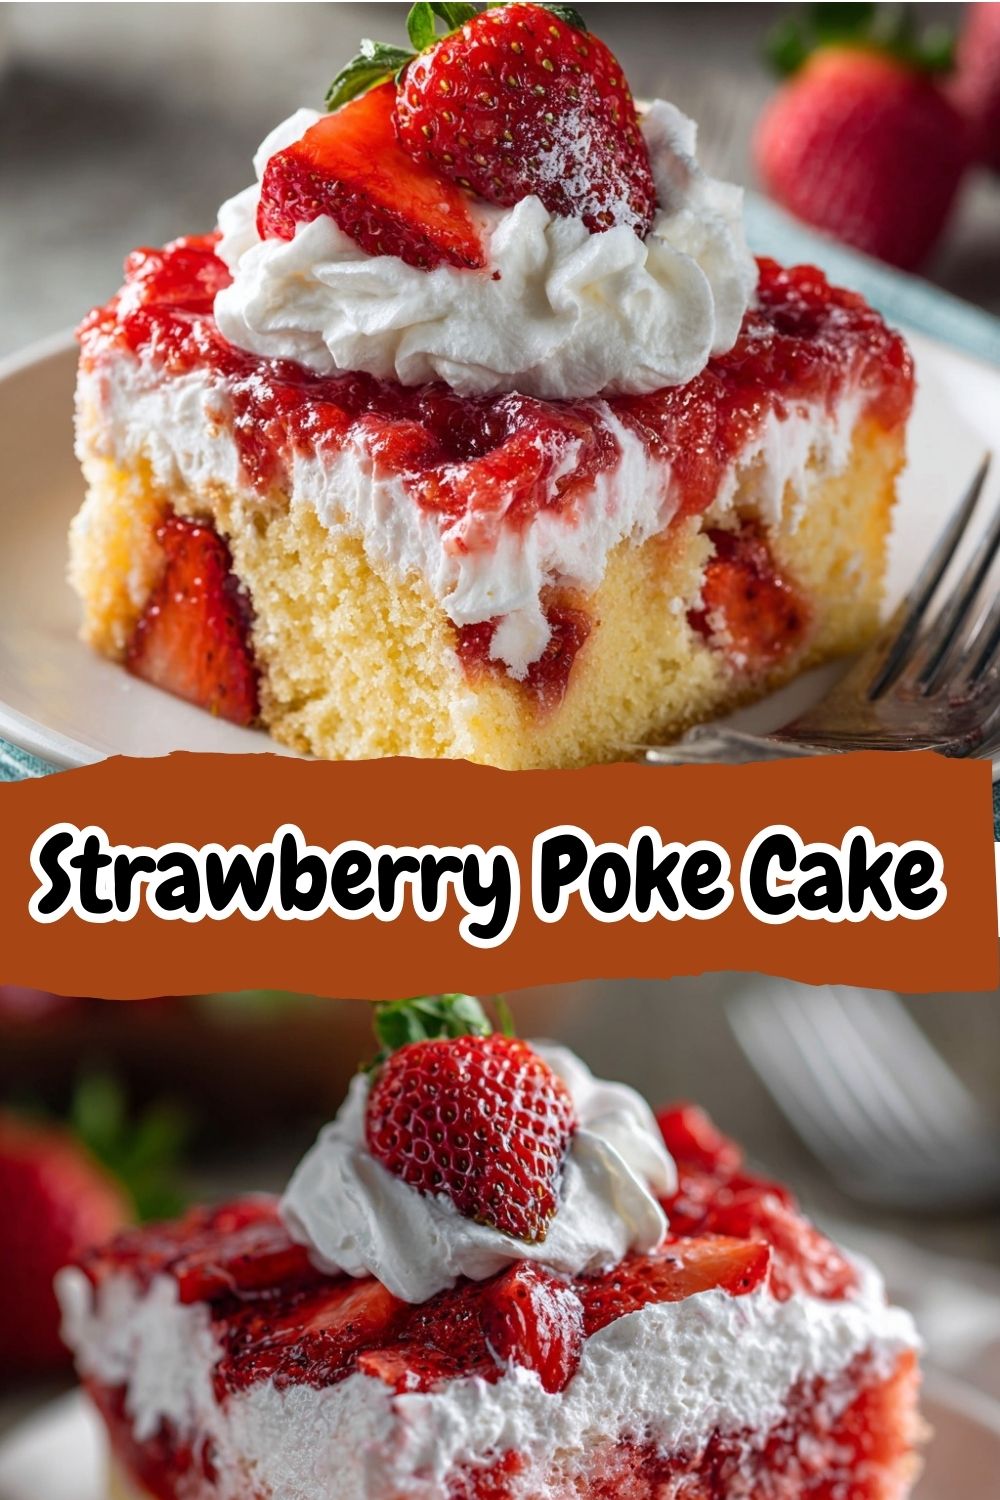
This isn’t just a cake; it’s a flavor experience. We start with a light, fluffy cake that gets poked full of happy little holes while it’s still warm. Then, we pour a wave of vibrant strawberry Jell-O right over the top, letting it waterfall into every nook and cranny. After a chill session in the fridge (where all the best magic happens), we crown it with a cloud of whipped topping and a confetti of fresh, juicy strawberries. Every single forkful is a perfect trilogy: moist, berry-soaked cake, cool creamy topping, and a bright burst of fresh fruit. It’s nostalgia in a pan, a guaranteed smile-maker, and the secret weapon of every smart cook who knows that the best recipes are the ones that look like you fussed, but secretly took you minutes to put together. So, tie on your apron, and let’s make some delicious, stress-free magic.
Print
Strawberry Poke Cake : Moist, Creamy, and Bursting with Strawberry Flavor
- Total Time: 2 hours 45 minutes (including chilling time)
- Yield: 12 servings 1x
- Diet: Low Fat
Description
Strawberry Poke Cake is a light and refreshing dessert made with white cake, sweet strawberry gelatin, and creamy whipped topping. It’s a perfect treat for spring and summer gatherings.
Ingredients
- 1 box white cake mix (plus ingredients required on the box: eggs, oil, water)
- 1 (3 oz) package strawberry gelatin (Jell-O)
- 1 cup boiling water
- 1/2 cup cold water
- 1 (8 oz) tub whipped topping (Cool Whip), thawed
- 1 cup fresh strawberries, diced
Instructions
- Preheat oven and prepare the white cake mix according to the package directions. Bake in a 9×13-inch pan and let cool slightly.
- Using a fork or skewer, poke holes all over the top of the cake.
- In a bowl, dissolve the strawberry gelatin in boiling water, then stir in cold water.
- Pour the gelatin mixture evenly over the cake, allowing it to soak into the holes. Refrigerate for at least 2 hours.
- Spread the whipped topping over the chilled cake.
- Top with diced fresh strawberries before serving.
- Prep Time: 15 minutes
- Cook Time: 30 minutes
- Category: Dessert
- Method: Baking
- Cuisine: American
Nutrition
- Serving Size: 1 slice
- Calories: 210
- Sugar: 18g
- Sodium: 220mg
- Fat: 6g
- Saturated Fat: 3g
- Unsaturated Fat: 2g
- Trans Fat: 0g
- Carbohydrates: 35g
- Fiber: 1g
- Protein: 2g
- Cholesterol: 20mg
A Poked Cake and a Priceless Memory
This cake takes me right back to my grandma’s linoleum-floored kitchen, where the air always smelled like sugar and salt air. I couldn’t have been more than seven, standing on a wobbly stool, “helping” her make what she called her “Sunshine Cake” for the church picnic. My job was the most important one: poking the holes. She’d hand me the clean end of her favorite wooden spoon, its handle worn smooth from years of batter stirring. “Now, Isla,” she’d say, her eyes twinkling, “don’t be shy. Give that cake some polka dots so the strawberry juice can get down and dance!”
I’d go to town, poking with a seriousness usually reserved for art class, convinced I was creating a masterpiece. The best part was the pour. She’d let me slowly tip the bowl of brilliant red liquid over the warm cake, and we’d watch, mesmerized, as it greedily soaked up every last drop. The wait for it to chill felt like an eternity, but the reward—that first slice, impossibly pink and served on her floral china—was pure joy. She taught me that the best food isn’t about perfection; it’s about the laughter shared while making it, the love poured into it (literally, in this case!), and the simple pleasure of sharing something sweet. Every time I make this poke cake, I’m back in that kitchen, and I hope this recipe creates a similar sprinkle of happiness in yours.
Gathering Your Flavor Wave: Ingredients & Insights
Here’s the beautiful part: this stunning cake starts with simple, accessible ingredients. Let’s break them down so you know exactly why each one is a star player.
- 1 box white or yellow cake mix (plus the eggs, oil, and water listed on the box) – This is our trusty foundation! I’m a firm believer in smart shortcuts, and a good quality box mix gives us a consistently soft, tender crumb that’s perfect for soaking up all that Jell-O goodness. Chef’s Insight: I personally lean towards white cake mix for a blank canvas that lets the strawberry flavor shine even brighter, but yellow cake adds a lovely buttery note. It’s a win-win!
- 1 (3 oz) box strawberry Jell-O – The heart of the operation! This is what creates that iconic moistness and infuses every bite with sweet, nostalgic strawberry flavor. Substitution Tip: For a more natural twist, you can use a 3 oz box of “Simply” gelatin or a similar brand with simpler ingredients. The process is identical.
- 1 cup boiling water & ½ cup cold water – This dynamic duo activates our Jell-O. The boiling water dissolves the powder completely, and the cold water brings it down to a temperature that won’t “cook” the cake when we pour it on.
- 1 tub (8 oz) whipped topping, thawed (like Cool Whip) – Our fluffy, dreamy cloud topping! It’s stable, lightly sweet, and spreads like a dream. Substitution Tip: You can absolutely use an equal amount of homemade stabilized whipped cream (heavy cream whipped with a little sugar and vanilla) for a richer flavor. Just know it may soften a bit faster if left out.
- 1–2 cups fresh strawberries, hulled and sliced – The fresh, juicy crunch on top! This isn’t just garnish—it’s essential. The bright, tart-sweet burst of real berry cuts through the sweetness and makes the whole dessert sing. Chef’s Insight: If strawberries aren’t in season, don’t stress! A handful of freeze-dried strawberries crushed over the top add amazing concentrated flavor and a beautiful pop of color.
Let’s Make the Magic: Step-by-Step Instructions
Ready to ride the poke cake wave? Follow these steps, and I’ll be right here with my best tips and tricks to ensure your cake is absolutely perfect.
Step 1: Bake That Base. Preheat your oven according to your cake mix directions. Grease or spray a 9×13-inch baking pan. I like to give mine a very light dusting of flour after spraying for absolute non-stick insurance. Mix up your cake batter as directed on the box. Pour the batter into your prepared pan and bake until a toothpick inserted in the center comes out clean. The smell alone is heavenly! Once it’s done, pull it from the oven and let it cool on a wire rack for just 15-20 minutes. We want it warm, not hot-to-the-touch, for the next step. Chef’s Hack: Running a butter knife around the edges of the warm cake helps it settle evenly and prevents any sticking as it cools.
Step 2: The Great Poke. This is the fun part! Take the handle of a wooden spoon, the round end of a chopstick, or even the tines of a fork. You want something about ¼ to ½ inch in diameter. Now, poke holes all over the surface of the warm cake. Don’t be timid! Poke down until you hit the bottom of the pan, spacing your holes about an inch apart. Pro Tip: I find a wooden spoon handle creates the perfect-sized well—big enough for the Jell-O to flow into, but not so big it makes the cake unstable. Think “polka dots,” not “craters.”
Step 3: The Soaking Ceremony. While the cake is cooling, make your Jell-O “syrup.” In a heatproof bowl or measuring jug, empty the entire packet of strawberry Jell-O powder. Pour over the 1 cup of boiling water and whisk vigorously for a full 2 minutes, until it’s completely, utterly dissolved. This is key for a smooth soak. Then, stir in the ½ cup of cold water. Now, carefully and slowly, pour this gorgeous red liquid all over the poked cake. I like to start around the edges and work my way in a spiral toward the center. Take your time—let it seep down into every single hole. You’ll see it disappear almost magically! Chef’s Note: It might look like a lot of liquid, but trust the process. That cake is going to drink it all up like a sponge and become impossibly moist.
Step 4: The Patient Chill. This is the hardest step because it requires waiting! Gently cover the pan with plastic wrap or foil and place it in the refrigerator. You need to let it chill for at least 3-4 hours, but overnight is absolute GOLD. This time allows the Jell-O to fully set within the cake, transforming it from a soggy-seeming mess into a perfectly moist, sliceable masterpiece. Don’t skip this!
Step 5: The Grand Finale. Just before you’re ready to serve, take your thawed whipped topping and give it a quick fluff with a spatula. Spread it evenly over the completely chilled cake. Then, artfully arrange your sliced fresh strawberries on top. Slice, serve, and get ready for the compliments to roll in! Serving Hack: For super clean slices, run your knife under hot water and wipe it dry between each cut.
Serving Your Masterpiece
This cake is a beauty straight from the pan, so I usually serve it right from its baking dish for a cozy, family-style feel. For a potluck or party, you can certainly lift out portions with a spatula and plate them individually. I love adding a little extra flair by placing a whole, perfect strawberry with the leaves still on beside each slice, or a tiny mint leaf for a pop of green. A light dusting of powdered sugar over the top just before serving looks gorgeous, too. Pair it with a glass of cold milk, a cup of coffee, or a bubbly glass of prosecco for the ultimate celebration!
Ride Your Own Flavor Wave: Fun Variations
The poke cake universe is your oyster! Once you master the basic method, the flavor combinations are endless. Here are a few of my favorite twists:
- Tropical Sunset: Use a pineapple or coconut cake mix. Poke and soak with mango or peach Jell-O. Top with coconut whipped topping and toasted coconut flakes.
- Chocolate-Covered Strawberry: Use a chocolate cake mix! Poke and soak with the strawberry Jell-O as usual. Top with chocolate whipped cream or a chocolate ganache drizzle before adding the strawberries.
- Berry Medley: Use raspberry or mixed berry Jell-O for the soak. Top with a mix of fresh raspberries, blueberries, blackberries, and strawberries.
- “Strawberry Shortcake” Upgrade: Use the strawberry Jell-O soak, but fold 1 cup of finely diced fresh strawberries into the whipped topping before spreading. It’s like strawberry shortcake in poke cake form!
- Dairy-Free/Gluten-Free: Use your favorite gluten-free cake mix and ensure your Jell-O brand is GF. Top with a dairy-free whipped topping or coconut whipped cream.
Isla’s Chef Notes & Kitchen Confessions
I’ve made this cake more times than I can count, and it’s evolved in my kitchen. At first, I was a poke-purist, but then one time I was out of a full box of Jell-O and only had two little single-serve packets. In a panic, I used them with adjusted water, and guess what? It worked! The cake was slightly less saturated but still delicious, teaching me that this recipe is wonderfully forgiving. Another time, I got a little overzealous with the poking and connected a few holes, causing a slight “trench.” I just sprinkled a few extra strawberry slices there after topping—problem solved and it looked intentional!
The biggest lesson? The overnight chill is non-negotiable for the absolute best texture. I once tried to serve it after only 2 hours because, well, impatience. It was tasty but a bit messy. Letting the Jell-O fully set makes for that iconic, clean slice that holds its shape beautifully. This cake is a testament to my cooking philosophy: it’s about joy, not judgment. So have fun with it!
Your Questions, Answered!
Q: My cake seems really soggy after I poured the Jell-O on. Did I ruin it?
A: Absolutely not! This is the most common worry, and it’s totally normal. When you first pour the liquid over the warm cake, it will look very wet and even a little soupy. This is exactly what’s supposed to happen. As it chills in the fridge for those 3-4+ hours, the Jell-O sets *firm*, transforming that sogginess into incredible, uniform moisture. Trust the chill!
Q: Can I make this cake ahead of time?
A: You’re speaking my language! This cake is the *ultimate* make-ahead dessert. You can bake, poke, and soak the cake up to 24 hours in advance. Keep it covered in the fridge. I recommend adding the whipped topping and fresh berry garnish the day you plan to serve it for the freshest look and texture. The topped cake will still hold up beautifully in the fridge for a day.
Q: What can I use instead of whipped topping?
A> You have great options! An equal amount of homemade whipped cream is fabulous (whip 2 cups cold heavy cream with ¼ cup powdered sugar and 1 tsp vanilla until stiff peaks form). For a cream cheese twist, blend one 8 oz block of softened cream cheese with 1 cup of powdered sugar until smooth, then fold it into the whipped cream or whipped topping. It adds a lovely tang!
Q: Can I use sugar-free Jell-O?
A> Yes, you can! The process is identical. Just be aware that sugar-free gelatin may set a bit softer or differently than the regular variety, but it will still work perfectly well for this application.
Nutritional Info (Approximate)
Per serving (based on 12 servings, using standard ingredients listed):
Calories: ~230 | Total Carbohydrates: 34g | Total Fat: 8g | Saturated Fat: 3g | Sugar: 25g | Protein: 2g
Please note: This is an estimate based on the specific ingredients used. For precise dietary calculations, use your preferred nutritional calculator with your exact brands and measurements.