Let’s Reinvent a Classic (And Keep the Magic)
Okay, let’s have a real talk for a second. Raise your hand if you’ve ever stood in front of the fridge, post-workout or mid-afternoon slump, craving something decadent. Something like… tiramisu. That perfect, creamy, coffee-kissed, cocoa-dusted slice of heaven. But then the little voice in your head (or maybe the nutrition tracker on your phone) goes, “Really? Now?” And you shut the fridge, feeling a little defeated. Friend, I have been there so many times. The craving is real, but so is the desire to feel good about what you’re eating.
That exact standoff—between my inner dessert fanatic and my practical, “let’s-fuel-our-body-right” side—is what sparked the creation of these Protein Tiramisu Cups. I wanted all the soul-soothing, sophisticated flavor of the classic Italian dessert, but in a form that felt like a treat, not a cheat. A snack you could enjoy after a workout, as a satisfying afternoon pick-me-up, or even as a legit “I-deserve-this” dessert that won’t leave you in a sugar coma.
These little cups are my kitchen magic trick. They’re no-bake, come together in about 10 minutes of active time, and are packed with protein to keep you full and fueled. The layers of coffee-soaked goodness and creamy filling are 100% indulgent in spirit, but cleverly crafted with better-for-you ingredients. Think of it as tiramisu’s cool, health-conscious cousin who still knows how to have a great time. So, grab your favorite little cups or jars, and let’s make a dessert that loves you back!
Print
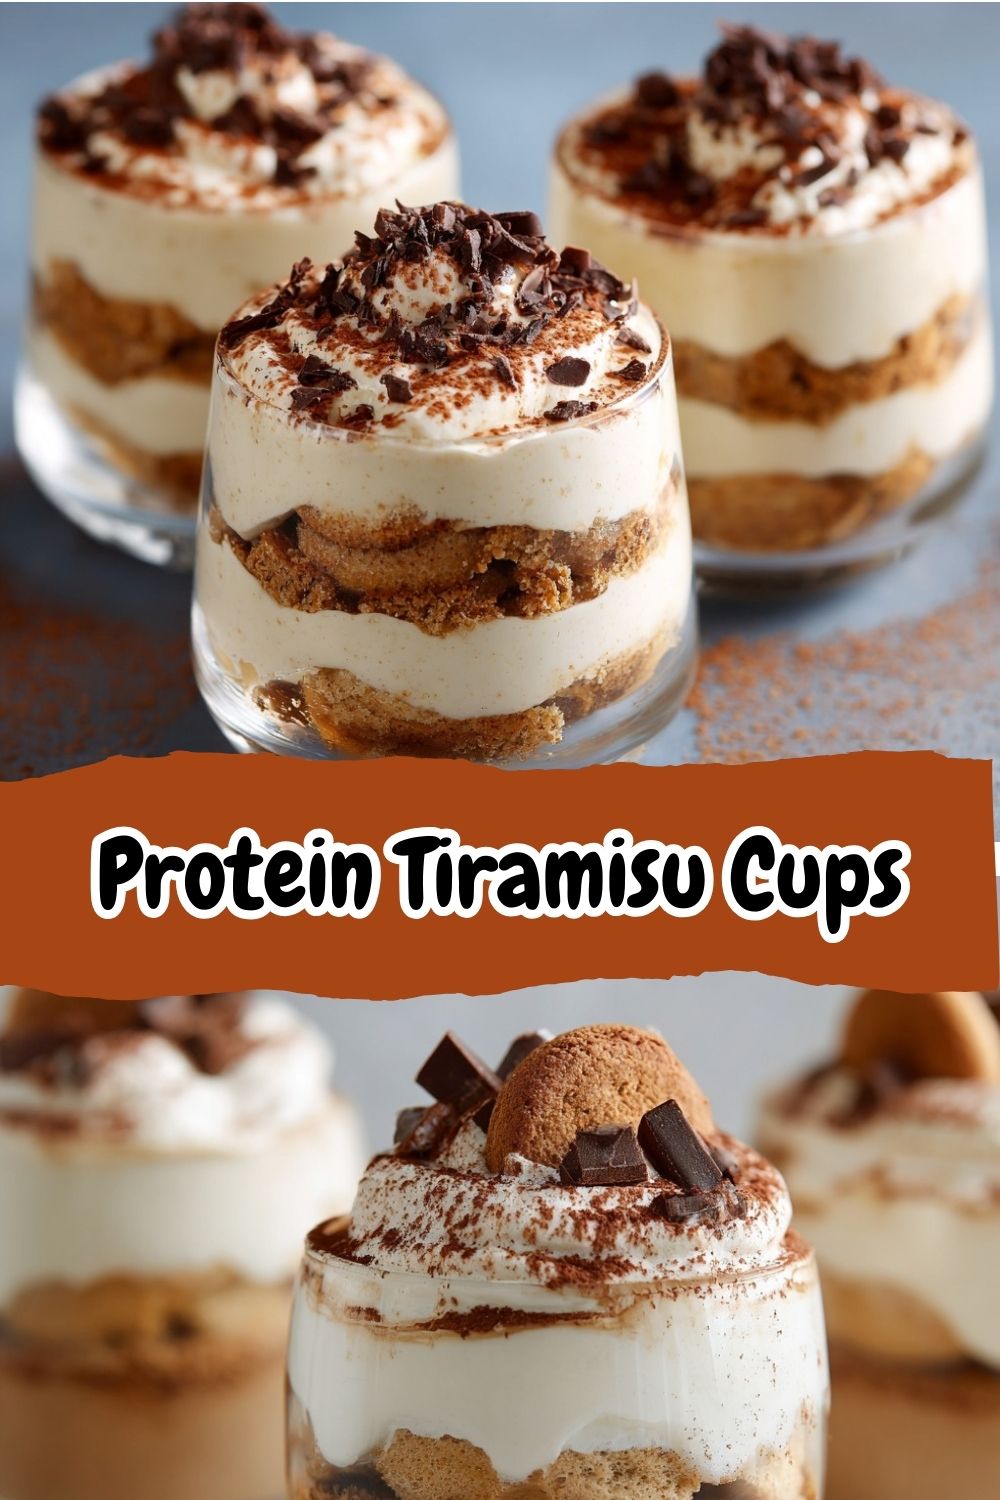
Protein Tiramisu Cups : Coffee-Soaked Layers with a Creamy Protein Twist
- Total Time: 10 minutes
- Yield: 2 servings 1x
Description
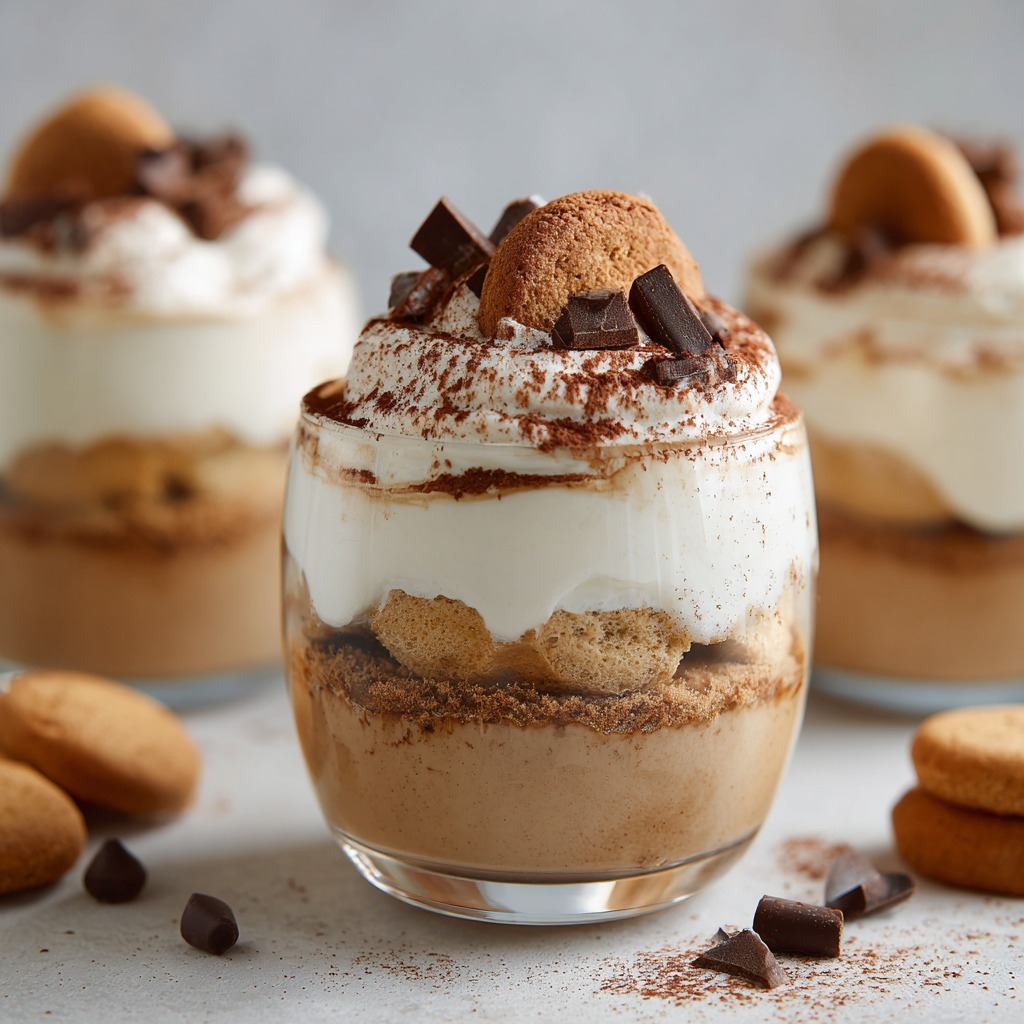
These Protein Tiramisu Cups deliver classic dessert flavor with a healthy upgrade. Layers of coffee-soaked oats or ladyfinger-style cookies meet a creamy, protein-packed filling for a no-bake treat that feels indulgent but fuels your day. Perfect for post-workout or a feel-good snack that satisfies cravings.
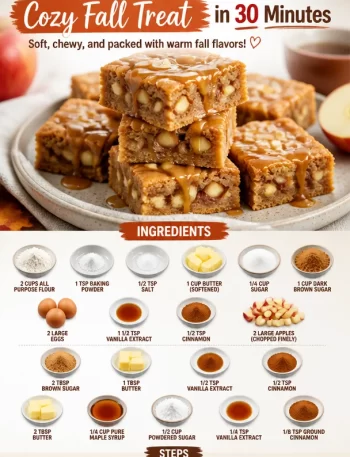
Ingredients
1 cup plain or vanilla Greek yogurt
1 scoop vanilla or coffee-flavored protein powder
1/2 tsp vanilla extract
1 tbsp maple syrup or honey (optional)
1/2 cup strong brewed coffee, cooled
6–8 ladyfinger cookies or 1/2 cup oat flakes
1 tbsp cocoa powder (for dusting)
Dark chocolate shavings (optional, for topping)
Instructions
Make Filling: Mix Greek yogurt, protein powder, vanilla, and sweetener until smooth and creamy.
Soak Base Layer: Dip ladyfingers or oats quickly in coffee (don’t soak too long!) and place at the bottom of cups.
Layer: Add a layer of protein filling over the coffee layer. Repeat if desired for multiple layers.
Top & Chill: Finish with a dusting of cocoa powder and optional chocolate shavings. Chill for at least 1 hour for best texture.
- Prep Time: 10 mins
- Category: Dessert
Nutrition
- Calories: 230
- Carbohydrates: 18g
- Protein: 22g
Tiramisu & My Grandma’s Kitchen Table
My love for tiramisu is deeply personal. It’s not a recipe from my coastal hometown, but one I fiercely adopted. I remember the first time I truly tasted it. I was about fourteen, at a tiny, family-run Italian restaurant for my aunt’s birthday. The waiter brought out a large, messy, beautiful slice. It wasn’t neat. The cocoa was a little uneven, and it looked like it might topple over. One bite and I was transported—the bitter coffee, the sweet, creamy mascarpone, the delicate, almost-spongy ladyfingers. It felt adult and incredibly comforting all at once.
Years later, I tried to recreate that feeling for my Grandma. She’d never had it, and I wanted to impress her with my “fancy” culinary skills. Let’s just say my first homemade attempt was… a learning experience. I over-soaked the ladyfingers, creating a sad, coffee soup at the bottom of the dish. My mascarpone mixture was lumpy. But my Grandma? She ate every last bit, declaring it the best thing she’d ever had. “Isla, darling,” she said, wiping a smudge of cocoa from her chin, “it’s not about perfect layers. It’s about the joy you mix into it.” That stuck with me. Every time I make a tiramisu-inspired treat now, I think of her. These Protein Tiramisu Cups are my ode to that spirit—less fuss, all the joy, and a little extra goodness mixed right in.
What You’ll Need (& Why It Works)
Here’s the dream team of ingredients that makes this healthy-ish treat sing. Don’t stress if you need to swap something—I’ve got you covered with options!
- 1 cup plain or vanilla Greek yogurt: This is our superstar base. It gives us that tangy creaminess reminiscent of mascarpone/ricotta, plus a huge protein punch. Insight: Use full-fat for the richest texture, but low-fat works great too! For a vegan swap, a thick, plain coconut yogurt or silken tofu (blended smooth) is fantastic.
- 1 scoop vanilla or coffee-flavored protein powder: This is our secret weapon for turning yogurt into an ultra-creamy, pudding-like filling AND boosting the protein. Chef Tip: A casein or protein blend mixes beautifully. If you only have unflavored, just add a touch more vanilla extract or sweetener.
- 1/2 tsp vanilla extract: The non-negotiable flavor enhancer. It rounds out everything. Try using vanilla bean paste if you have it for those gorgeous little specks!
- 1 tbsp maple syrup or honey (optional): Taste your filling after mixing the protein powder with the yogurt. Some yogurts and powders are sweet enough! This is just for balancing. Substitution: Any liquid sweetener works, or a pinch of stevia.
- 1/2 cup strong brewed coffee, cooled: This is the soul of tiramisu! Use espresso for a deeper flavor, or even instant coffee dissolved in hot water. Insight: For a decaf version, use decaf coffee or even a strong chicory root “coffee.” For kids or caffeine-sensitive folks, you can use a mix of cocoa powder and hot water for a chocolate soak.
- 6–8 ladyfinger cookies or 1/2 cup oat flakes: The classic vs. the wholesome! Ladyfingers (savoiardi) give you the authentic texture. Quick Tip: Look for the harder, drier kind, not the soft sponge cake ones. Oat flakes (quick oats, not steel-cut) are my go-to for a gluten-free, fiber-filled base that soaks up coffee like a dream.
- 1 tbsp cocoa powder (for dusting): The iconic finish. Use unsweetened, high-quality cocoa or cacao powder for that bittersweet final touch.
- Dark chocolate shavings (optional, for topping): Because more chocolate is always a good idea. A microplane zester is perfect for creating delicate, melty shavings.
Building Your Flavor Wave: Step-by-Step
This is the fun part! We’re building beautiful, delicious layers. Put on some music, and let’s create.
- Brew & Cool Your Coffee: First things first, get your coffee brewing so it has time to cool completely. Hot coffee will melt our filling and turn our base into mush. I pour mine into a wide, shallow bowl to speed up the process. Chef Hack: Add a single ice cube and swirl it around to cool it down fast, then remove the cube before dipping.
- Make the Magic Filling: In a medium bowl, add your Greek yogurt, protein powder, and vanilla extract. Grab a whisk or a spatula and start mixing! It might look clumpy at first, but keep going. In about a minute, it will transform into a wonderfully thick, smooth, and creamy pudding. Taste it! Now’s the time to decide if you want to add that optional maple syrup or honey. Give it one final mix and set aside. Pro Tip: If you have a minute, let this filling sit in the fridge. The protein powder continues to absorb moisture, making it even thicker and more luxurious.
- Soak Your Base Layer: This step requires a light touch! If using ladyfingers, quickly dip each side into the cooled coffee. We’re talking 1-2 seconds per side—just enough to moisten, not enough to disintegrate. If using oat flakes, sprinkle about 2 tablespoons directly into the bottom of each cup, then drizzle about 1-1.5 tablespoons of coffee over them. Gently press down with a spoon to create an even layer. The Golden Rule: Soggy = sad. We want moist and flavorful, not waterlogged.
- Layer It Up: Now, spoon or pipe half of your creamy protein filling over the coffee-soaked base in your cups. Smooth it out. For a double-decker experience, repeat! Add another light layer of dipped oats or ladyfingers, then the remaining filling. I love using clear glasses or jars so you can see all the beautiful layers you’ve created.
- The Grand Finale & Chill: Sift your cocoa powder over the top for that classic, elegant finish. Add those dark chocolate shavings if you’re feeling fancy. Now, the hardest part: patience. Cover the cups and pop them in the fridge for at least 1 hour. This chilling time is non-negotiable—it allows the flavors to marry, the oats to soften perfectly, and the filling to set into the dreamiest texture. Trust me, it’s worth the wait!
How to Serve & Savor
When that hour (or, let’s be real, three hours later) is up, it’s showtime! Pull your cups from the fridge. I love serving them straight in the glass they were chilled in—it’s rustic and charming. For an extra touch, right before serving, you can add a final light dusting of fresh cocoa powder and maybe a single coffee bean or mint leaf on top. Eat it with a spoon, getting a little bit of every layer in each bite: the bold coffee, the creamy filling, the bitter cocoa. It’s a perfect post-dinner treat, a brilliant breakfast parfait (yes, really!), or your secret weapon against the 3 PM slump.
Ride Your Own Flavor Wave: Fun Twists!
The beauty of this recipe is its flexibility. Make it your own with one of these easy twists:
- Chocolate Hazelnut Dream: Use chocolate protein powder, and mix a tablespoon of pure hazelnut butter into the filling. Soak your base in cold brew coffee for an extra kick.
- Pumpkin Spice Tiramisu: Perfect for fall! Add 2 tbsp of pumpkin puree and a pinch of pumpkin pie spice to the filling. Soak the base in chai tea instead of coffee.
- Tropical Escape: Use coconut yogurt and vanilla protein powder. Soak the oat layer in cold brew coffee with a teaspoon of coconut milk. Top with toasted coconut flakes instead of cocoa.
- Berry Bliss: Make a quick berry compote (mash some berries with a little sweetener) and layer it between the filling and the coffee-soaked base.
- Keto-Friendly: Use full-fat Greek yogurt, a keto-friendly protein powder, and sweetener. For the base, try a layer of crushed keto shortbread cookies or simply use chopped nuts.
A Few More Thoughts From My Kitchen
This recipe has seen many iterations in my kitchen. The first version? I used cottage cheese (blended until smooth) before Greek yogurt, and while it worked, the texture wasn’t as instantly creamy. My husband, the official taste-tester, has endured many “Is this too coffee-forward?” or “Is the oat layer weird?” moments. Our favorite discovery was that these cups taste even better on day two, after the oats have fully softened into a cake-like layer. It’s a make-ahead dream!
Don’t be afraid to play. Once, I ran out of cocoa powder and grated a dark chocolate espresso bean bar over the top—incredible. Another time, I layered in some sliced bananas, which made it taste like a tiramisu-banana pudding hybrid. The point is, once you know the basic formula—soaked layer + creamy protein filling + chill—you can ride any flavor wave you’re craving. That’s what BiteTide is all about.
Your Questions, Answered!
Q: My filling is runny! What did I do wrong?
A: No panic! This usually means the protein powder needs more time to absorb the liquid from the yogurt. Pop the whole mixture in the fridge for 15-20 minutes, and it will thicken right up. Also, make sure you’re using a thick Greek yogurt (drain off any liquid sitting on top).
Q: Can I make this vegan?
A> Absolutely! Use a thick, plain plant-based yogurt (coconut is my top pick for richness) and a vegan protein powder. For the base, oats are naturally vegan, but check your ladyfinger labels if you go that route. Sweeten with maple syrup.
Q: How long do these last in the fridge?
A: They’re best enjoyed within 2-3 days. The oats will continue to soften, which is delicious, but after that, the layers might start to get a little too friendly with each other. I do not recommend freezing, as the texture of the yogurt filling can become grainy.
Q: My protein powder made the filling clumpy/grainy. Help!
A> This is a common protein powder quirk. Two solutions: 1) Sift your protein powder into the yogurt. 2) Use a small hand mixer or blender to whip it all together for 30 seconds. This will ensure a silky-smooth result.
Nutritional Info (Per Cup, with Greek Yogurt & Oats)
This is an estimate and will vary based on your specific ingredients and brands used.
Calories: ~230 | Protein: 22g | Carbs: 18g | Fat: 7g | Fiber: 2g
Prep Time: 10 mins | Chill Time: 1 hour | Servings: 2