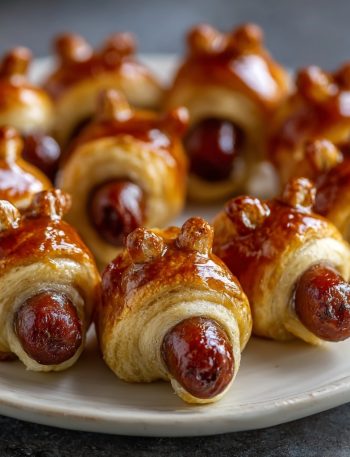
Pull-Apart Pizza Ring: The Cheesy, Shareable Party Favorite You NEED in Your Life!
Hey there, flavor friend! Isla here, from my cozy kitchen to yours. Tell me if this sounds familiar: you’ve got a crew coming over for the big game, a movie marathon is on the horizon, or you’re just staring into the fridge on a Friday night, hit with a tidal wave of pizza craving. But… you don’t want to deal with delivery wait times or the fuss of making a whole pizza from scratch. You want something epic, something cheesy, something that makes everyone gather ‘round the table with wide, hungry eyes.
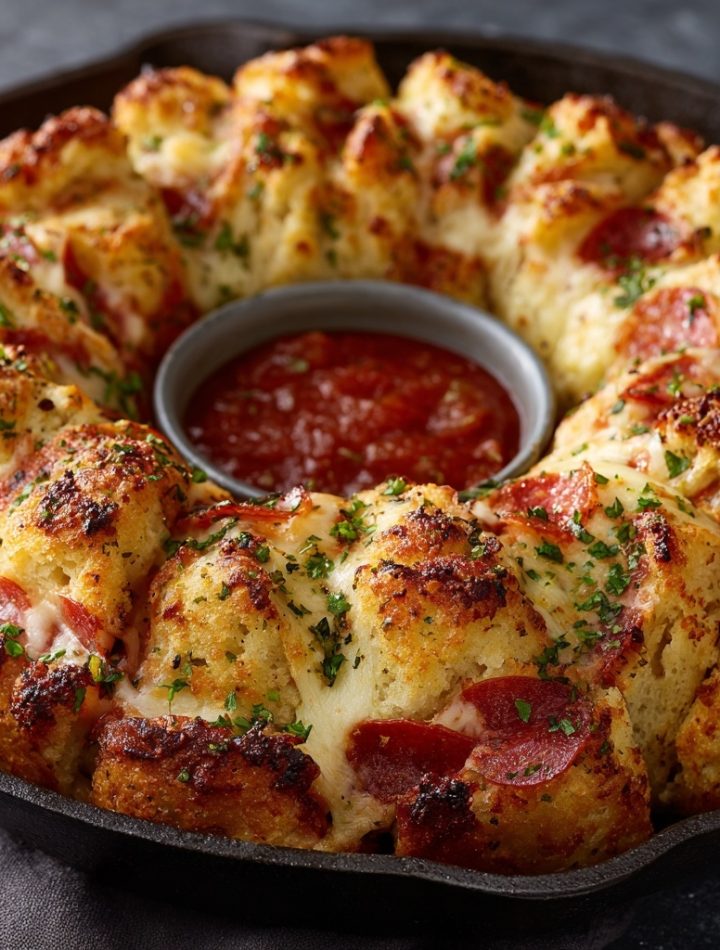
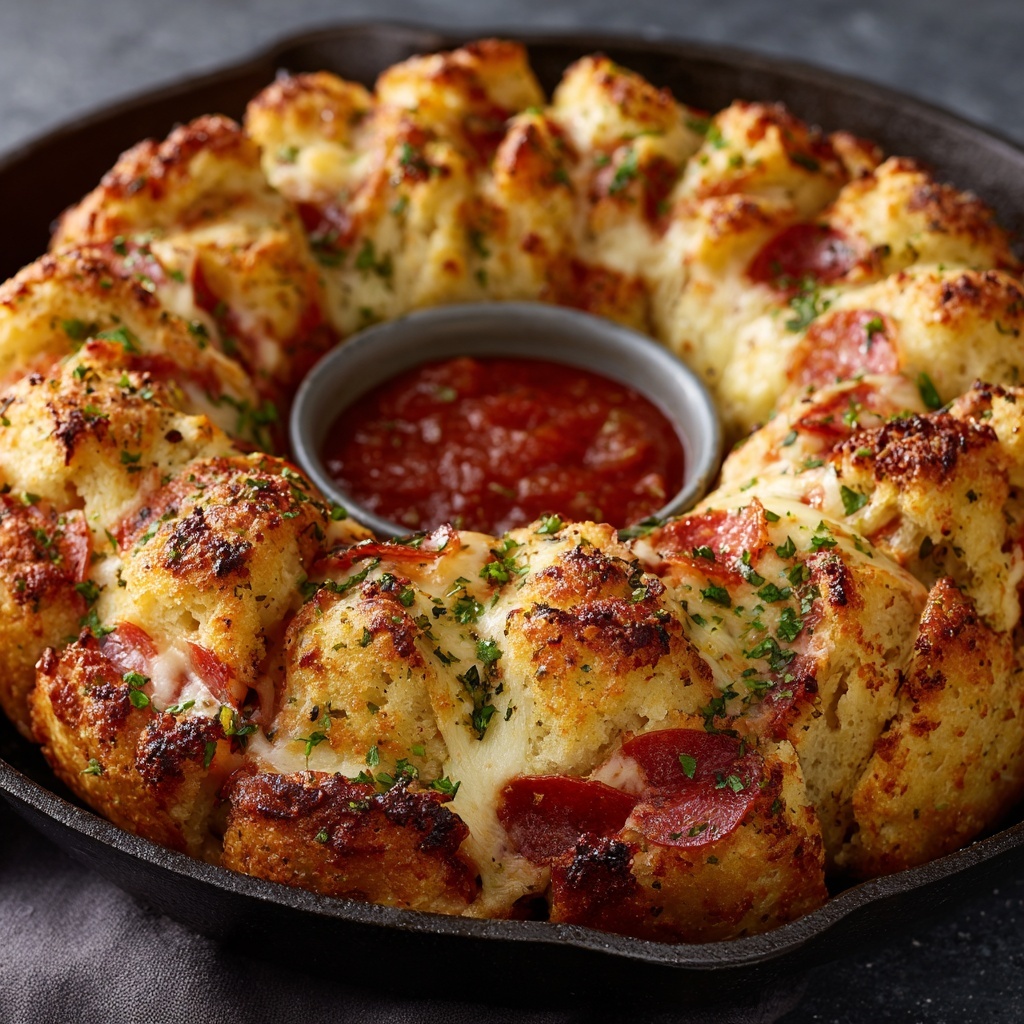
Well, my friend, you’ve just sailed into the perfect harbor. Let me introduce you to your new kitchen superhero: the Pull-Apart Pizza Ring. Imagine this: soft, pillowy biscuit dough, each piece stuffed with melty mozzarella and zesty pepperoni, all baked together in a glorious, golden ring. You pull it apart with your hands, dipping each cheesy, buttery, garlicky morsel into warm pizza sauce. It’s interactive, it’s insanely delicious, and it’s the ultimate centerpiece for any gathering (or a very, very good night in for one). This is the kind of comfort food that pulls you in—literally and figuratively. So, tie on your apron, and let’s make some magic!
A Ring of Memories: Why This Dish Feels Like Home
This recipe always takes me right back to my grandma’s linoleum-floored kitchen. She wasn’t a fancy chef, but she was a wizard with what she had. Her version of a “party appetizer” was a can of biscuits, some leftover cheese ends, and whatever was in the fridge, all baked up in her old, lopsided tube pan. I remember standing on a stool, my small hands “helping” her toss everything together, the smell of garlic and yeast filling the air. It was never about perfection; it was about the joy of creating something together, the anticipation as it baked, and the pure, unadulterated glee of pulling off a steaming, cheesy piece straight from the pan. That’s the spirit I’ve baked into this Pull-Apart Pizza Ring. It’s a little nostalgic, a whole lot of fun, and it’s guaranteed to create new memories around your table, too.
Print
Pull-Apart Pizza Ring : The Cheesy, Shareable Party Favorite!
- Total Time: 40 mins
- Yield: 6 servings 1x
Description
Say hello to the ultimate finger food—Pull-Apart Pizza! Soft biscuit dough loaded with gooey mozzarella, zesty pepperoni, and a buttery garlic-herb finish. It’s the perfect crowd-pleaser for game nights, movie marathons, or anytime you want pizza with a fun twist. This is comfort food that pulls you in—literally.
Ingredients
24 oz biscuit dough (store-bought or homemade)
16 oz mozzarella cheese, cubed or shredded
1 cup pepperoni, chopped or mini
4 tbsp butter, melted
2 tbsp olive oil
2 tbsp minced garlic
1 tbsp Italian seasoning
½ tsp kosher salt
16 oz pizza sauce (for dipping)
Instructions
Preheat Oven: Set to 350°F (175°C). Grease a bundt pan or large baking dish.
Mix Ingredients: In a large bowl, cut biscuit dough into quarters. Add cheese, pepperoni, garlic, olive oil, butter, Italian seasoning, and salt. Toss until evenly coated.
Layer & Bake: Place mixture evenly into the bundt pan. Bake for 30–35 minutes or until golden brown and cooked through.
Cool & Serve: Let rest for 5 minutes, then invert onto a plate. Serve warm with pizza sauce on the side for dipping.
- Prep Time: 10 mins
- Cook Time: 30 mins
- Category: Snack
Gather Your Flavor Crew: What You’ll Need
Here’s the beautiful part: this recipe is a master of simplicity. We’re using a few key players to create maximum flavor impact. Don’t be shy about making swaps—this is your kitchen, your rules!
- 24 oz Biscuit Dough (like Pillsbury Grands!): This is our golden, fluffy foundation. The flaky layers in these biscuits are pure magic when they bake up around the fillings. Chef’s Insight: If you’re feeling ambitious, you can absolutely use homemade biscuit dough! But the beauty of this recipe is its ease, so no judgment here. I always keep a tube or two in the fridge for emergency cravings.
- 16 oz Mozzarella Cheese, cubed or shredded: The star of our cheesy, gooey show! Pro-Tip: I highly recommend using low-moisture, block mozzarella that you cube yourself. It melts beautifully but retains some structure, creating those epic cheese pulls. Pre-shredded bagged cheese often has anti-caking agents that can make the melt less smooth.
- 1 cup Pepperoni, chopped: Hello, zesty, savory flavor! Substitution Tip: Not a pepperoni person? No problem! Swap in cooked and crumbled Italian sausage, diced ham, or even salami. For a veggie-packed version, try sautéed mushrooms and bell peppers.
- 4 tbsp Butter, melted & 2 tbsp Olive Oil: This dynamic duo creates a rich, buttery coating that helps the seasonings stick and gives the whole ring a gorgeous, golden-brown crust. The olive oil adds a lovely fruity depth.
- 2 tbsp Minced Garlic: Because more garlic is always the answer. Chef’s Confession: I’ve been known to use a heaping tablespoon instead of a level one. Life’s too short for bland food!
- 1 tbsp Italian Seasoning: This is our flavor powerhouse! It brings in all those herby, aromatic notes we love in a great pizza.
- ½ tsp Kosher Salt: This enhances all the other flavors. Quick Note: If you’re using table salt, use a bit less, as it’s saltier by volume.
- 16 oz Pizza Sauce (for dipping): The essential sidekick! Warming this up before serving makes all the difference—it’s like the cozy blanket for your cheesy pizza bites.
Let’s Build This Flavor Masterpiece! Your Step-by-Step Guide
Ready? This is where the fun begins. We’re not just making food; we’re crafting an experience. Follow these steps, and you’ll be a Pull-Apart Pizza Ring legend in no time.
- Preheat & Prep: Fire up that oven to a toasty 350°F (175°C). While it’s warming up, generously grease a 10-12 cup Bundt pan or a similar-sized oven-safe dish with non-stick spray or a bit of butter. Chef’s Hack: Don’t have a Bundt pan? A deep, round cake pan or even a 9×13 baking dish will work! You won’t get the ring shape, but you’ll get all the same delicious, pull-apart goodness. We call that a “Pull-Apart Pizza *Slab*,” and it’s just as welcome here!
- The Quarter-Cut Tango: Grab your biscuits. Using a pair of kitchen shears or a sharp knife, cut each biscuit into quarters. Little Chef Insight: Cutting them creates more nooks and crannies for the cheese and pepperoni to hide in, which means more flavor in every single bite! This is a fantastic step to hand off to a kitchen helper (kid, partner, friend—put ‘em to work!).
- The Big Toss: In a large bowl, combine your biscuit quarters, mozzarella, and chopped pepperoni. In a separate small bowl, whisk together the melted butter, olive oil, minced garlic, Italian seasoning, and salt. Pour this glorious, fragrant butter mixture over the biscuit and cheese mixture. Now, get in there with your hands (clean ones, please!) or a spatula and GENTLY toss everything until every single piece is coated in that herby, buttery goodness. Pro-Tip: Be gentle! We don’t want to squish the biscuit dough, just coat it. This ensures a light and fluffy final product.
- Pan & Bake: Carefully transfer your mixture into the prepared Bundt pan, spreading it out into an even layer. Pop that beautiful, cheesy creation into the preheated oven and bake for 30-35 minutes. You’re looking for a deep golden-brown top and bubbly, melted cheese peeking through the sides. Your kitchen will smell like an Italian bistro, and that’s how you know you’re on the right track!
- The Grand Reveal (The Cool-Down): This is the hardest part, I promise. Once it’s out of the oven, let the ring rest in the pan for a full 5-7 minutes. This is non-negotiable, my friend! This resting time allows the molten cheese to set just enough so that when you flip it, it holds its beautiful ring shape instead of becoming a delicious but messy landslide. After it has rested, place a large plate or serving platter over the top of the pan. With confidence (and maybe a kitchen towel, because the pan is hot!), flip the whole thing over. Gently lift the pan away to reveal your masterpiece.
- Serve with Sizzle: While the ring is resting, warm your pizza sauce in a small saucepan. Transfer your gorgeous Pull-Apart Pizza Ring to a serving platter, place the warm sauce in a bowl for dipping right in the center of the ring, and get ready for the applause!
How to Serve This Show-Stopper
Presentation is part of the fun! I love placing the warm ring on a large, rustic wooden board or a vibrant platter. Plop the bowl of warm pizza sauce right in the center—it looks so inviting. Scatter a few extra fresh basil leaves or a sprinkle of red pepper flakes around the platter for a pop of color. Then, just set it in the middle of the table, call your people, and watch the magic happen. This is finger food at its finest, so no plates or forks are needed—just plenty of napkins and big smiles!
Ride Your Own Flavor Wave: Recipe Variations
The beauty of this recipe is its incredible versatility. Make it your own with these fun twists!
- Meat Lover’s Dream: Add cooked and crumbled Italian sausage and some chopped bacon along with the pepperoni.
- Veggie Delight: Skip the meat and load up with a cup of well-drained, sautéed veggies like bell peppers, onions, black olives, and mushrooms.
- Three-Cheese Supreme: Swap half the mozzarella for a mix of provolone and parmesan for a deeper, more complex cheesy flavor.
- Breakfast Ring: Turn this into a brunch star! Use cooked breakfast sausage or chopped ham, and swap the mozzarella for cheddar. Omit the pizza sauce and serve with a side of warm marinara or even a cheesy gravy for dipping.
- Spicy ‘Nduja Twist: For my fellow heat-seekers, mix a tablespoon or two of spicy ‘nduja or some Calabrian chili paste into the butter mixture. Thank me later!
Isla’s Chef’s Notes & Kitchen Confessions
This recipe has been a part of my life for so long, it’s practically family. It’s evolved from my grandma’s “kitchen sink” special to the more refined (but still gloriously messy) version you see today. One of my favorite kitchen stories involves the first time I made this for a big friendsgiving. I was so excited, I forgot to grease the pan. Let’s just say we had a “deconstructed” pull-apart pizza that year—still delicious, but not quite the show-stopper I’d planned! So, learn from my mistakes: GREASE THAT PAN.
I also love that this recipe is a blank canvas. Don’t be afraid to play with the flavors. I’ve added a sprinkle of everything bagel seasoning to the butter mix, and it was a revelation. The point is to have fun, to cook without stress, and to create something that makes you and your people genuinely happy. That’s what BiteTide is all about.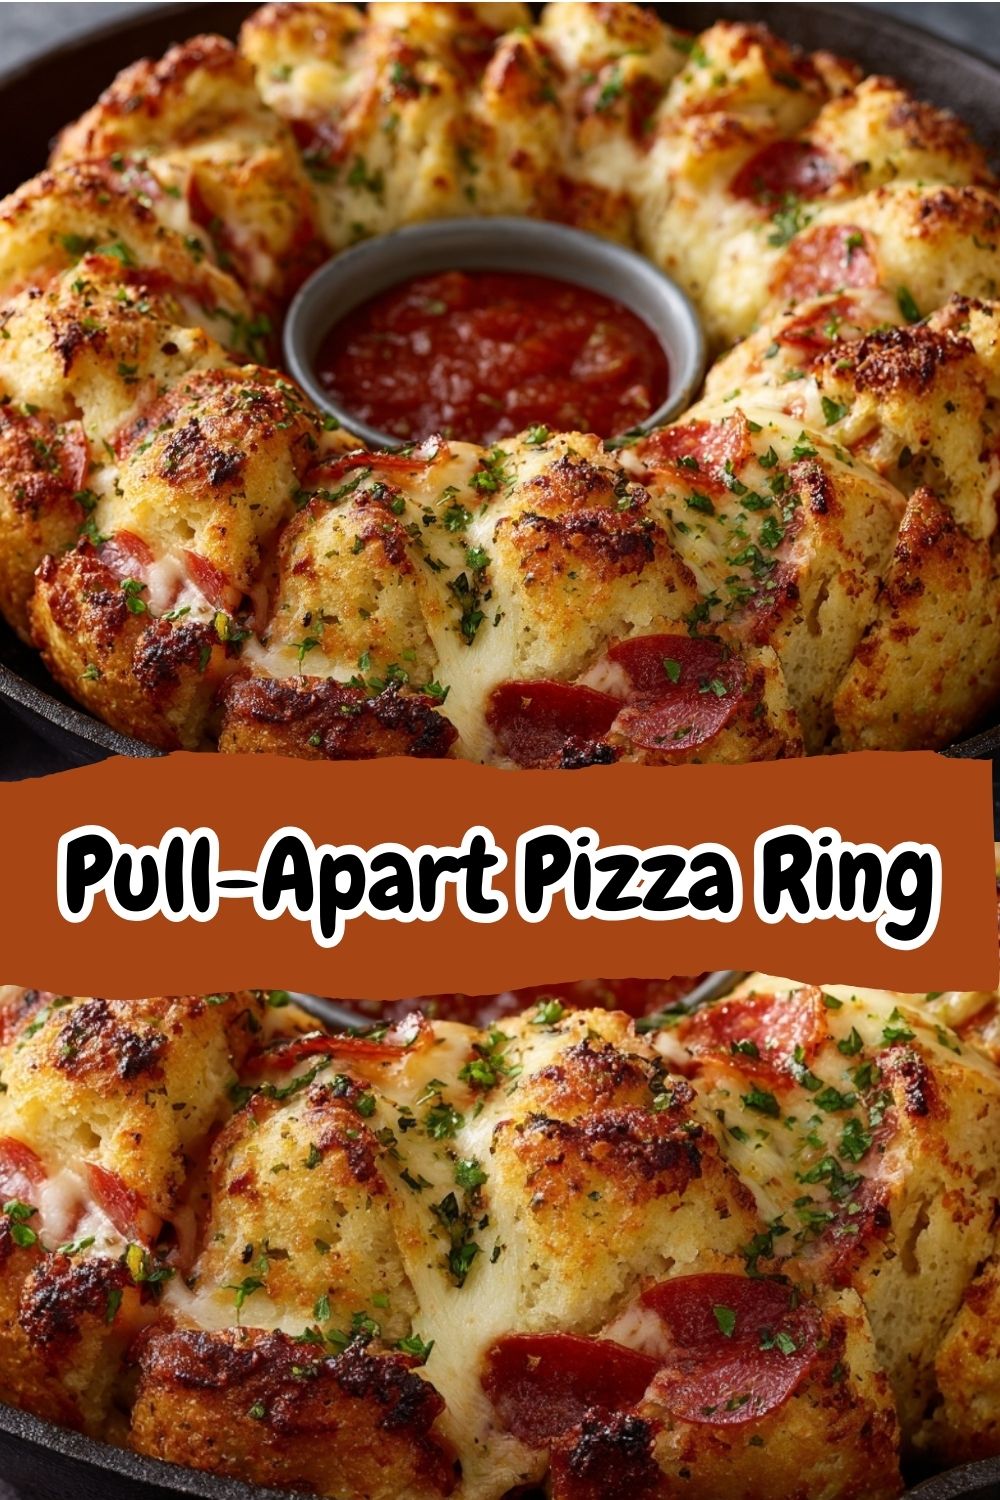
Your Questions, Answered! FAQs & Troubleshooting
I’ve made this a zillion times, and I’ve heard all your brilliant questions. Here are the answers to the most common ones!
Q: My dough was still a bit raw in the middle. What happened?
A: Ah, the classic dilemma! This usually happens if the oven was a bit too hot, causing the outside to brown before the inside could cook through. Oven temperatures can vary, so an oven thermometer is a chef’s best friend. Next time, try tenting the ring with foil for the last 10-15 minutes of baking to slow down the browning. Also, make sure you’re using a standard 10-12 cup Bundt pan—if it’s smaller, the ring will be too thick and dense to cook evenly.
Q: Can I make this ahead of time?
A: You sure can! Assemble the entire ring in the pan, cover it tightly with plastic wrap, and pop it in the fridge for up to 12 hours before you need to bake it. When you’re ready, just bake it straight from the fridge, adding maybe 5-10 extra minutes to the baking time since it will be cold.
Q: My cheese leaked out and stuck to the pan. Help!
A> Welcome to the club! This is the most common “issue,” but it’s easily managed. First, grease your pan EXTREMELY well. I’m talking non-stick spray, butter, the works. Second, that resting period after baking is absolutely critical. It allows the cheese to firm up just enough. And finally, when you flip it, do it with confidence and speed. If a little cheese does stick, just scrape it out with a spatula and patch it back onto the ring—no one will ever know!
Q: Can I use pre-shredded cheese? It’s just easier.
A> I hear you! And yes, you absolutely can. The final product might be slightly less “stringy” and a bit more “melty,” but it will still be utterly delicious. The convenience factor is a huge win on a busy day.
Quick Nutritional Breakdown
Please note: This is an estimated breakdown for one serving (assuming 8 servings total) and can vary based on specific ingredients and brands used.
- Calories: ~370
- Protein: 16g
- Fat: 23g
- Carbohydrates: 28g
Prep Time: 10 mins | Cook Time: 35 mins | Total Time: 45 mins | Servings: 6-8