Hot Cross Buns: Your New Favorite Cozy Bake
Hey there, friend! Isla here from BiteTide. Can you smell it? That warm, intoxicating aroma of cinnamon and yeast wafting through the kitchen, promising something truly special is about to come out of the oven. That’s the magic of baking Hot Cross Buns. If you’ve never made them from scratch, you’re in for the happiest little kitchen project of your life.
I know what you might be thinking—yeast breads sound fussy. But I’m here to tell you, with a little patience and a lot of love, these buns are absolutely within your reach. We’re talking about impossibly soft, fluffy pillows of dough, gently spiced with cinnamon and nutmeg, and studded with sweet, plump raisins. And that iconic cross on top? It’s easier than you think and adds such a lovely, traditional touch.
At BiteTide, we believe food should be a joy, not a chore. So whether you’re baking these for an Easter brunch, a cozy weekend treat, or just because you deserve a warm, buttery bun with your afternoon coffee, I’m walking you through every single step. We’re going to fill your kitchen with the best smells and your heart with that proud-baker feeling. So, tie on your favorite apron, and let’s make some memories—and some seriously delicious Hot Cross Buns!
A Kitchen Full of Flour and Love
My love for Hot Cross Buns started not in a fancy bakery, but in my Grandma Mae’s wonderfully chaotic kitchen. Every year, the Friday before Easter, her small, sunlit kitchen would transform into a bun-making factory. The counters would disappear under a blanket of flour, and the air would grow thick with the scent of spices.
My job, from the time I could stand on a stool, was to “paint” the crosses. Grandma would mix up a simple paste, fill a little parchment cone, and let me carefully pipe the lines onto each puffy bun. I took my job so seriously, my tongue often poking out in concentration. She’d always say, “Isla, darling, the cross isn’t just a mark; it’s a little blessing for our bread.” Then, as the buns baked, we’d sit at the table, stealing a few raisins from the bag and waiting for that golden moment when we could slather the first warm bun with an obscene amount of butter. It wasn’t just about the baking; it was about the tradition, the waiting, and the shared, buttery joy. That’s the feeling I want to bring to your kitchen today.
Print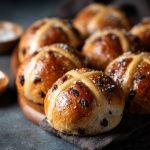
Hot Cross Buns : Soft, Spiced & Sweetly Traditional
- Total Time: About 2 hrs 30 mins
- Yield: 12 buns 1x
- Diet: Vegetarian
Description
Soft, sweet spiced buns studded with dried fruit, marked with the classic cross and glazed for a shine — a traditional Easter‑style treat.
Ingredients
- 375 ml warm milk
- 50 g unsalted butter, melted and cooled
- 75 g caster (superfine) sugar
- 1 large egg
- 640 g bread flour (or all‑purpose flour)
- 2 tsp ground cinnamon
- 2 tsp mixed spice (or all‑spice)
- ½ tsp salt
- 210 g sultanas (or raisins/currants)
- Zest of 1 orange
- 3 tsp (≈9 g) instant/rapid‑rise yeast
- For the crosses: 75 g plain flour + about 5 tbsp water
- For the glaze: 1 tbsp apricot jam + 2 tsp water
Instructions
- Warm the milk and melt the butter; allow to cool to hand‑warm temperature.
- In a large bowl, combine the flour, sugar, cinnamon, mixed spice, salt and yeast.
- Add the warm milk mixture, the egg, sultanas and orange zest; mix to form a soft dough.
- Turn the dough onto a lightly floured surface and knead for about 10 minutes (or use a stand mixer with dough hook about 5 minutes) until smooth and elastic.
- Place dough into a lightly oiled bowl, cover, and let it rise in a warm place until doubled in size (about 1–1½ hours).
- Punch down the risen dough, divide into 12 equal pieces, shape into smooth buns and place them on a baking tray or in a baking dish slightly spaced apart.
- Cover loosely and allow to rise again until nearly doubled (about 40 minutes).
- Preheat the oven to 200 °C (or 180 °C fan). While it’s warming, mix the plain flour and water to a paste and pipe the crosses onto the tops of the buns.
- Bake for around 20–22 minutes until the buns are golden brown and well risen.
- Meanwhile, heat the apricot jam and water until melted and smooth, then brush the glaze over the hot buns as soon as they come out of the oven.
- Allow to cool slightly before serving (they’re lovely warm, perhaps lightly toasted and buttered).
- Prep Time: 30 mins (plus first rise ~1‑1½ hrs and second rise ~40 mins)
- Cook Time: 20‑22 mins
- Category: Bread / Sweet breakfast bun
- Method: Baking (yeast‑leavened dough)
- Cuisine: English
Nutrition
- Serving Size: 1 bun
- Unsaturated Fat: ≈ 2–3 g
Gathering Your Bun-Making Brigade
Nothing here is complicated, I promise! These are simple, wholesome ingredients that come together to create pure magic. I’ve included some of my favorite chef insights and swaps to make this recipe truly yours.
- ¾ cup (180 mL) warm milk: This is the cozy bath that wakes up our yeast. You want it warm to the touch, like a pleasant bathwater, not hot. Too hot, and you’ll send the yeast to an early grave. If you’re dairy-free, unsweetened almond or oat milk works beautifully.
- 2¼ tsp active dry yeast (1 packet): Our little miracle worker! This is what gives the buns their incredible airy, soft texture. Make sure your yeast isn’t ancient for the best rise.
- ½ cup (100 g) granulated sugar: This sweetens the dough and also gives the yeast a quick snack to get it going. Don’t be tempted to skimp; it balances the spices perfectly.
- ¼ cup (60 g) unsalted butter, softened: For that rich, tender crumb and buttery flavor. I always use unsalted so I can control the salt level. “Softened” means it should give easily when you press it. Pro tip: if you forgot to take it out, you can grate cold butter on a box grater to speed up the process!
- ½ tsp salt: The flavor enhancer! It might seem small, but salt is crucial for balancing the sweetness and making all the other flavors pop.
- 1 tsp ground cinnamon & ¼ tsp ground nutmeg: The dynamic duo of coziness! Cinnamon brings the warmth, and nutmeg adds a subtle, nutty depth. For an extra kick, a tiny pinch of cardamom or allspice is a dream.
- 3½ cups (440 g) all-purpose flour: The backbone of our buns. I like to fluff my flour in the container before scooping and leveling it off to avoid a dense dough. For a slightly heartier bun, you can swap in ½ cup of whole wheat flour.
- ½ cup (75 g) raisins or currants: These little bursts of sweetness are non-negotiable for me! If your raisins are a bit dry, plump them up by soaking them in hot water or a splash of orange juice for 10 minutes before draining.
- For the cross: ½ cup flour + ~⅓ cup water: Just a simple paste that bakes into the classic cross. It’s traditionally just flour and water, but some people add a bit of oil or sugar. We’re keeping it simple and classic today!
- Optional glaze: ¼ cup apricot jam, warmed: This is the baker’s secret for that gorgeous, professional-looking shine. It adds a subtle fruity sweetness that takes these buns to the next level. Honey or maple syrup also works if that’s what you have!
Let’s Make Some Magic: The Step-by-Step
Ready? This is where the fun begins. I’ll be with you for every step, knead, and rise. Read through all the steps once before you start—it’s my number one chef hack for a smooth, stress-free baking session.
- Wake Up the Yeast: In a small bowl or a liquid measuring cup, combine your warm milk and the yeast. Give it a little stir and let it sit for 5-10 minutes. You’re waiting for it to get foamy and fragrant—this is your sign that the yeast is alive and happy! If it doesn’t foam, your milk was likely too hot or cold, or your yeast is old. Start over to avoid sad, flat buns.
- Create the Dough Base: In the bowl of a stand mixer fitted with a dough hook (or a large mixing bowl if you’re kneading by hand), combine the foamy yeast mixture, sugar, softened butter, salt, cinnamon, and nutmeg. Mix it on low just until it’s a shaggy, combined mess. Chef’s Tip: Adding the butter now, instead of later, creates a more tender crumb because the fat coats the flour proteins.
- Incorporate Flour & Fruit: With the mixer on low, gradually add the flour, about one cup at a time, until a soft dough begins to form. Once most of the flour is in, add your raisins or currants. Keep mixing until the dough pulls away from the sides of the bowl and the fruit is evenly distributed. It might be a bit sticky, and that’s okay!
- The Kneading Stage: If using a mixer, let it knead the dough on medium speed for 6-8 minutes. If you’re kneading by hand, turn the dough out onto a lightly floured surface and get ready for a little arm workout! Use the heels of your hands to push the dough away from you, then fold it back over itself, giving it a quarter turn each time. Do this for 8-10 minutes. You’re done when the dough is smooth, elastic, and springs back slowly when you poke it.
- The First Rise (The Patience Part): Place your beautiful, smooth dough ball into a lightly greased bowl. Turn it over once to coat the top. Cover the bowl with a clean kitchen towel or plastic wrap and place it in a warm, draft-free spot. Let it rise until doubled in size, about 1 to 1.5 hours. My favorite warm spot? An oven that’s been turned off but was warmed by the pilot light or with the interior light on.
- Shape the Buns: Once doubled, punch the dough down gently to release the air. It’s very satisfying! Turn it out onto a clean surface and divide it into 12 equal pieces. I like to use a kitchen scale for precision, but eyeballing it works just fine. Roll each piece into a smooth ball by cupping your hand over it and making small circles on the counter. Place the balls into a greased 9×13 inch baking dish, arranging them snugly so they become one big, happy family as they rise and bake.
- The Second Rise: Cover the pan again with your towel and let the buns rise for another 30-40 minutes. They should be puffy and touching each other. Meanwhile, preheat your oven to 375°F (190°C).
- Pipe the Crosses: In a small bowl, whisk together the ½ cup of flour with about ⅓ cup of water. You’re aiming for a thick but pipeable paste—like a thick pancake batter. Add water a tablespoon at a time if it’s too thick. Transfer the paste to a small zip-top bag, snip a tiny corner off, and pipe crosses over the tops of your risen buns. This part is so fun—don’t stress about perfection!
- Bake to Golden Perfection: Slide the pan into your preheated oven and bake for 15-17 minutes. You’re looking for a beautiful, deep golden brown on top. Your kitchen will smell like heaven. I promise.
- The Glaze (The Final Shine): As soon as you pull the buns from the oven, warm your apricot jam in the microwave for 15-20 seconds until it’s brushable. Immediately brush this glossy glaze over the hot buns. This gives them that stunning, professional finish and adds a touch of extra sweetness.
How to Serve Your Masterpiece
Okay, the hardest part is over: waiting! Let the buns cool in the pan for just about 5 minutes. Then, you have a choice to make. You can serve them warm, straight from the pan, where they are at their absolute softest and most divine. Or, you can let them cool completely on a wire rack.
But here’s the non-negotiable BiteTide rule: you must serve them with a generous slather of good, salted butter. The butter melting into the warm, spiced bread is a core memory in the making. They’re perfect with a cup of strong English breakfast tea, a milky latte, or even a glass of cold milk. Serve them as the star of your brunch table, pack them in a picnic basket, or enjoy one as your well-deserved chef’s treat.
Ride Your Own Flavor Wave: Fun Variations!
Once you’ve mastered the classic, get creative! This dough is a wonderful blank canvas.
- Citrus Zest: Add the zest of one orange or lemon to the dough along with the spices for a bright, sunny twist.
- Chocolate Chip: Swap the raisins for an equal amount of dark or milk chocolate chips. A crowd-pleaser for sure!
- Apple Cinnamon: Fold in ½ cup of finely chopped, dried apples along with the raisins.
- “Tropical” Buns: Use diced dried pineapple, mango, and coconut flakes instead of raisins. A pinch of ginger would be amazing here too.
- Whole Wheat & Honey: Substitute 1 cup of the all-purpose flour with whole wheat and swap the sugar for honey. You’ll get a heartier, deeply flavored bun.

Isla’s Chef Notes & Kitchen Confessions
This recipe has been a labor of love in my kitchen. The first time I made them by myself, I was so nervous I checked the rising dough every five minutes, convinced I’d failed. The buns turned out great, but I learned that yeast knows what it’s doing—it doesn’t need a helicopter parent!
Over the years, I’ve made one key tweak: I now add the butter right at the beginning with the wet ingredients. I found it creates a more consistently tender bun than trying to work it in after the flour. It’s a small change, but it makes a big difference.
And a funny story: one year, I was filming a reel for Instagram while piping the crosses and I was so focused on talking to the camera that I piped a big, smiley face on one of the buns instead of a cross! My followers loved it, and now it’s a little “Easter egg” I do in one bun from every batch. It just goes to show, your kitchen, your rules. Don’t be afraid to have fun and make a little mess!
Your Bun Questions, Answered!
I’ve gotten a lot of questions about this recipe over the years, so here are the answers to the most common ones.
Q: My dough didn’t rise. What went wrong?
A: Oh, we’ve all been there! The most common culprits are old yeast or liquid that was too hot (which kills the yeast) or too cold (which puts it to sleep). Always test your yeast first, and make sure your milk is just warm to the touch. Also, ensure your rising spot is warm and draft-free.
Q: Can I make these the night before?
A> Absolutely! This is a fantastic make-ahead trick. After shaping the buns and placing them in the pan, cover them tightly with plastic wrap and pop them in the refrigerator overnight. The cold slows the yeast, giving them a long, slow rise. In the morning, take the pan out, let them sit on the counter for about an hour to finish rising, then bake as directed. You’ll have fresh buns for breakfast with minimal morning effort!
Q: My dough is really sticky. Should I add more flour?
A> A sticky dough is often a soft, light dough! Try to resist adding too much extra flour during kneading, as it can make the buns dense. Instead, lightly flour your hands and work surface. The dough should become less sticky as you knead and the gluten develops. If it’s still unmanageably sticky after 5 minutes of kneading, then you can add a tablespoon of flour at a time.
Q: Can I freeze the baked buns?
A> Yes, they freeze beautifully! Let them cool completely after baking, then place them in a freezer-safe bag or container for up to 3 months. To enjoy, thaw at room temperature and warm them in a 300°F (150°C) oven for 5-10 minutes to bring back that fresh-from-the-oven softness.
Nutritional Information*
*This is an estimate for one bun without the optional apricot glaze.
- Calories: 208
- Fat: 5g
- Saturated Fat: 3g
- Cholesterol: 23mg
- Carbohydrates: 37g
- Fiber: 1g
- Sugars: 9g
- Protein: 5g
- Sodium: 130mg
Prep Time: 20 minutes