Wake Up to a Crispy, Cheesy Morning Victory!
Hey there, friend! Isla here, from my cozy kitchen to yours. Let’s talk about mornings. We’ve all been there: the alarm clock is public enemy number one, you’re running on fumes, and the siren song of a drive-thru is almost too loud to ignore. But what if I told you there’s a better way? A way to have a hot, satisfying, incredibly delicious breakfast that’s ready in minutes, feels like a hug from the inside, and is a million times better than anything you can get in a paper bag?
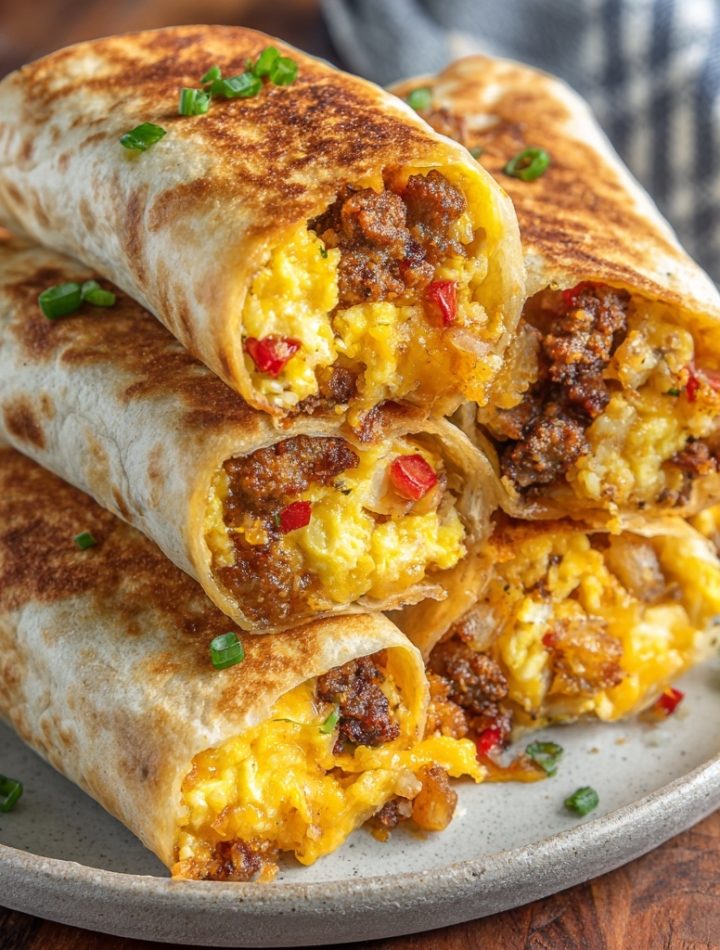
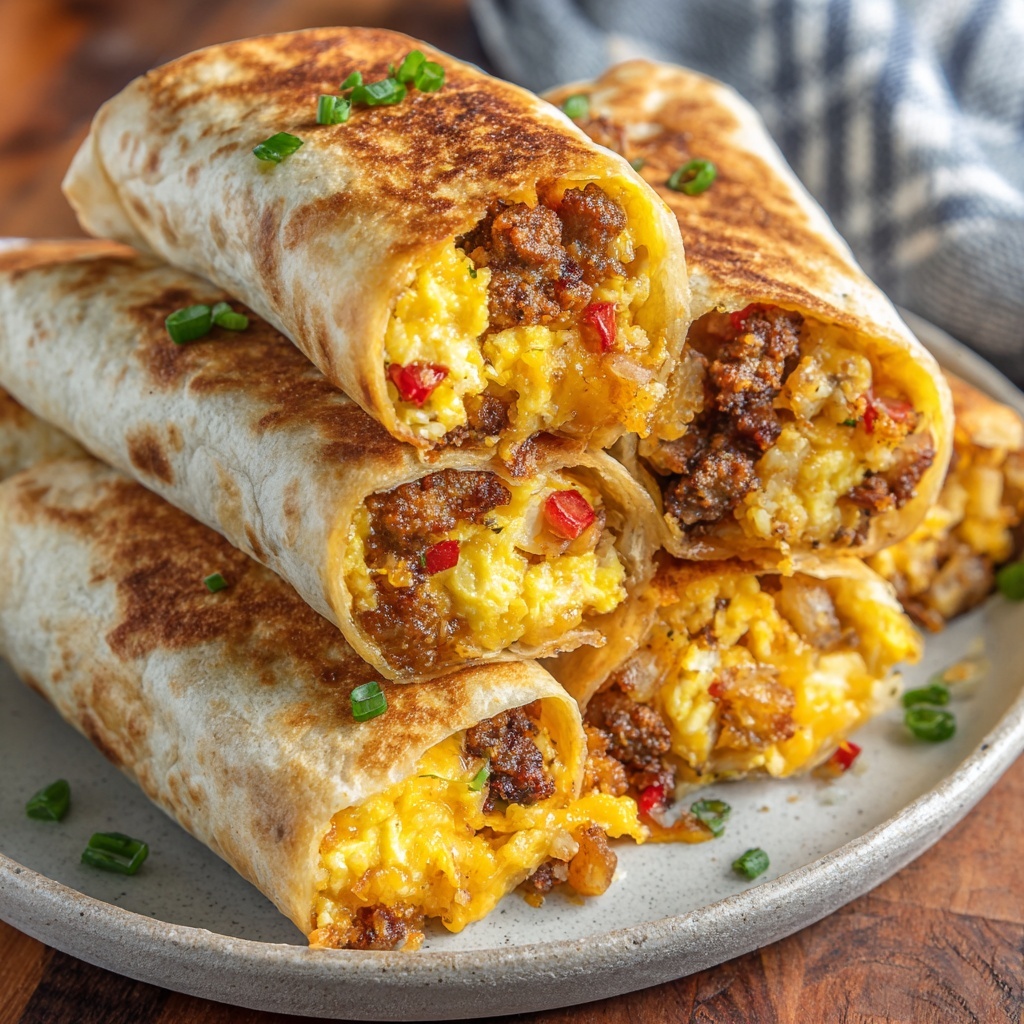
Enter the hero we all need: the Air Fryer Breakfast Burrito. This isn’t just any burrito. This is a golden-brown, crispy-edged, flavor-packed masterpiece that’s melty, savory, and perfectly portable. Imagine this: a warm flour tortilla, crisped to absolute perfection in the air fryer, giving way to a fluffy, soft scramble of eggs, smoky breakfast sausage, gooey cheddar cheese, and just the right amount of hearty potatoes. It’s the ultimate grab-and-go dream, but it’s also fancy enough for a lazy weekend brunch.
I created this recipe for real life. It’s for the busy parent, the work-from-home warrior, the student with a 8 AM class. It’s meal-prep magic that actually tastes amazing days later. So, let’s banish boring breakfasts together. Grab your air fryer, and let’s make a morning meal that’s not just fuel—it’s a reason to smile.
The Burrito That Built a Tradition
This recipe takes me right back to my dad’s chaotic, wonderful Sunday morning kitchen. After his early morning fishing trips, the kitchen would become our command center. The radio would be blaring old rock tunes, the smell of coffee was thick in the air, and he’d be whipping up a massive skillet of “catch-of-the-day” scrambled eggs—usually with whatever he’d caught and a hodgepodge of veggies from the fridge.
But the best part was the assembly line. My job was to warm the tortillas on the stove burner (a little charred was a feature, not a bug!) and he’d pile them high. We’d roll them up, wrap them in foil, and hand them out to any neighbor or friend who happened to stop by. It was less about the perfect recipe and more about the joy of sharing something hot and homemade. That feeling of a warm, tightly wrapped bundle of goodness, made with love and a bit of improvisation, is the soul of this air fryer burrito. It’s my modern, crispy-fied tribute to those messy, happy mornings.
Print
Air Fryer Breakfast Burritos : Crispy, Cheesy & Meal Prep-Friendly
- Total Time: 25 minutes
- Yield: 6 servings 1x
Description
Start your mornings right with these Air Fryer Breakfast Burritos — golden and crispy on the outside, melty and savory on the inside. Stuffed with eggs, cheese, and your favorite breakfast fillings, they’re the ultimate grab-and-go meal. Perfect for busy mornings, freezer prep, or lazy weekend brunches.
Ingredients
6 large flour tortillas
8 eggs, scrambled
1 cup cooked breakfast sausage or bacon crumbles
1 cup shredded cheddar or pepper jack cheese
½ cup cooked hash browns or diced potatoes
¼ cup chopped green onions or bell peppers (optional)
Salt and pepper to taste
Cooking spray or olive oil spray
Instructions
In a large skillet, scramble eggs until just set. Season with salt and pepper.
Lay out tortillas and layer with eggs, meat, cheese, potatoes, and any extra fillings.
Fold sides in and roll up burritos tightly.
Spray lightly with cooking oil and place in the air fryer basket seam-side down.
Air fry at 375°F (190°C) for 8–10 minutes, flipping halfway through, until golden and crispy.
Let cool slightly before serving, or wrap in foil for later.
- Prep Time: 15 mins
- Cook Time: 10 minutes
- Category: Breakfast
- Cuisine: American
Your Burrito Building Blocks
Here’s everything you need to create your own breakfast magic. Remember, cooking is an adventure, not a science experiment—so feel free to swap and play!
- 6 large flour tortillas (burrito-size): The trusty vessel! I like the classic flour ones for their flexibility and perfect crisp factor. If you’re going low-carb, a large, pliable coconut or almond flour wrap works too, just watch the air fry time as they can crisp up faster.
- 8 large eggs, scrambled: The heart of the operation. They create that fluffy, protein-packed base. Pro Chef Insight: For the fluffiest scramble, I whisk my eggs with a tablespoon of water or milk right before they hit the pan—it creates steam for an amazing texture!
- 1 cup cooked breakfast sausage or bacon crumbles: The savory superstar! I’m a sucker for the spicy pork sausage, but turkey sausage, chopped ham, or even vegetarian crumbles are fantastic swaps. This is where you make it your own.
- 1 cup shredded cheddar or pepper jack cheese: The glue that holds it all together! Cheddar is a classic, but pepper jack gives it a lovely little kick. For the ultimate melt, always shred your own cheese from a block—the pre-shredded stuff has anti-caking agents that can make it a bit grainy.
- ½ cup cooked hash browns or diced potatoes: The hearty filler! This gives the burrito that satisfying, stick-to-your-ribs quality. Using frozen, pre-cooked hash browns is my biggest weeknight hack—no peeling or boiling required!
- ¼ cup chopped green onions or bell peppers (optional): The fresh pop! I always add these for a bit of color and a fresh flavor contrast. Not a pepper person? No problem! Spinach, mushrooms, or even a spoonful of salsa mixed into the eggs would be divine.
- Salt and pepper to taste: The essential flavor enhancers. Don’t be shy! Season your eggs well while they’re cooking.
- Cooking spray or olive oil spray: The crisp-maker! A light spritz is all you need to transform that soft tortilla into a shatteringly crisp, golden wrapper.
Let’s Build the Perfect Burrito: A Step-by-Step Guide
Ready for the fun part? Let’s get rolling! I’ll walk you through each step with all my favorite chef hacks to ensure burrito perfection.
- Scramble Your Eggs to Fluffy Perfection. Crack your eggs into a bowl, add that splash of water or milk, and whisk until they’re uniform and a little frothy. Heat a non-stick skillet over medium heat with a tiny bit of oil or butter. Pour in the eggs and let them set for a moment before gently pushing them around with a spatula. You’re aiming for soft, large curds. Chef’s Hack: Take them off the heat just before they look fully done—they’ll continue to cook from the residual heat and won’t get rubbery in the burrito. Season with salt and pepper right at the end.
- Set Up Your Burrito Assembly Line. This is key for efficiency! Lay out all your tortillas on a clean surface. Have your scrambled eggs, cooked meat, cheese, potatoes, and any veggies in separate bowls, lined up and ready to go. I like to warm my tortillas for about 15 seconds in the microwave first—it makes them much more pliable and less likely to tear when you roll.
- Layer, Don’t Pile! This is the secret to a burrito that rolls beautifully and eats even better. Spoon your fillings onto the lower third of the tortilla, leaving a good 1-2 inch border on the sides. Start with a base of eggs, then add your meat, a generous sprinkle of cheese (the melty magic!), potatoes, and finally your veggies. Chef’s Tip: Resist the urge to overfill! A modest, well-distributed layer is the key to a tight, leak-proof roll.
- The Art of the Tight Roll. Fold the bottom flap of the tortilla up and over the filling, tucking it in snugly. Then, fold in the left and right sides towards the center. Now, roll it forward, keeping it as tight as you can, until you have a perfect little package. Chef’s Hack: If you’re struggling, think of it like swaddling a very delicious baby. A tight burrito is a happy burrito!
- Spritz and Get Ready to Crisp. Place your burrito seam-side down on a plate. Give the top a light but thorough spray with your cooking oil. This is what will give you that gorgeous, golden-brown, crispy texture. Carefully transfer them to your air fryer basket, always seam-side down. This natural weight helps seal them shut during cooking.
- Air Fry to Golden Glory! Pop them into the air fryer at 375°F (190°C). Cook for 8-10 minutes, but here’s the crucial part: flip them halfway through! At the 4-5 minute mark, carefully flip each burrito over. This ensures an even, all-over crispness. You’ll know they’re done when the tortilla is beautifully golden and firm to the touch.
- The Most Important Step: Let Them Rest! I know, the temptation is real. But trust me on this. Take the burritos out and let them sit for 3-5 minutes before biting in. This allows the molten-hot cheese and steam inside to settle, so you don’t get a lava-hot surprise, and it helps the structure set.
How to Serve Your Masterpiece
Presentation is part of the fun! For a gorgeous brunch spread, slice one burrito in half on a sharp diagonal to show off all those beautiful, colorful layers inside. Plate it alongside a vibrant little salad of mixed greens with a lime vinaigrette, or some fresh fruit like sliced melon and berries. For the ultimate cozy experience, serve it whole on a plate with a big dollop of cool, creamy sour cream, a spoonful of zesty pico de gallo, and a generous drizzle of your favorite hot sauce or a creamy avocado crema. Don’t forget a strong cup of coffee or a fresh orange juice to wash it all down!
Ride Your Own Flavor Wave: Endless Variations!
The beauty of this recipe is its versatility. Don’t just make my burrito—make it yours!
- Southwest Fiesta: Swap in chorizo for the sausage, use pepper jack cheese, and add a few tablespoons of canned green chiles and corn to the filling.
- “Everything Bagel” Veggie: Skip the meat and use sautéed spinach, mushrooms, and onions. Mix a tablespoon of everything bagel seasoning into your scrambled eggs and use a smear of cream cheese instead of cheddar.
- Denver Style: A classic! Use diced ham, and plenty of finely diced green and red bell peppers along with some onion.
- Greek-Inspired: Fill with cooked, seasoned ground lamb or chicken, spinach, kalamata olives, and crumbled feta cheese. Serve with a side of tzatziki for dipping.
- Fully Loaded: Go all out! Add in some black beans, a spoonful of salsa, and a sprinkle of corn for a truly hearty feast.
Isla’s Kitchen Confidential
This recipe has seriously evolved in my kitchen. The first time I made them, I was so overzealous with the filling that I created what my partner lovingly called “The Burrito Volcano”—cheese and egg lava erupted all over the air fryer basket! Lesson learned: a tight roll is a non-negotiable. I’ve also found that if I’m making a big batch for the freezer, it’s worth writing the contents on the foil with a sharpie. “Sausage & Cheddar” or “Veggie” saves a lot of guesswork later!
The other thing I’ve learned? This recipe is a fantastic fridge-cleaner. That little bit of leftover roasted potatoes from last night’s dinner? Diced up, they’re perfect. A handful of wilting spinach? Wilt it into the eggs. It’s a “waste-not, want-not” dish that always feels like a win.
Your Burrito Questions, Answered!
I’ve gotten so many DMs about this recipe, so let’s tackle the most common questions head-on!
Q: Can I really make these ahead and freeze them?
A: You absolutely can, and you should! It’s a game-changer. After you roll your burritos, let them cool completely. Then, wrap each one tightly in plastic wrap and again in foil, or place them in a heavy-duty freezer bag. They’ll keep for up to 3 months. To cook from frozen, no need to thaw! Just pop them directly into the air fryer (you can remove the plastic wrap but keep the foil on for the first half of cooking if you like a softer tortilla). Cook at 350°F for 12-16 minutes, flipping halfway through, until hot and crispy.
Q: My burrito is leaking! What did I do wrong?
A> Don’t worry, it happens to the best of us! Leaking is usually one of two things: 1) Overfilling: It’s the most common culprit. Less is more when it comes to burrito filling. 2) A torn tortilla: Always warm your tortillas first to make them pliable, and be gentle when rolling. If a little cheese melts out, just see it as a tasty, crispy bonus!
Q: Can I make this without an air fryer?
A: Of course! My classic methods still work beautifully. For a skillet: Heat a little oil or butter in a non-stick skillet over medium heat. Place the burrito seam-side down and cook for 2-3 minutes per side, until golden brown and crispy. For an oven: Preheat your oven to 400°F (200°C). Place the burritos on a baking sheet, spray with oil, and bake for 15-20 minutes, flipping halfway through.
Q: My burrito isn’t getting crispy. Help!
A: A soggy burrito is a sad burrito. The fix is usually simple! First, make sure you’re giving it a good, even spray with oil—this is essential for browning. Second, don’t overcrowd the air fryer basket. The hot air needs to circulate around each burrito to work its magic. Finally, make sure your filling isn’t too wet. If you’re using veggies like tomatoes or fresh salsa, pat them dry with a paper towel first.
Quick Nutrition & Prep Info
- Prep Time: 15 minutes
- Cook Time: 10 minutes
- Total Time: 25 minutes
- Servings: 6 burritos
Estimated per burrito (using sausage and cheddar): ~380 calories, 22g fat, 25g carbs, 19g protein. (Note: This is an estimate and can vary based on your specific ingredients and fillings.)
Storage: Keep cooled burritos in the fridge for up to 3 days. Reheat in the air fryer at 350°F for 5-7 minutes until warm and crispy. For the freezer, wrap tightly and freeze for up to 3 months. Reheat from frozen as directed in the FAQ section.
There you have it! Your complete guide to the crispiest, cheesiest, most satisfying breakfast burrito of your dreams. I hope this recipe brings as much joy to your kitchen as it has to mine. If you make them (and you totally should!), I’d love to see your creation! Tag me @BiteTide on Instagram or Pinterest so I can share in your breakfast victory.
Happy cooking, and remember—every great day deserves a great start.
– Isla 💛