
Cranberry Orange Scones: Your New Favorite Cozy Morning Ritual
Hey there, friend! Isla here, from my cozy kitchen to yours. Tell me, does anything beat the smell of something warm and buttery baking in the oven on a slow morning? It’s like a hug for your whole house. And if I had to pick one smell to bottle up as the official scent of “happy, cozy vibes,” it would be the sweet, citrusy aroma of these Cranberry Orange Scones.
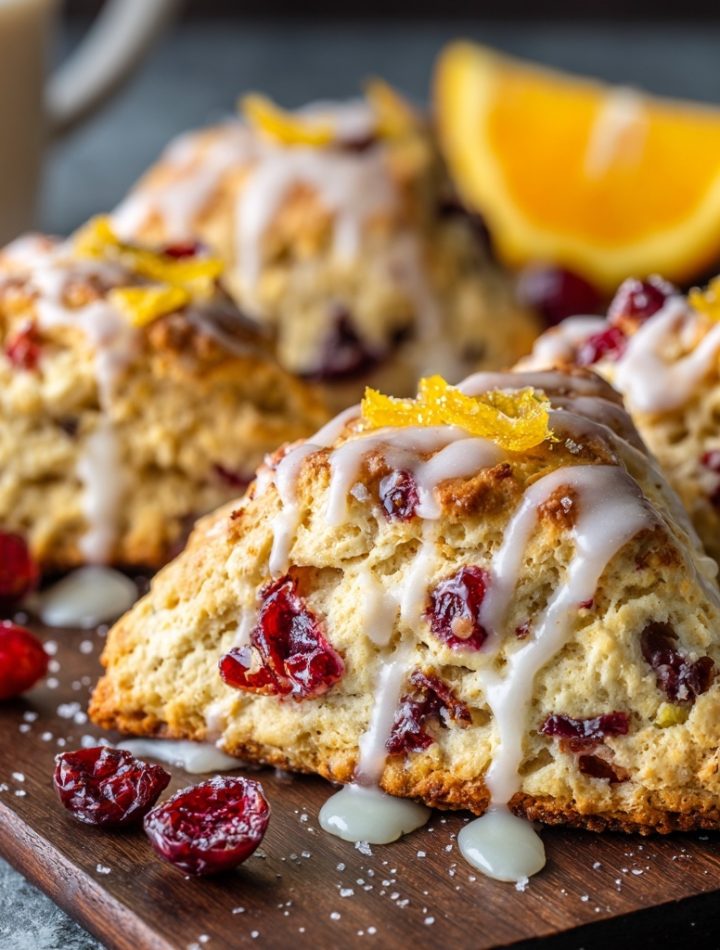
We’re not talking about those dry, crumbly scones that leave you reaching for a gallon of coffee. Oh no. We’re creating buttery, tender, melt-in-your-mouth pastries that are bursting with bright, tart cranberries and sunny orange zest. They’re soft on the inside, with just the right amount of flaky, golden crispness on the outside, all finished with a shimmering orange glaze and a sprinkle of candied peel that makes them look like they just came from the fanciest bakery in town.
The best part? They’re secretly simple. I designed this recipe for real life—think busy mornings, last-minute brunch plans, or that sudden weekend craving for something special. You don’t need any fancy equipment or a pastry degree. Just a bowl, a few simple ingredients, and the joy of creating something delicious. So, tie on your favorite apron, put on some feel-good music, and let’s bake up a little bit of magic together.
A Zest for Life and a Handful of Cranberries
This recipe will always have a special place in my heart because it reminds me of my Grandma Elara. Her kitchen was my first culinary classroom, a place filled with the warm scent of yeast, simmering jams, and the constant, cheerful sound of her humming. She had a tiny, sun-drenched nook by the window where a gnarled old orange tree grew in a pot, and she’d often let me zest the fruits for her baking.
One chilly December morning, she plopped me on a stool, handed me a little zester, and tasked me with creating a “mountain of orange sunshine” while she chopped cranberries. I remember the citrus oil misting the air, making everything smell like a perfect, sunny day. She taught me that the zest holds all the powerful, aromatic flavor, the true soul of the orange. As we folded the bright red cranberries and fragrant zest into the dough, she’d say, “See, Isla? Life, like a good scone, needs a little tartness to appreciate the sweet.” Every time I make these, I’m right back in that sunny corner, learning that the best recipes are the ones woven with love and a really good story.
Print
Cranberry Orange Scones : Buttery, Bright & Perfectly Tart
- Total Time: 30 mins
- Yield: 12 mini scones 1x
Description
These mini Cranberry Orange Scones are soft, flaky, and full of holiday flavor. Bursting with tart cranberries and citrusy orange zest, they’re finished with a sweet orange glaze and candied peel for a bakery-style touch. Perfect for brunch, gifting, or cozy mornings with coffee.
Ingredients
2 cups all-purpose flour
⅓ cup granulated sugar
1 tablespoon baking powder
½ teaspoon salt
Zest of 1 large orange
½ cup cold unsalted butter, cubed
½ cup dried cranberries (or fresh if chopped)
⅔ cup heavy cream (plus more for brushing)
1 large egg
For the Glaze:
1 cup powdered sugar
2–3 tablespoons fresh orange juice
Candied orange peel, for garnish
Instructions
Preheat oven to 400°F and line a baking sheet with parchment.
In a large bowl, whisk flour, sugar, baking powder, salt, and orange zest.
Cut in butter with a pastry cutter or fingers until mixture resembles coarse crumbs.
Stir in cranberries.
In a small bowl, whisk cream and egg; add to dry mix and gently combine.
Turn dough onto a floured surface and pat into a 1-inch thick circle. Cut into mini wedges or rounds.
Place on baking sheet, brush with cream, and bake for 12–15 minutes or until golden.
Cool slightly, then drizzle with orange glaze and sprinkle with candied peel.
- Prep Time: 15 mins
- Cook Time: 15 mins
- Category: Dessert
Gathering Your Flavor Crew: The Ingredients
Alright, let’s get our mise en place ready! (That’s just a fancy chef term for having all your ingredients prepped and measured—it makes everything flow so smoothly). Here’s your shopping list for scone success. I’ve included some of my favorite chef insights and swaps, because I believe in cooking with what you have!
- 2 cups all-purpose flour: This is our trusty foundation. It gives the scones just the right structure. For a slightly more tender crumb, you can swap in ½ cup of cake flour, but all-purpose works perfectly!
- ⅓ cup granulated sugar: Just the right amount of sweetness to balance the tart cranberries. I like using plain white sugar here to let the other flavors shine.
- 1 tablespoon baking powder: This is our rising star! It’s what gives scones their lovely lift and airy texture. Make sure yours is fresh for the best results.
- ½ teaspoon salt: Never, ever skip the salt! It’s the flavor enhancer that makes the buttery, sweet, and tart notes pop. It’s the secret handshake between all the ingredients.
- Zest of 1 large orange: The MVP of flavor! Use a microplane to get the fine zest, avoiding the bitter white pith. This is where that incredible, sunny citrus aroma comes from.
- ½ cup cold unsalted butter, cubed: I repeat: COLD! This is the single most important tip for flaky scones. The cold butter steams as it bakes, creating those dreamy, buttery layers. I like to cube mine and then pop it back in the freezer for 10 minutes before using.
- ½ cup dried cranberries (or fresh if chopped): I usually use dried for convenience and their chewy texture, but if you have fresh cranberries, chop them coarsely! They’ll give you little bursts of intense tartness.
- ⅔ cup heavy cream (plus more for brushing): This adds richness and tenderness. The fat content is key for a luxurious texture. For brushing, it gives the tops that beautiful golden-brown color.
- 1 large egg: Our binding agent! It adds structure and a little extra richness to the dough.
For the Glaze & Garnish:
- 1 cup powdered sugar: It creates a smooth, drizzle-able glaze that sets beautifully.
- 2–3 tablespoons fresh orange juice: Freshly squeezed is best! It gives the glaze a vibrant, true orange flavor that you just can’t get from a bottle.
- Candied orange peel, for garnish: This is the bakery-style finishing touch! It adds a little crunch and a gorgeous pop of color. You can find it in the baking aisle or make your own if you’re feeling fancy.
Let’s Get Baking: The Step-by-Step Magic
Ready to create some magic? Follow these steps, and you’ll be a scone superstar in no time. I’ve packed this section with all my favorite little hacks to ensure your scones are absolute perfection.
- Preheat and Prep: First things first, preheat your oven to 400°F (200°C). This is a hot oven, and we need it ready for our cold dough! Line a baking sheet with parchment paper. No mess, no sticking, easy cleanup. Chef hack: If you don’t have parchment, a light sprinkle of flour on the pan works too.
- The Dry Team Assembles: In a large bowl, grab your whisk and give the flour, sugar, baking powder, salt, and that glorious orange zest a really good whisking. We’re not just mixing; we’re aerating the flour and making sure the baking powder is evenly distributed. This is the secret to a uniform, tender rise. You’ll smell the orange zest already—isn’t it heavenly?
- The Cold Butter Dance: Time for the cold butter! Scatter your frozen butter cubes over the flour mixture. Now, using a pastry cutter, two forks, or even your fingertips, work the butter into the flour. You want to work quickly so the butter stays cold. Stop when the mixture looks like coarse, pebbly sand with some larger pea-sized bits of butter still visible. Those butter bits are your future flaky layers—protect them!
- Berry Time: Gently stir in your cranberries. If you’re using dried, you can toss them in a little flour first—this helps prevent them from sinking to the bottom during baking.
- Bringing It All Together: In a small bowl or a liquid measuring cup, whisk together the heavy cream and the egg until they’re one happy, creamy liquid. Make a well in the center of your dry ingredients and pour the cream mixture in. Now, use a fork or a spatula to gently, gently, GENTLY mix everything. I can’t stress this enough: stop mixing as soon as the dough starts to come together. It will be shaggy and look a little dry in places—that’s perfect! Overmixing is the enemy of tender scones.
- Shape with Love (Not Force): Turn the dough out onto a lightly floured surface. Pat it—don’t knead it!—into a circle that’s about 1-inch thick. This thickness is ideal for getting a nice, tall scone. For mini scones, I like to use a small round cutter (about 2 inches) or simply cut the circle into 12 small wedges, like a pizza.
- The Final Touch Before Baking: Place your shaped scones on the prepared baking sheet, giving them a little room to breathe. Now, use a pastry brush to give the tops a light wash of heavy cream. This is what gives them that beautiful, glossy, golden-brown finish. No egg wash needed here—the cream is pure magic.
- Bake to Golden Perfection: Slide your baking sheet into the preheated oven and bake for 12-15 minutes. You’re looking for gorgeous golden edges and a top that’s lightly browned. Your kitchen will smell absolutely incredible. A pro tip: do the tap test. The tops should feel firm to a gentle tap.
- The Glaze of Glory: Let the scones cool on the baking sheet for about 10 minutes. They need to set! While they’re cooling, make the simple glaze. Whisk the powdered sugar and fresh orange juice together until smooth. Start with 2 tablespoons and add the third if you need it to be thinner. Drizzle it artfully (or enthusiastically!) over the warm scones and immediately sprinkle with the candied orange peel. The warm scone will help the glaze set into a beautiful, crackly finish.
How to Serve These Sunny Delights
Okay, the hardest part is over—waiting for them to cool just enough so you don’t burn your tongue! I love serving these scones still slightly warm. They’re a dream all on their own, but if you want to take them to the next level of cozy, serve them with a pat of good salted butter and a cup of strong coffee or a pot of Earl Grey tea. For a real treat, clotted cream and a dollop of orange marmalade will make you feel like you’re at the most charming tea shop in the world. They’re perfect for a holiday brunch spread, a thoughtful food gift packed in a cute box, or just a quiet moment of “you time” on a lazy Saturday morning.
Ride Your Own Flavor Wave: Fun Variations
The beauty of a basic scone recipe is that it’s a blank canvas for your cravings! Here are a few of my favorite twists:
- White Chocolate & Orange: Swap the cranberries for ½ cup of white chocolate chips. The creamy sweetness is a knockout pairing with the orange.
- Lemon Blueberry Bliss: Use lemon zest instead of orange and fresh blueberries (tossed in flour) instead of cranberries. A lemon glaze is a must here!
- Pistachio & Cranberry: Add ¼ cup of chopped, shelled pistachios to the dough with the cranberries for a lovely crunch and color.
- Vegan-Friendly: Use plant-based butter and cream, and a flax egg (1 tbsp ground flax + 3 tbsp water, let sit 5 mins). The texture is still amazing!
- Gluten-Free: Substitute the all-purpose flour with a 1:1 gluten-free baking blend. The result is just as tender and delicious.
Isla’s Chef Notes & Kitchen Confessions
This recipe has been my go-to for years, and it’s evolved with me. The first time I made scones, I overmixed the dough into a tough, hockey-puck-like state. It was a delicious lesson learned! Now, I embrace the shaggy dough, and it rewards me with the most incredible texture.
Another confession: I’m a huge advocate for the “freeze for later” method. After I cut my scones, I often freeze them on the baking sheet until solid, then toss them in a freezer bag. Then, I can bake one or two straight from frozen whenever a craving hits—just add a couple of extra minutes to the bake time. It’s my secret for having fresh, warm scones anytime.
Most importantly, have fun with it! Baking is supposed to be joyful. If your dough is a little sticky, add a touch more flour. If your glaze is too thin, add more sugar. You’re the boss of your scones. I promise, no matter what, they’ll be made with love, and that’s the most important ingredient of all.
Scone SOS: Your Questions, Answered!
I’ve gotten so many wonderful questions about this recipe over the years. Here are the ones that pop up most often, so you can bake with total confidence.
Q: My scones spread everywhere and didn’t rise! What happened?
A: The most common culprit here is warm butter. If your butter melts before it hits the oven, it can’t create steam pockets for that flaky lift. Make sure your butter is ice-cold, and if your kitchen is warm, pop your shaped scones in the fridge for 10 minutes before baking. Also, double-check that your baking powder is fresh!
Q: Why is my dough so sticky and hard to handle?
A. Don’t panic! This can happen depending on the humidity or your flour. Just sprinkle your work surface and your hands with a little more flour. Remember, it’s better to have a slightly sticky dough than an overworked one. A bench scraper is also a fantastic tool for handling sticky dough without adding too much extra flour.
Q: Can I use milk or half-and-half instead of heavy cream?
A. You can, but the result will be slightly less rich and tender. The high fat content in heavy cream is part of what makes these scones so luxurious. If you do swap, I’d recommend using ½ cup of cold whole milk to start, as it has a thinner consistency, and add a little more only if the dough seems too dry.
Q: How do I store these, and can I freeze them?
A. Once completely cool, store them in an airtight container at room temperature for up to 2 days. To refresh, warm them in a 300°F oven for 5-10 minutes. They also freeze beautifully for up to 3 months! Freeze the baked, unglazed scones on a tray, then transfer to a freezer bag. Thaw and warm, then glaze. You can also freeze the unbaked, shaped dough and bake from frozen, adding a few extra minutes to the bake time.
Quick Nutrition Note
Prep Time: 15 minutes | Bake Time: 15 minutes | Total Time: 30 minutes | Makes: 12 mini scones
Per scone (approximate, without glaze): Calories: 190 | Carbs: 25g | Fat: 9g | Sugar: 10g | Protein: 3g
Please note: Nutritional information is a rough estimate and can vary based on the specific ingredients you use.