Savory Herb and Cheese Bread: Your New Kitchen Superpower
Hey there, friend! Isla here. Let’s talk about one of life’s simplest, most profound pleasures: the smell of freshly baked bread wafting through your home. It’s a universal signal of comfort, of love, of “you are home and all is well.” Now, imagine that smell, but better. Infuse it with the earthy aroma of rosemary and thyme, the sharp, tangy scent of melting cheddar, and a hint of golden, buttery garlic. Are you with me? That, my friend, is the magic of this Savory Herb and Cheese Bread.
I know what you might be thinking: “Isla, bread is fussy. Yeast is intimidating. I don’t have all day!” I hear you, and I’m here to tell you that this recipe is your gateway to fearlessly fabulous baking. This isn’t a fussy, precise artisanal loaf that demands a degree in food science. This is a hearty, rustic, gloriously cheesy bread that’s as forgiving as it is delicious. We’re making a double batch because one loaf simply disappears too fast—trust me on this. It’s crusty on the outside, impossibly soft and cheesy on the inside, and packed with so much aromatic flavor that your kitchen will smell like a professional bakery for the rest of the day. So, tie on your apron, and let’s turn simple ingredients into something truly spectacular. You’ve got this!
Print
Savory Herb and Cheese Bread : Crusty, Cheesy & Full of Aromatic Flavor
- Total Time: 55 minutes
- Yield: 20 slices 1x
Description
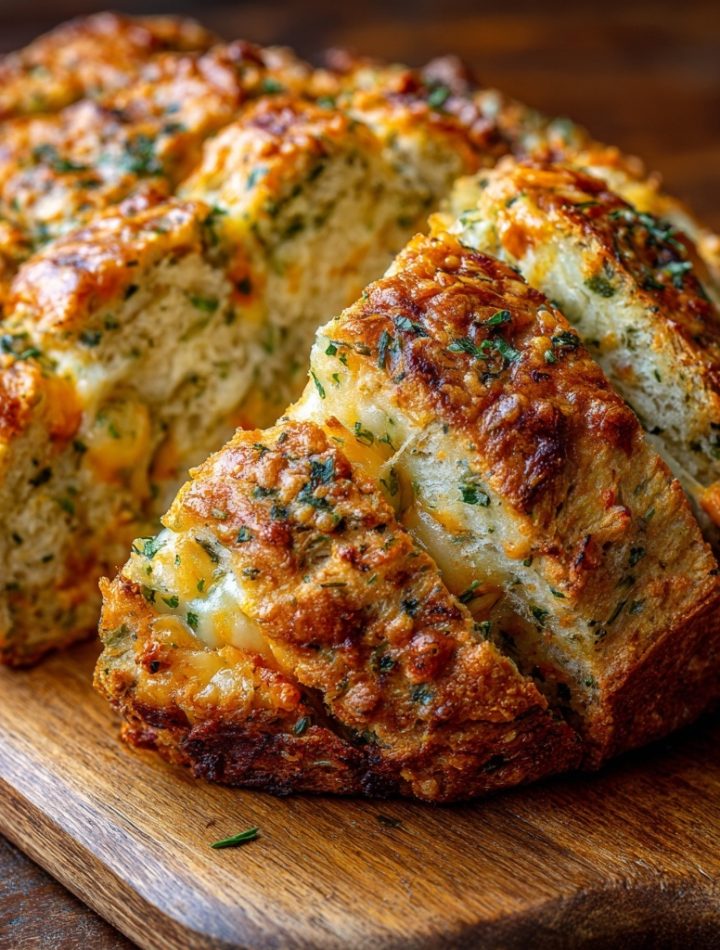
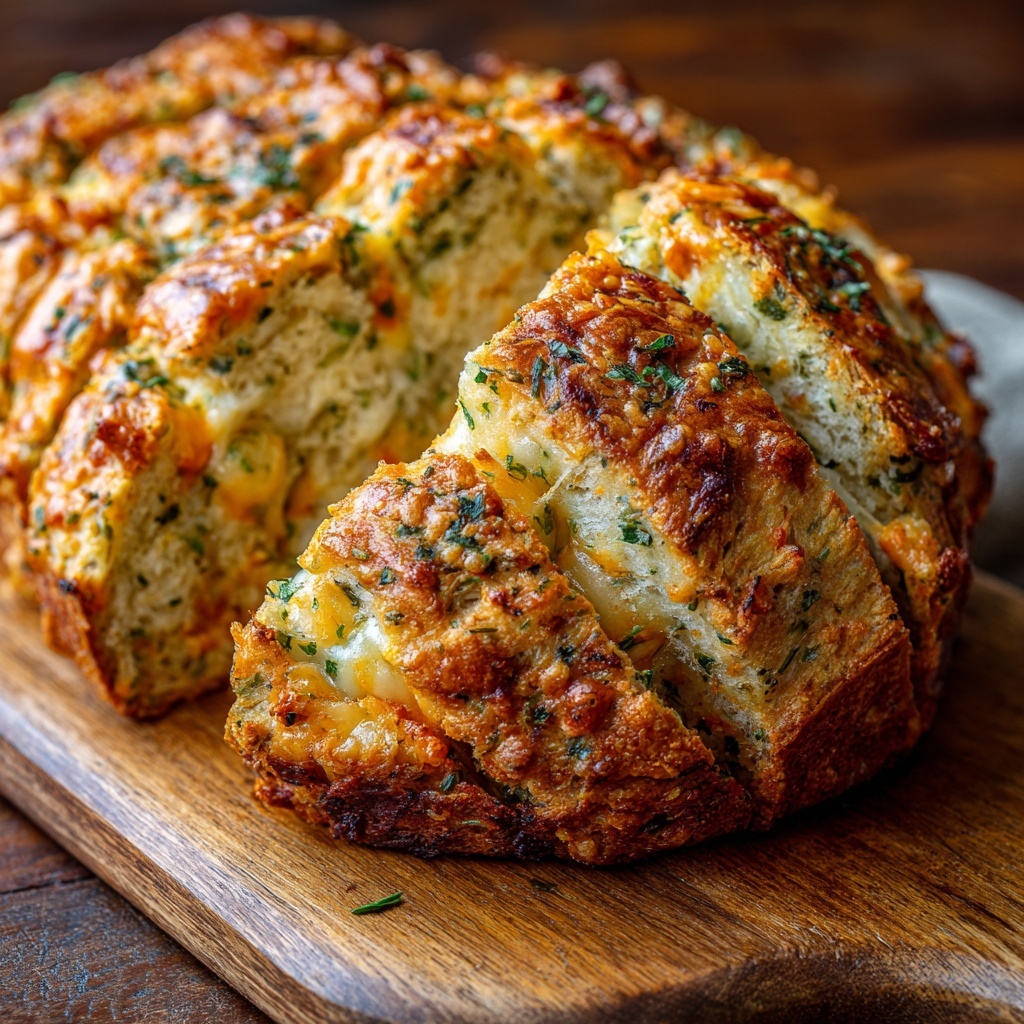
This Savory Herb and Cheese Bread is the ultimate cold-weather comfort. With a golden crust, soft cheesy center, and fragrant dried herbs baked right in, each slice is hearty, flavorful, and completely satisfying. Whether served as a side with soups and stews or enjoyed on its own, this bread brings rustic charm to every bite. We’ve doubled the batch and added bold twists like garlic, sharp cheese, and buttery herbs for next-level flavor.
Ingredients
6 cups all-purpose flour
2 packets (4½ tsp) active dry yeast
2 cups warm water (110°F)
2 tsp sugar
2 tsp salt
2 tbsp olive oil
2 cups shredded cheese (sharp cheddar, gruyère, or mozzarella blend)
2 tbsp mixed dried herbs (thyme, rosemary, oregano)
4 cloves garlic, finely minced (optional – for garlic herb flavor)
2 tbsp melted butter (for brushing crust)
Optional: ½ tsp crushed red pepper flakes (for subtle heat)
Instructions
Activate Yeast: In a bowl, combine warm water, sugar, and yeast. Let sit 5–10 minutes until foamy.
Make the Dough: In a large bowl, mix flour, salt, herbs, and garlic (if using). Add yeast mixture and olive oil. Stir to form a shaggy dough.
Knead & Rise: Knead for 8–10 minutes until smooth and elastic. Place in a greased bowl, cover, and let rise for 1–1.5 hours until doubled.
Shape & Fill: Punch down the dough and fold in shredded cheese. Shape into 2 loaves or 1 large round. Place on parchment-lined baking sheet or in loaf pans.
Second Rise: Cover and let rise again for 30–45 minutes. Preheat oven to 375°F (190°C).
Bake: Bake for 30–35 minutes or until golden and crusty. Brush with melted butter and a sprinkle of herbs or sea salt. Cool slightly before slicing.
- Prep Time: 20 minutes
- Cook Time: 35 minutes
- Category: Snack
The Bread That Built a Bridge
This recipe will always remind me of my dad. He’s a man of few words, a fisherman who speaks the language of the sea and the sky, not necessarily the kitchen. But on rainy afternoons when the boats were docked, he’d get this quiet, focused look and declare it was “bread day.” I’d stand on a little stool next to him, my hands covered in flour, “helping” him knead. He never measured anything—it was all in the feel, he’d say. A handful of this, a pinch of that. His secret was always a hefty dose of dried herbs from my grandma’s garden and whatever strong cheese we had in the icebox.
The kitchen would fall silent except for the rhythmic thump-thump-thump of dough on the counter. We wouldn’t talk much, but we were communicating. He was teaching me patience as we waited for the dough to rise, showing me the transformation of simple flour and water into a living, breathing thing. The moment we pulled that golden, puffed-up loaf from the oven, the silence would break. We’d tear into it while it was still steaming, burning our fingers, and he’d finally smile. “Not bad, kid,” he’d say. That bread was more than food; it was our bridge. It’s where I learned that the best recipes aren’t just about flavor—they’re about the stories and the connections we bake right into them.
Gather Your Flavor Crew: The Ingredients
Here’s the dream team! This is a double batch, giving you two beautiful loaves—one to devour immediately and one to share (or, you know, hoard for tomorrow’s epic grilled cheese). I’ve included my favorite chef insights and swaps so you can make this bread your own.
- 6 cups all-purpose flour: The reliable backbone of our bread. It gives us that perfect, sturdy-yet-soft crumb. If you want to experiment, you can swap out 1-2 cups for whole wheat flour for a nuttier flavor and heartier texture.
- 2 packets (4½ tsp) active dry yeast: Our little miracle workers! This is what makes our bread rise and become light and airy. Make sure your yeast is fresh for the best rise.
- 2 cups warm water (110°F/43°C): The key to waking up the yeast. Think “baby bottle warm”—not hot, or you’ll send the yeast to an early grave. If you don’t have a thermometer, it should feel warm and comfortable on your wrist.
- 2 tsp sugar: Don’t worry, this bread isn’t sweet! The sugar is just a quick snack for the yeast to get them active and bubbly.
- 2 tsp salt: Essential for flavor! It balances the richness of the cheese and enhances all the other ingredients. Never skip the salt in bread baking.
- 2 tbsp olive oil: This adds a subtle fruitiness and keeps the dough wonderfully soft and pliable.
- 2 cups shredded cheese: The star of the show! I love a mix of sharp cheddar for punch and gruyère for its nutty, melty magic. A mozzarella blend works great too for ultimate pull-apart goodness.
- 2 tbsp mixed dried herbs (thyme, rosemary, oregano): This is your flavor powerhouse. I use dried here because they hold up beautifully during the long bake without burning. Feel free to use an Italian seasoning blend for convenience!
- 4 cloves garlic, finely minced (optional): Because garlic makes everything better, right? This infuses the entire loaf with a subtle, savory warmth.
- 2 tbsp melted butter (for brushing): The final flourish! Brushing the hot loaf with butter gives it a gorgeous, glossy, restaurant-quality crust and an extra layer of rich flavor.
- ½ tsp crushed red pepper flakes (optional): My little rebel addition! A pinch adds a subtle, warm heat in the background that plays so well with the cheese and herbs.
Let’s Get Baking: The Step-by-Step Magic
Ready to create some magic? Follow these steps, and you’ll be a bread-baking boss in no time. I’ve packed this section with all my favorite kitchen hacks to set you up for success.
- Activate Your Yeast: In a medium bowl, combine your warm water, sugar, and yeast. Give it a quick stir and then walk away for 5-10 minutes. This is your first sign of success! You’re looking for a creamy, foamy layer on top—this tells you your yeast is alive, happy, and ready to make your bread rise. Chef’s Hack: If you don’t see foam, your yeast might be old or your water was too hot/cold. It’s best to start over to avoid a dense loaf.
- Make the Dough: In a large mixing bowl (I use my stand mixer, but a good old-fashioned wooden spoon works too!), whisk together the flour, salt, dried herbs, and minced garlic (if using). This ensures the salt and herbs are evenly distributed. Now, pour in the foamy yeast mixture and the olive oil. Stir everything together until a shaggy, floury dough forms. It will look messy, and that’s perfect!
- Knead & Rise: Now, it’s time to get your hands dirty! Turn the dough out onto a lightly floured surface and knead for 8-10 minutes. You’re looking for it to become smooth, elastic, and slightly springy to the touch. If you’re using a stand mixer, use the dough hook attachment on medium speed for about 5-7 minutes. Place your beautiful, smooth dough into a lightly oiled bowl, turn it over to coat, and cover the bowl with a clean kitchen towel or plastic wrap. Let it rise in a warm, draft-free spot for 1 to 1.5 hours, or until it has doubled in size. Chef’s Hack: No warm spot? Turn your oven on to the “warm” setting for one minute, then turn it off. Place the covered bowl in the slightly warm oven—it’s the perfect rising environment!
- Shape & Fill:This is the fun part! Gently punch down the dough to release the air. It’s weirdly satisfying. Now, sprinkle your shredded cheese over the dough and gently knead it for a minute or two right in the bowl, just until the cheese is evenly incorporated. Don’t overwork it! Divide the dough in half and shape each piece into a rustic oval loaf or a round boule. Place them on a parchment-lined baking sheet (or into two greased 9×5 inch loaf pans).
- Second Rise: Cover the shaped loaves again with your kitchen towel and let them rise for another 30-45 minutes. They should look nice and puffy. During this time, preheat your oven to 375°F (190°C). A hot oven is crucial for that initial “oven spring” that gives us a great rise and a beautiful crust.
- Bake to Perfection: Place your baking sheet in the preheated oven and bake for 30-35 minutes. The bread is done when it’s deeply golden brown on top and sounds hollow when you tap the bottom. Chef’s Hack: For an extra-crispy crust, place a small, oven-safe dish of water on the bottom rack of the oven while it preheats. The steam works wonders! The second they come out of the oven, brush the tops generously with the melted butter. This adds flavor and gives them a gorgeous sheen. Let the loaves cool on a wire rack for at least 20 minutes before slicing. I know it’s torture, but this allows the structure to set so you don’t get a gummy interior!
How to Serve This Masterpiece
Oh, the possibilities! While this bread is absolutely magnificent all on its own, still warm from the oven, it’s also the ultimate team player. Slice it thick and serve it alongside a big, steaming bowl of tomato soup, a hearty beef stew, or a fresh garden salad. For your next dinner party, slice a loaf into chunks and serve it on a wooden board with a dish of high-quality olive oil and balsamic vinegar for dipping. And let’s not forget breakfast—a thick slice, toasted and slathered with butter, is a truly glorious way to start the day.
Ride Your Own Flavor Wave: Recipe Variations
This recipe is a fantastic canvas for your creativity! Here are a few of my favorite twists:
- Everything Bagel Twist: Before the second rise, brush the loaves with an egg wash (1 egg + 1 tbsp water) and sprinkle generously with everything bagel seasoning.
- Sun-Dried Tomato & Basil: Fold in ½ cup of chopped sun-dried tomatoes (oil-packed and drained) and 2 tbsp of fresh, chopped basil along with the cheese.
- Jalapeño Cheddar: Add a kick by folding in 1-2 finely diced jalapeños (seeds removed for less heat) with the cheese.
- Gluten-Free Swap: Use a 1:1 gluten-free all-purpose flour blend and add 1 tsp of xanthan gum if it’s not already included in the blend.
- Bacon & Scion: For the ultimate treat, fold in ½ cup of cooked, crumbled bacon and ¼ cup of finely chopped fresh chives.
Isla’s Chef Notes & Kitchen Confessions
This recipe has been my go-to for years, and it’s evolved with me. The first time I made it, I was so nervous about the yeast that I probably checked it 10 times in 5 minutes. I’ve also learned a thing or two the hard way—like the time I got impatient and added the salt directly to the yeast water (it killed the yeast, and I ended up with two delicious-smelling, but very dense, cheese bricks). We live and we learn!
These days, I often mix the dough the night before and let it do its first rise slowly in the refrigerator overnight. This “cold ferment” develops an even deeper flavor. I just take it out in the morning, let it come to room temperature, and then pick up at the shaping step. It’s a fantastic little hack for fresh bread with your dinner on a busy weekday. Remember, baking is a journey, not a destination. Embrace the little imperfections—they’re what make your loaf uniquely yours!
Your Questions, Answered!
I’ve gotten a lot of questions about this bread over the years, so here are the answers to the most common ones!
Q: My dough didn’t rise. What went wrong?
A: This is almost always a yeast issue. Either the yeast was old and lost its potency, or the water was too hot and killed it, or too cold and didn’t activate it. The “foamy” stage in step one is your safety net! If you don’t see that foam, it’s best to start over. Also, make sure your rising spot is warm and draft-free.
Q: Can I make this in a bread machine?
A: Absolutely! Since this is a double batch, you’ll need to halve the recipe to fit a standard machine. Add the ingredients according to your machine’s manufacturer instructions (usually liquids first). Add the cheese when the machine beeps for “add-ins.”
Q: My bread is dense and gummy inside. Help!
A> This usually has one of two causes: 1) The bread was sliced while still too hot. That rest time is non-negotiable for the crumb to set! Or 2) The oven wasn’t hot enough. An oven thermometer is a cheap and invaluable tool to ensure your oven is at the right temperature for a good rise.
Q: How do I store it, and can I freeze it?
A: Once completely cool, store it in a paper bag for a day to keep the crust crisp, or in a plastic bag for up to 3 days for a softer crust. It freezes beautifully! Wrap the whole loaf or individual slices tightly in plastic wrap and then in foil. Freeze for up to 3 months. Thaw at room temperature and reheat in a 350°F oven for 10 minutes to revive that fresh-baked magic.
Quick Nutrition Info
Per Slice (approx.): ~210 calories | 8g fat | 28g carbs | 7g protein
Please note: This is an estimate and can vary based on specific ingredients used.