
Let’s Make Some Holiday Magic: Marshmallow Wreaths!
Hey there, friend! Isla here from BiteTide, and I am absolutely tingling with holiday excitement. Can you smell it? That crisp, chilly air mixed with the scent of pine, cinnamon, and… melting marshmallows? Oh yes, it’s that time of year again. The time for twinkling lights, cozy sweaters, and whipping up those iconic, incredibly fun treats that make the season so sweet. Today, we’re diving headfirst into a recipe that’s pure, unadulterated joy: Holiday Marshmallow Wreaths.
These little guys are more than just a snack; they’re a memory-making activity, a burst of festive color on your cookie tray, and a guaranteed smile-inducer for anyone from tiny toddlers to generous grandpas. They’re crunchy, gloriously gooey, and require exactly zero baking skills. If you can stir a pot and aren’t afraid to get your hands a little sticky, you are already a master wreath-maker in the making. So, tie on your favorite apron, crank up those holiday tunes, and let’s create some delicious, edible holiday cheer together. I promise, it’s going to be a blast!
A Sticky-Fingered Christmas Tradition
I can’t even look at a bag of marshmallows without being instantly transported back to my grandma’s kitchen, circa 1998. The Formica countertops were always cool to the touch, and the air was perpetually thick with the smell of something wonderful—usually her famous gingerbread. But one weekend every December, the main event was wreath-making. My cousins and I would crowd around the table, our little faces serious with concentration as we waited for the magical green goo to be ready.
The rule was always the same: wait for it to cool just enough to handle. We never did. We’d all dive in, squealing as the warm mixture stuck to our fingers, shaping lopsided wreaths while sneaking bites of the plain cereal straight from the box. My grandma, a saint with a twinkle in her eye, would just laugh and tell us the messier they were, the more love they held. She’d place the red candies with surgical precision, turning our abstract green blobs into something that truly looked festive. To this day, the taste of a cornflake marshmallow wreath tastes like childhood, laughter, and the unconditional love that fills a kitchen during the holidays. It’s a feeling I try to bake into every single one I make now.
Print
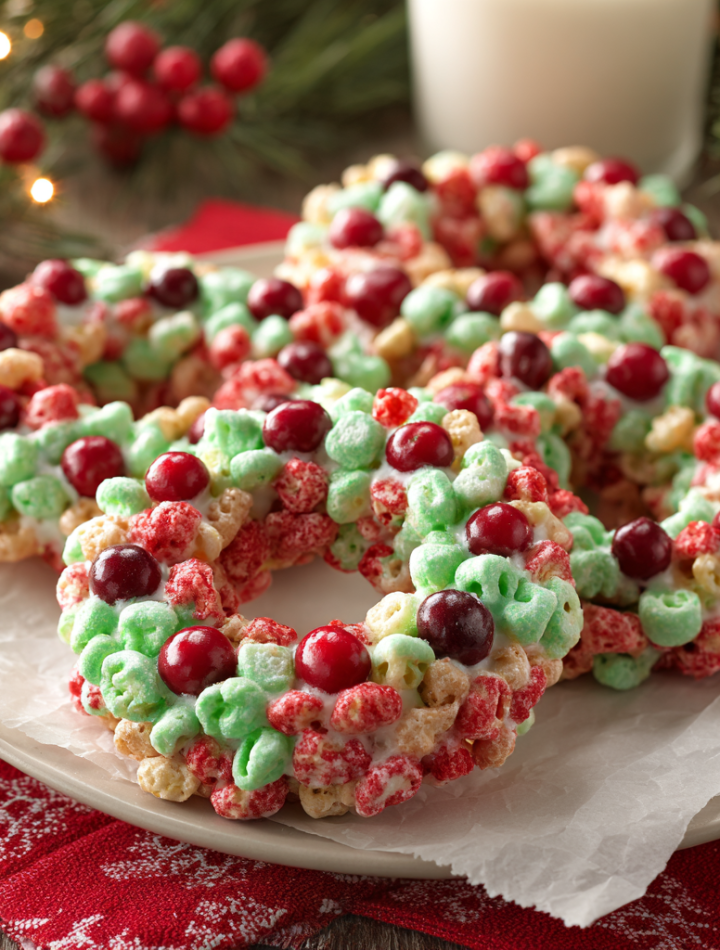
Holiday Marshmallow Wreaths
- Total Time: 45 minutes
- Yield: About 16 mini wreaths 1x
Description
These cheerful little wreaths are a holiday classic—crunchy, gooey, and decked out in festive colors. Made with melted marshmallows, cornflakes, and a hint of green food coloring, they’re shaped into mini wreaths and dotted with red candies for a merry finish. Fun to make, fun to eat, and perfect for kids and cookie trays alike.
Ingredients
½ cup (1 stick) unsalted butter
1 bag (10 oz) mini marshmallows
1 teaspoon green food coloring (gel works best)
4 cups cornflakes cereal
Red cinnamon candies or red mini M&M’s (for decorating)
Cooking spray or butter (for your hands)
Instructions
In a large saucepan over low heat, melt butter.
Add marshmallows and stir until fully melted and smooth.
Remove from heat and mix in green food coloring until the color is evenly distributed.
Gently stir in cornflakes, coating completely.
Lightly grease your hands, then quickly form the mixture into small wreath shapes and place on waxed paper.
Decorate each with 2–3 red candies while still sticky.
Let set at room temperature until firm.
- Prep Time: 15 minutes
- Cook Time: 30 minutes
- Category: Dessert
Nutrition
- Calories: 130
- Sugar: 15g
- Sodium: 75mg
- Fat: 5g
- Carbohydrates: 21g
- Protein: 1g
Gathering Your Wreath-Making Crew (The Ingredients!)
Here’s the beautiful part: you only need a handful of simple ingredients to create this holiday magic. This is all about pantry power! Let’s break it down.
- ½ cup (1 stick) unsalted butter – This is our rich, creamy base that adds incredible flavor and helps create that perfect, smooth texture. Chef’s Insight: Using unsalted lets you control the saltiness. If you only have salted, that’s totally fine! Just know your wreaths might have a very subtle sweet-and-salty thing going on, which I personally love.
- 1 bag (10 oz) mini marshmallows – The star of the show and our glue! Minis melt down faster and more evenly than the big guys. Substitution Tip: For a fun twist, try using flavored marshmallows like peppermint or vanilla! Just know it might alter the color a bit.
- 1 teaspoon green food coloring (gel works best) – This gives us that beautiful, iconic wreath hue. Pro Chef Hack: Gel food coloring is my absolute GO-TO for this. It provides vibrant color without thinning out the marshmallow mixture like liquid coloring can. If you only have liquid, start with a few drops and add more as needed.
- 4 cups cornflakes cereal – Our crunch factor! They provide the perfect texture and structure. Substitution Tip: Not a cornflake fan? Crispy rice cereal works wonderfully for a different kind of crunch. You could even do a half-and-half mix!
- Red cinnamon candies or red mini M&M’s (for decorating) – Our cheerful holiday “berries”! Red hots give a little spicy kick, while M&M’s are all about the chocolatey sweetness. Use what you love!
- Cooking spray or butter (for your hands) – This is non-negotiable, your secret weapon against sticky fingers! Trust me, you’ll thank me later.
Crafting Your Edible Masterpieces: Step-by-Step
Okay, team! Let’s get into the nitty-gritty. This process is fast and fun, so have all your ingredients measured and ready to go before you start heating anything. We call this mise en place (everything in its place) in the chef world, and it’s a game-changer for avoiding stress!
- Melt the Butter: Grab a large saucepan—I mean large, bigger than you think you need—and place it over low heat. Add your stick of butter and let it melt slowly. We’re not trying to brown it here, just gently melt it into a golden pool. Chef’s Tip: Low and slow is the name of the game. High heat will burn the butter before the marshmallows even get in the ring!
- Marshmallow Meltdown: Once the butter is liquid goodness, pour in the entire bag of mini marshmallows. Now, start stirring! Use a sturdy silicone spatula or a wooden spoon. Keep stirring over that low heat until the marshmallows are completely melted and the mixture is smooth and lump-free. This should take about 5-7 minutes. Chef’s Commentary: This is the most therapeutic part for me. Watching those fluffy puffs dissolve into a glossy, white lava is pure kitchen magic. Don’t rush it!
- Go Green! Take the pot off the heat. Now, add your green food coloring. If you’re using gel, a little goes a long way! Start with about half a teaspoon, stir it in, and add more until you get that perfect, festive forest green. Pro Hack: Stir quickly here to evenly distribute the color before the mixture starts to set up.
- The Big Fold-In: Now, dump all 4 cups of cornflakes into the marshmallow goo. Here’s the key: gently fold them in. You don’t want to aggressively stir and crush all your cereal into dust. Use a folding motion to ensure every single flake gets coated in that vibrant green marshmallow goodness. Chef’s Note: It might seem like a lot of cereal, but keep folding! It will all come together.
- Get Your Hands Ready! Immediately—and I mean immediately—spray your clean hands generously with cooking spray or rub them with a little butter. The mixture is very hot, so you have to work quickly and carefully. Grab a small handful of the mixture (about 2-3 tablespoons worth). Safety Tip: If it’s too hot to handle, let it sit for just 60 seconds, but no longer, or it will start to harden and become impossible to shape.
- Shape the Wreaths: This is the fun part! Press and shape the handful into a small circle. Then, use your thumb to poke a hole in the center and gently widen it to form a wreath shape. Place your masterpiece on a baking sheet lined with wax or parchment paper. Repeat with the remaining mixture, re-greasing your hands as needed. Embrace the imperfections! They’re handmade with love.
- Decorate! While the wreaths are still warm and sticky, press 3 or 4 red candies onto each one as your holly berries. This has to be done while they’re still pliable, so decorate as you go!
- Let Them Set: Once all your wreaths are shaped and decorated, simply leave them alone at room temperature for about 30 minutes to firm up. Then, prepare for the oohs and aahs!
How to Serve Your Festive Creations
Presentation is part of the fun! Pile these cheerful wreaths high on a festive platter or a cake stand. For a really stunning effect, place a small, real candle in the center of the tray—just make sure no one mistakes it for a snack! They are the perfect addition to any holiday cookie swap, the star of your Christmas dessert table, or a wonderful homemade gift piled into a cellophane bag tied with a pretty ribbon. They’re best enjoyed within a day or two, alongside a cup of hot cocoa and surrounded by good company.
Ride the Flavor Wave: Creative Twists!
Feel like switching it up? This recipe is a fantastic blank canvas for your creativity!
- Peppermint Twist: Add ½ teaspoon of peppermint extract along with the food coloring and use crushed candy canes instead of red candies for decoration.
- Chocolate Drizzle: Once the wreaths are set, melt some white or dark chocolate and drizzle it over the top for an extra decadent finish.
- Fruity Fun: Use a different color food coloring (red for a poinsettia?) and use different colored candies like yellow M&M’s or even dried cranberries.
- Nutty Crunch: Gently fold in ½ cup of chopped pecans or peanuts along with the cereal for an added layer of texture and flavor.
- Gluten-Free Friendly: Simply ensure your cornflakes are a certified gluten-free brand, and you’re good to go!
Isla’s Chef Notes & Kitchen Stories
This recipe has been through it all in my kitchen! I once had a batch turn a bizarre shade of army green because I got overzealous with the food coloring. We dubbed them “Grinch Wreaths” and they were a hilarious hit. Another year, my nephew decided the best way to help was to add an entire handful of rainbow sprinkles to the mix. It was chaotic and beautiful, and honestly, it tasted amazing. The point is, don’t be afraid to play and make a mess.
Over time, I’ve learned that the single most important factor is speed once the cereal is added. It sets up fast! If it does start to harden in the pot, you can place it over the absolute lowest heat for 15-20 seconds to soften it up again. This recipe is resilient, just like us during the holidays. It’s all about embracing the beautiful, delicious chaos.
Your Wreath Questions, Answered!
Q: My mixture is too sticky and impossible to handle! What did I do wrong?
A: This usually means the marshmallow-to-cereal ratio is off, often from not measuring the cereal correctly. Did you pack it into the measuring cup? You should gently pour it in to get an accurate, light-and-fluffy 4 cups. If it’s too late, you can try adding a handful more cereal to the mixture in the pot to soak up the extra stickiness.
Q: Can I make these ahead of time?
A: You can! They hold up best for about 24-48 hours. After that, they can start to get a little stale or overly hard. Store them in a single layer in an airtight container at room temperature. I don’t recommend refrigerating them, as it can cause them to weep and become soggy.
Q: Why did my wreaths turn out really hard?
A> This typically happens if the marshmallow mixture was cooked too long or over too high of heat, which causes it to become tough as it sets. Remember, low heat is crucial! Also, be sure to store them properly in an airtight container to keep them from drying out.
Q: I can’t find gel food coloring. Can I use liquid?
A> Absolutely! Just be aware that you will need more of it to achieve a vibrant color (think 1-2 tablespoons), and that extra liquid can very slightly alter the texture, potentially making your mixture a bit softer. Add it drop by drop until you get the color you want.
Nutritional Information
Prep Time: 15 minutes | Set Time: 30 minutes | Total Time: 45 minutes | Yield: About 16 mini wreaths
Per Wreath: Calories: 130 | Fat: 5g | Saturated Fat: 3g | Carbohydrates: 21g | Sugar: 15g | Protein: 1g | Sodium: 75mg
Please note: Nutritional information is an estimate and may vary based on specific ingredients used and portion sizes.