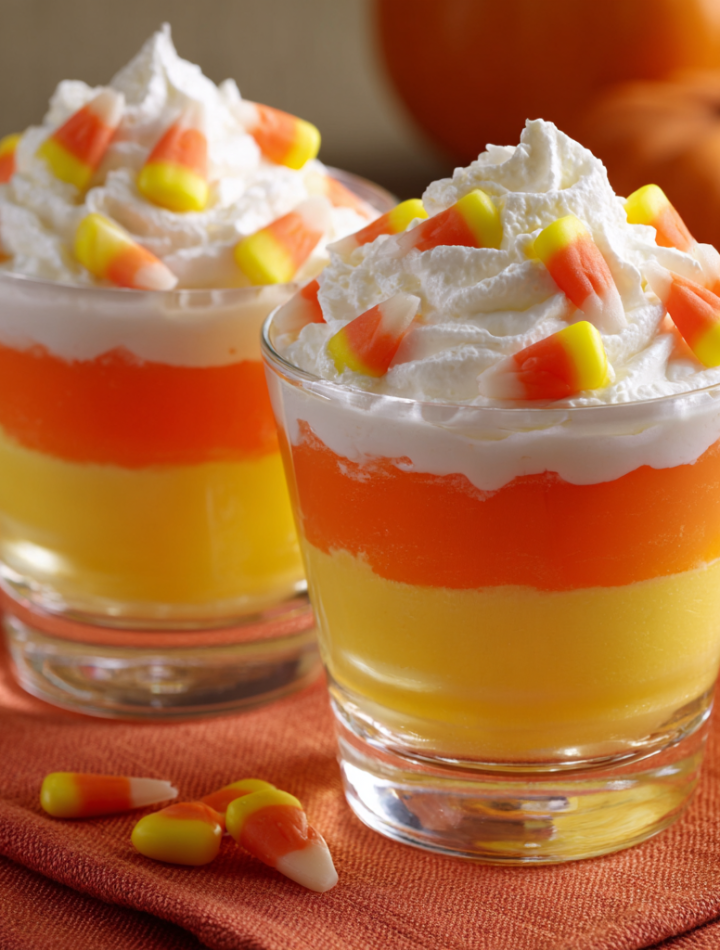
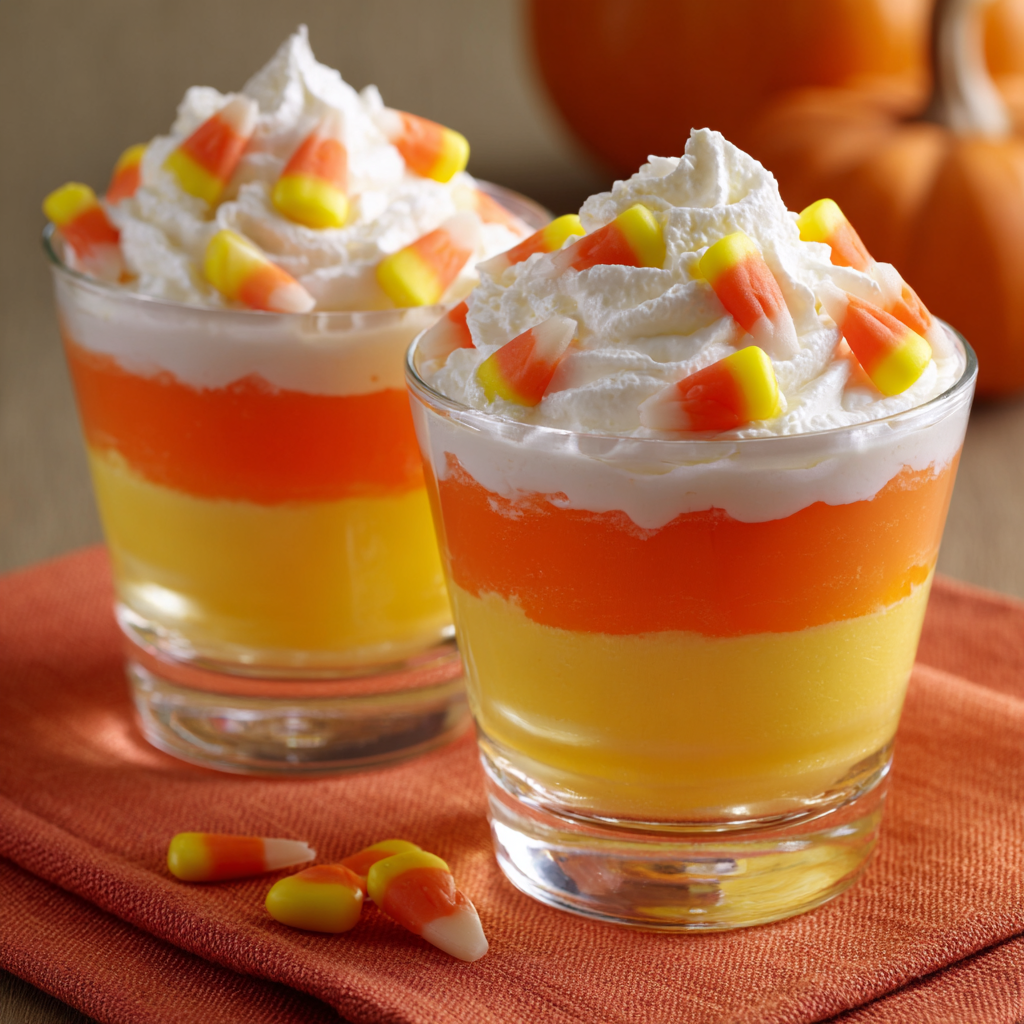
Your New Favorite Spooky Season Dessert: Candy Corn Parfaits!
Hey there, flavor friend! Isla here, from my cozy kitchen to yours. Can you feel it? That crisp, magical shift in the air? The leaves are starting to turn, there’s a distinct smell of pumpkin spice everywhere, and let’s be real—the Halloween candy aisle is basically calling our names. It’s officially the season of spooky, cozy, and downright delicious fun!
And what’s more iconic than candy corn? Love it or have a… strong opinion about it, you can’t deny it’s a total symbol of Halloween. But I’m a dessert girl at heart, and I wanted to create something that captures all that nostalgic, tri-colored joy in a form that’s even more delightful to eat. Enter: these utterly adorable, wiggly, creamy, and impossibly fun Candy Corn Parfaits!
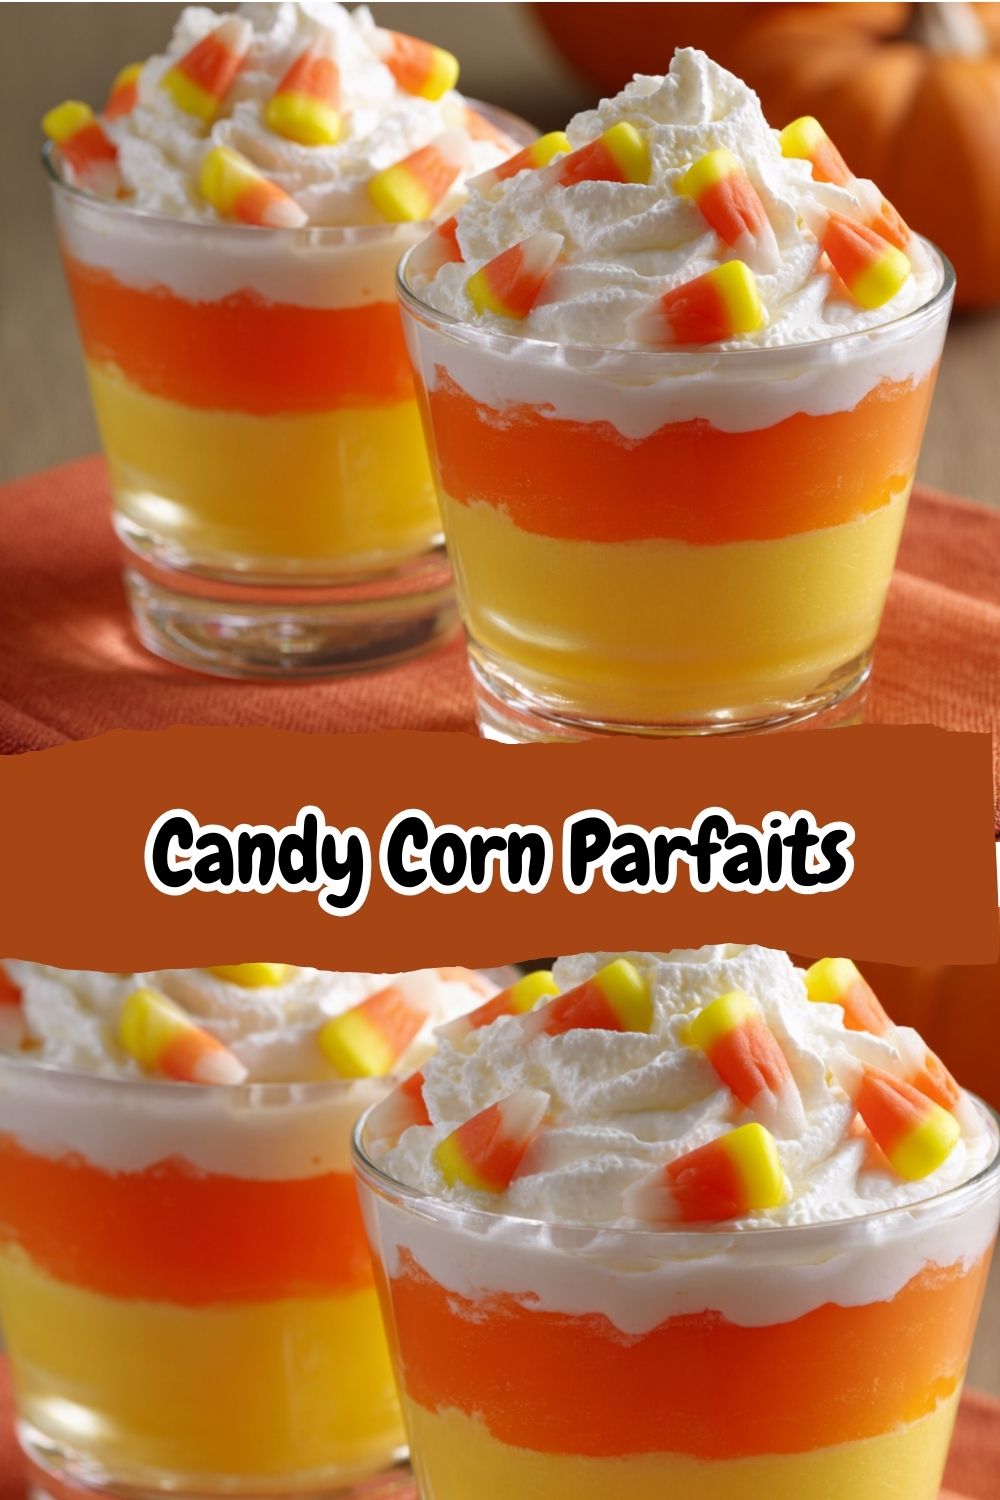
This isn’t just a dessert; it’s an experience. It’s the kind of simple, joyful recipe that makes everyone—kids and kids-at-heart—light up. We’re talking layers of vibrant orange Jell-O, sunny yellow vanilla pudding, and a cloud of fluffy whipped cream. It’s a treat that looks like it took all day but honestly comes together with a few simple steps and a little help from the fridge. It’s the perfect centerpiece for your Halloween party, a fun after-school project, or just a sweet way to treat yourself during this wonderfully eerie season. So, grab your favorite clear cups, and let’s make some magic together!
A Spoonful of Nostalgia: Why This Recipe Tugs at My Heart
This recipe takes me right back to my grandma’s linoleum-floored kitchen, the smell of sugar cookies permanently baked into the walls. Every Halloween, she’d host a “Spooky Supper” for the neighborhood kids. There’d be mummy dogs, a punch bowl with a frozen hand ice ring, and she’d always, always let me be her official “dessert assistant.”
One year, we decided to get fancy. The goal: a dessert that looked like the big bowl of candy corn sitting by the door. Our first attempt was… a mess. We tried layering melted candy corn into something, and it was a tooth-achingly sweet, sticky disaster. We laughed until we cried, wiping orange and yellow goo off our aprons. The next day, with the wisdom of a kitchen pro, she suggested we use Jell-O and pudding. It was a revelation! That moment of creative problem-solving, of turning a kitchen flop into a fabulous new tradition, is exactly the kind of joy I want to bring to your kitchen. These parfaits are a tribute to her, to fun, and to never being afraid to try (and sometimes fail) in the name of something delicious.
Print
Candy Corn Parfaits
- Total Time: 15 minutes
- Yield: 4 servings 1x
Description
Bright, festive, and full of flavor—these Candy Corn Parfaits bring the classic Halloween treat to life in dessert form. With layers of orange Jell-O, creamy yellow pudding, and a fluffy whipped cream top, they capture the sweet look of candy corn without the chew. A fun and colorful way to sweeten any spooky gathering.
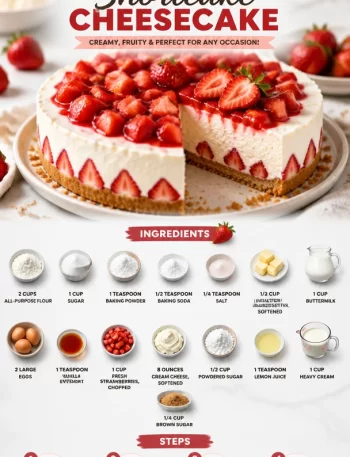
Ingredients
1 box orange Jell-O (3 oz)
2 cups cold water
1 cup prepared vanilla pudding
Yellow food coloring
1 cup whipped cream or whipped topping
Clear cups or jars
Instructions
Prepare orange Jell-O according to package instructions. Let it cool slightly, then pour into clear cups to fill one-third. Chill until set.
Tint vanilla pudding with yellow food coloring and layer on top of the set Jell-O.
Spoon or pipe whipped cream over the pudding to form the final layer.
Chill until ready to serve. Optionally, garnish with candy corn pieces.
- Prep Time: 15 minutes (plus chilling)
Nutrition
- Calories: 180
- Sugar: 28g
- Fat: 4g
- Saturated Fat: 2g
- Carbohydrates: 34g
- Protein: 2g
Gathering Your Parade of Ingredients
Here’s the beautiful part: this recipe is all about simplicity and smart shortcuts. No fussy techniques here, just good vibes and great flavors. Here’s what you’ll need to create your own candy corn masterpiece:
- 1 box (3 oz) Orange Flavor Jell-O: This is our star! That bright, citrusy flavor and iconic color are non-negotiable for the classic look. Chef’s Insight: If you can’t find orange, a mix of red and yellow Jell-O will get you there! For a natural twist, you could try using a clear orange juice-based gelatin, but the color will be more muted.
- 2 cups Cold Water: You’ll use this to prepare the Jell-O. We’ll use cold water to help it set a bit faster. Ice-cold is your friend here!
- 1 cup Prepared Vanilla Pudding: The creamy yellow layer! You can use instant pudding you whip up yourself, the refrigerated kind from the store, or even homemade if you’re feeling extra. Substitution Tip: For a richer flavor, use French vanilla pudding. Dairy-free? Any plant-based vanilla pudding will work perfectly!
- Yellow Food Coloring: This is key for getting that perfect, sunny candy corn yellow hue in your pudding. Chef’s Insight: Gel food coloring will give you a more vibrant color without thinning out your pudding, but a few drops of liquid coloring will work just fine!
- 1 cup Whipped Cream or Whipped Topping: The glorious white top! I’m a sucker for real whipped cream sweetened with a little powdered sugar and vanilla, but a quality store-bought tub of whipped topping is a fantastic, stable shortcut. No judgment in this kitchen!
- 4-6 Clear Cups or Small Jars: Presentation is everything! Using clear glasses lets everyone see those beautiful, defined layers. Mason jars, parfait glasses, or even sturdy plastic cups all work.
- Optional Garnish: A few pieces of Real Candy Corn: For the full effect! Plop one on top of the whipped cream right before serving. It’s the cherry on top of our Halloween sundae!
Let’s Layer Up! Your Step-by-Step Guide to Parfait Perfection
Okay, team! Let’s do this. Put on some fun Halloween tunes, and let’s create these gorgeous layers. It’s all about patience and a steady hand!
- The Jiggly Orange Base: In a heatproof bowl, whisk the orange Jell-O powder with 1 cup of boiling water until it’s completely dissolved. This step is crucial—no gritty bits! Once it’s clear, stir in 1 cup of cold water. Now, here’s a pro tip: let this mixture cool on the counter for about 15-20 minutes. If you pour it hot right into the glasses, you’ll create condensation that makes the layers blurry later. We want sharp lines! Once it’s lukewarm, carefully divide the mixture evenly among your clear cups. Gently transfer them to the refrigerator and let them chill for at least 2 hours, or until completely firm to the touch.
- The Sunny Yellow Middle: While the Jell-O sets, let’s make our sunshine layer! If you’re using instant pudding, prepare it according to the package directions. Once it’s thick and lovely, start adding your yellow food coloring. My hack: Add a little at a time, whisking after each addition, until you achieve that perfect, bold candy corn yellow. If you’re using pre-made pudding, just whisk the food coloring right in. Cover the pudding and pop it in the fridge to let it set fully alongside the Jell-O.
- The Fluffy White Cloud: If you’re making homemade whipped cream, now’s the time! Chill your bowl and whisk attachment for 10 minutes, then beat 1 cup of heavy cream, 2 tablespoons of powdered sugar, and 1 teaspoon of vanilla extract on medium-high speed until soft peaks form. Don’t overbeat! We want pillowy softness, not butter.
- The Grand Layering Finale: Once your Jell-O is fully set (do the jiggle test!), it’s showtime. Take your yellow pudding and gently spoon it over the orange Jell-O layer. Try to spoon it into the center and spread it to the edges with the back of the spoon to avoid digging into the Jell-O. Fill it up to create your second distinct layer. Now, for the whipped cream! If you want to be fancy, transfer it to a piping bag fitted with a star tip. If not, just carefully spoon it on. Pile it high to create that classic candy corn white tip. And voila! You’ve just created edible art.
- The Final Chill: Pop the assembled parfaits back into the fridge for at least another 30 minutes before serving. This helps everything firm up and makes the layers clean and neat when you spoon into them.
How to Serve These Spooktacular Sweets
These parfaits are a showstopper all on their own! I love serving them right in the clear cups they were made in—it’s part of the charm. Arrange them on a platter for a party so guests can grab and go. Right before serving, add the optional candy corn piece on top for that authentic finish. For an extra special touch, you could add a black sprinkle or two for a “spider” effect, or even a small, spooky Halloween-themed spoon tucked into the side. The goal is fun, so get creative with it!
Ride Your Own Flavor Wave: Fun Variations to Try
Feel like mixing it up? This recipe is a fantastic canvas for creativity! Here are a few twists to make it your own:
- Chocolate Lover’s Dream: Swap the vanilla pudding for chocolate pudding! You’ll get a “black magic” effect with orange, brown, and white layers. So decadent.
- Boozy Adult Version: For a grown-up gathering, replace the cold water in the Jell-O with ½ cup of cold vodka or whipped cream vodka and ½ cup of cold water. Spooky and spirited!
- Piña Colada Paradise: Use pineapple Jell-O for the bottom layer and coconut pudding (tinted yellow) for the middle. Taste the tropics!
- Naturally Sweet: Use a natural orange juice sweetened gelatin and a homemade pudding colored with a tiny bit of turmeric (for yellow) for a dessert free from artificial dyes.
- Pumpkin Spice Everything: It’s the season! Mix a tablespoon of pumpkin pie spice into your vanilla pudding for a festive fall twist on the yellow layer.
Isla’s Chef Notes & Kitchen Stories
This recipe has evolved so much since that first messy attempt in my grandma’s kitchen. The biggest lesson learned? Patience with the Jell-O is NOT optional. I can’t tell you how many times I’ve been too eager and tried to layer the pudding on top of a Jell-O that was *almost* set. The result? A murky, orange-yellow swamp layer. Still tasty, but not the pretty parfait we’re aiming for!
Another funny story: I once tried to make a giant version in a big trifle bowl for a party. It looked incredible… until we tried to serve it. The weight of the layers caused a tectonic shift, and the entire thing collapsed into a delicious but homogenous beige blob. We renamed it “Ghost Goop” and served it with a laugh. So, moral of the story: individual cups are definitely the way to go for structural integrity! This recipe is all about joy, so even if your layers aren’t perfect, I promise they will be delicious.
Your Candy Corn Parfait Questions, Answered!
Q: My layers are mixing together! How can I prevent this?
A: The number one culprit is temperature. Make absolutely sure your Jell-O layer is 100% set—firm to the touch—before adding the pudding. Also, letting the Jell-O mixture cool before refrigerating prevents condensation. When spooning on the next layer, be gentle and use the back of a spoon to spread it without pressing down.
Q: Can I make these ahead of time?
A: Absolutely! They are the perfect make-ahead dessert. You can assemble them fully up to 24 hours in advance. Just keep them covered in the refrigerator. I’d add the final candy corn garnish right before serving so it doesn’t get soft.
Q: My pudding layer is too runny. What happened?
A: If you’re using instant pudding, make sure you whisked it for the full 2 minutes as directed on the box—this is crucial for it to thicken properly. If it’s still thin, just give it a few more minutes in the fridge to set up before layering. Pre-made pudding should be nice and thick already.
Q: Is there a way to make this vegetarian/vegan?
A: For sure! Use agar-agar instead of gelatin (follow package instructions for setting) for the orange layer. For the pudding and whipped cream, use plant-based alternatives. Coconut whipped cream is a fantastic vegan option for the top!
Nutritional Information*
*This is an estimate per parfait based on using sugar-free Jell-O, fat-free sugar-free pudding, and light whipped topping. Values will vary greatly based on the specific products you use.
- Calories: ~80
- Total Fat: 2g
- Saturated Fat: 1.5g
- Carbohydrates: 15g
- Sugars: 5g
- Protein: 2g