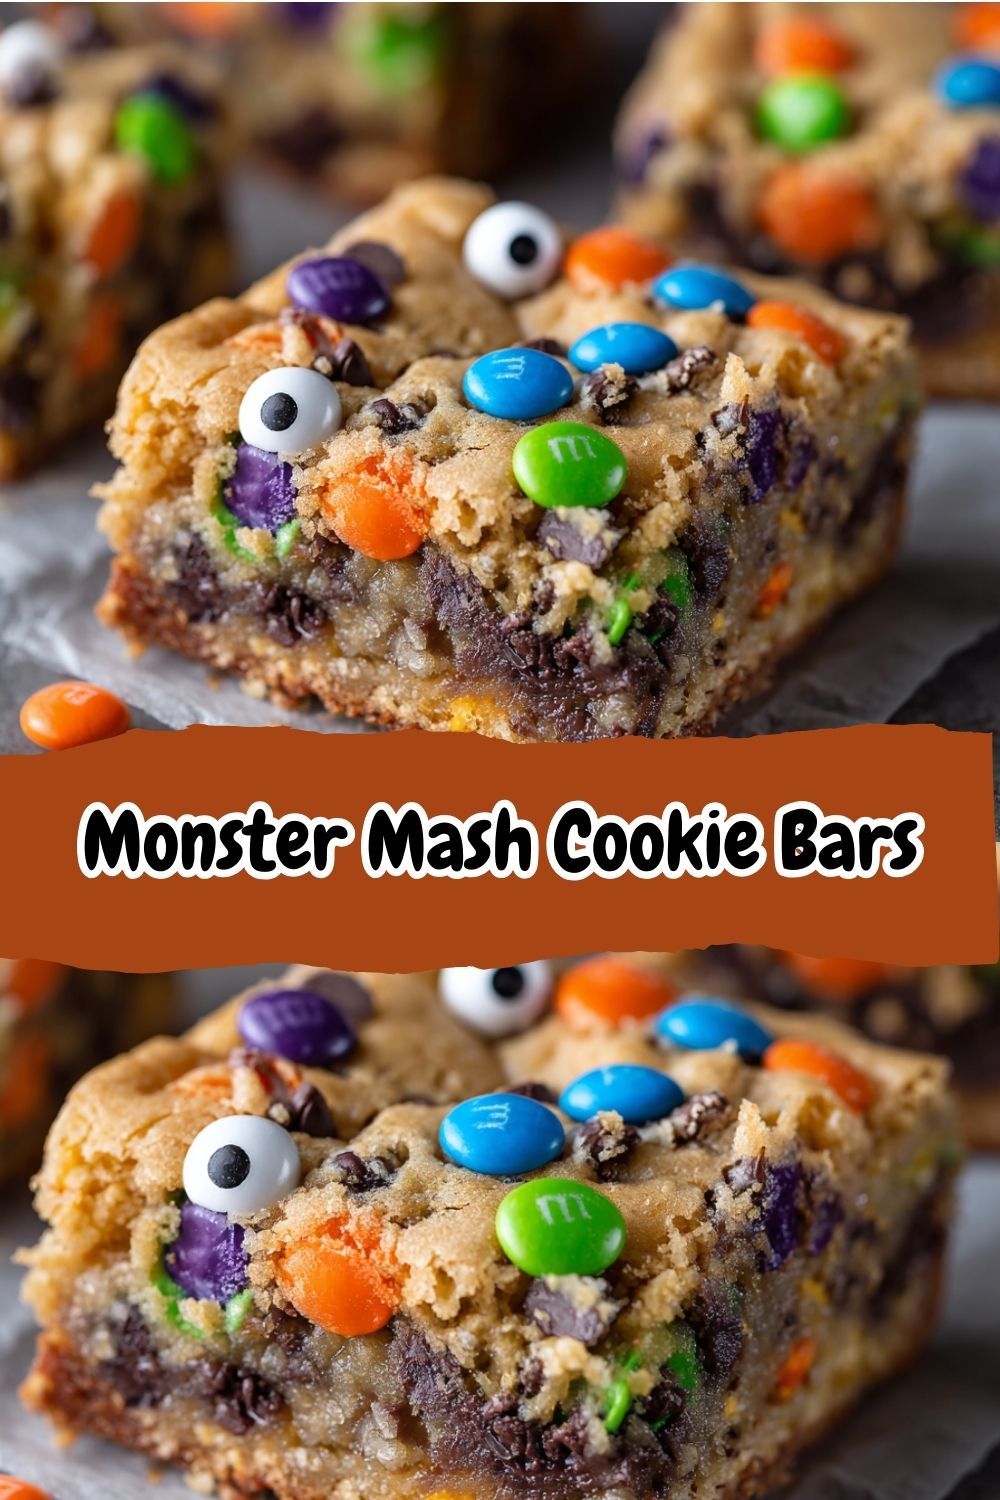
 Monster Mash Cookie Bars: Your New Halloween Obsession!
Hey flavor adventurers! Isla here from BiteTide, waving my spatula from a kitchen currently dusted in rainbow sprinkles and candy eyeballs. Can you feel it? That crisp, pumpkin-spiced energy in the air? Halloween’s creeping closer, and you know what that means: It’s officially UNLEASH THE FUN TREATS O’CLOCK! Forget complicated bakes that leave you haunted by dirty dishes. Today, we’re whipping up my Monster Mash Cookie Bars – the ultimate mashup of chewy cookie dough, melty chocolate chips, and a SPOOKTACULAR riot of Halloween candies. Imagine your favorite blondie met a monster truck rally full of candy… in bar form. One bowl, 10 minutes prep, and BOOM – you’ve got a pan of pure, playful deliciousness perfect for parties, lunchbox surprises, or surviving that “Mom, I’m booooored!” wail during spooky movie night. Let’s make baking feel like a costume party for your taste buds!
Why These Bars Make My Ghoul Heart Sing
Picture this: Tiny me, maybe 7 years old, face smeared with chocolate, sitting cross-legged on my Nonna’s speckled linoleum floor. It’s October. She’s rolling pasta dough like a boss, but I’m obsessed with the giant bowl of “monster mix” candy she’d ONLY bring out for Halloween baking. Peanut butter cups, weirdly shiny candy corn, those weird marshmallow pumpkins – it was treasure! We’d sprinkle them recklessly onto everything. One year, we dumped a whole bag into her classic cookie dough and baked it as bars instead of rounds. The result? A gloriously sticky, candy-studded mess we dubbed “Monster Mash.” Cutting into that first warm square felt like discovering edible confetti. That chaotic joy? That’s the soul of these bars. They’re not *just* dessert; they’re a permission slip to play with your food, embrace the colorful chaos, and create those “remember when…” moments. Just maybe wipe your face first.
Print
Monster Mash Cookie Bars
- Total Time: 35 mins
- Yield: 12 bars 1x
Description
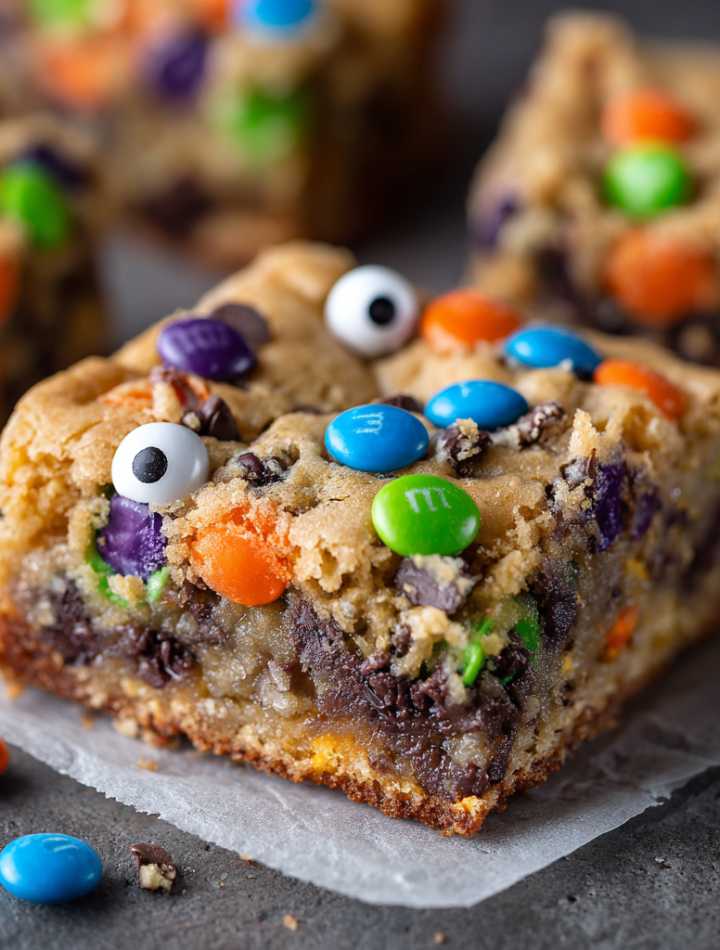
Monster Mash Cookie Bars are a colorful, chewy, candy-packed dessert that’s made for spooky season fun. Loaded with chocolate chips, Halloween candies, and gooey cookie dough, these bars come together in one bowl and bake into a soft, festive treat perfect for parties, movie nights, or trick-or-treat swaps.
Ingredients
1/2 cup unsalted butter, softened
1/2 cup brown sugar
1/4 cup granulated sugar
1 large egg
1 tsp vanilla extract
1 1/4 cups all-purpose flour
1/2 tsp baking soda
1/4 tsp salt
1/2 cup chocolate chips
1/2 cup Halloween M&Ms or candy-coated chocolates
1/4 cup candy eyeballs
Optional: sprinkles or chopped candy bars
Instructions
Preheat oven to 350°F (175°C). Line an 8×8-inch baking pan with parchment paper.
In a large bowl, cream butter and sugars until light and fluffy.
Add egg and vanilla, mixing until smooth.
Stir in flour, baking soda, and salt until just combined.
Fold in chocolate chips and M&Ms, reserving a few for topping.
Spread dough evenly into the prepared pan. Press remaining candies and eyeballs on top.
Bake for 20–25 minutes or until edges are golden and center is set.
Cool completely in the pan before cutting into squares.
- Prep Time: 10 mins
- Cook Time: 25 mins
- Category: Dessert
Nutrition
- Calories: 240
- Sugar: 18g
- Fat: 12g
- Carbohydrates: 30g
- Protein: 2g
Gathering Your Monster Squad (Ingredients)
Simple heroes create legendary monsters! Grab these:
- 1/2 cup unsalted butter, softened – The cozy hug in bar form! Chef’s Tip: SOFTENED, not melted! Poke it – it should dent easily. No time? Microwave cold butter for 5 SECONDS, flip, repeat until JUST pliable.
- 1/2 cup brown sugar – Deep molasses notes = chewy magic. Swap: Dark brown sugar for extra caramel vibes!
- 1/4 cup granulated sugar – Our crispy-edge specialist. Insight: This duo (brown + white) creates the PERFECT texture balance.
- 1 large egg – The binder! Chef’s PSA: Crack it into a small bowl first. No shell surprises mid-mix!
- 1 tsp vanilla extract – Flavor amplifier! Level Up: Use bourbon vanilla for a warm, complex note.
- 1 1/4 cups all-purpose flour – The trusty foundation. Gluten-Free? Swap 1:1 with a good GF blend (like Bob’s Red Mill).
- 1/2 tsp baking soda – Our lift & lightness agent. Must: Check it’s fresh! Old soda = flat bars.
- 1/4 tsp salt – Flavor superhero! Balances sweetness. Secret Weapon: Flaky sea salt on top after baking? YES.
- 1/2 cup chocolate chips – Non-negotiable gooey pockets! Fun Twist: Use orange & black chips for Halloween!
- 1/2 cup Halloween M&Ms or candy-coated chocolates – The COLOR! Pro Move: Reserve 2 tbsp for pressing on top – visual wow factor!
- 1/4 cup candy eyeballs – Personality points! Can’t Find? Mini marshmallows + chocolate chip pupils work!
- Optional: Sprinkles or chopped candy bars (Snickers, Reese’s) – GO WILD! My Fave: Crushed Oreos for a cookies ‘n cream monster!
Conjuring Your Bars: Let’s Get Mixing!
-
- Preheat & Prep: Crank that oven to 350°F (175°C). Line an 8×8-inch baking pan with parchment paper, leaving overhangs on two sides. WHY? This creates a sling to lift the whole slab out later for pristine cuts! Spritz the paper lightly with cooking spray too – no sticky tragedies!
<
- Creamy Dreamy Base: In your large bowl, beat the softened butter, brown sugar, and granulated sugar with a hand mixer (or strong arm!) for 2-3 minutes. Watch for Magic: It should turn pale, fluffy, and look like light coffee foam. This incorporates air = lighter bars!
- Egg-cellent Addition: Beat in the egg and vanilla extract just until smooth, about 30 seconds. Don’t Overmix! We want tender bars, not tough hockey pucks.
- Dry Dance: In a separate bowl, whisk together the flour, baking soda, and salt. Gradually add this to the wet ingredients, mixing on low speed (or by hand) JUST until no dry streaks remain. Seriously, stop! Overmixing flour = gluten development = dense bars. A few tiny lumps? Totally fine!
- Monster Mash-In: Time for FUN! Fold in the chocolate chips and most of the M&Ms/candies (save that 2 tbsp!). Gentle Folding Hack: Use a silicone spatula and scoop from the bottom up. We want candy distributed, not smashed! Eyeballs go in now too – let them hide inside for googly surprises!
- Pan & Decorate: Scrape the gloriously chunky dough into your prepped pan. Use the spatula (or lightly damp fingers) to spread it evenly into the corners. Now, press the reserved candies and extra eyeballs artistically onto the top! Add sprinkles or chopped candy now if using. Press gently so they stick but don’t sink.
- Bake to Perfection: Slide into the oven for 20-25 minutes. Key Signs: The edges should be golden brown and pulling slightly away from the pan. The center will look slightly soft but *set* – it shouldn’t jiggle like liquid. A toothpick inserted near the edge should come out clean (maybe a moist crumb), near the center might have melted chocolate (that’s okay!). OVENS LIE: Start checking at 18 mins! Underbaked > overbaked for chewiness.
- The Crucial Cool Down: RESIST THE URGE! Let the pan cool completely on a wire rack (about 1-2 hours). Why the torture? Cutting warm bars = crumbly mess. Cooling lets them set into fudgy, chewy perfection. Use this time to… hide some candy for yourself?
- Slice & Conquer: Lift the entire bar slab out using the parchment sling. Place on a cutting board. Use a large, sharp knife (dip it in hot water and wipe dry between cuts for super clean edges!) to cut into 12 squares, or 16 for smaller treats. Watch those eyeballs stare back!
Showtime! Serving Your Monster Masterpiece
Presentation is part of the fun! Stack them slightly haphazardly on a vibrant platter or cake stand. Toss a few extra loose candy eyeballs or Halloween sprinkles around the base. For parties, stick a mini paper bat or plastic spider ring on top of a bar or two for instant giggles. These are perfect at room temperature with a cold glass of milk or hot apple cider. Pack them in treat bags tied with orange and black ribbon for the coolest kid (or coworker!) on the block. No fancy plating needed – their colorful, chaotic charm speaks for itself!
Monster Makeovers: Endless Flavor Waves!
These bars are your flavor playground! Ride these waves:
- Peanut Butter Beast: Replace 2 tbsp butter with creamy peanut butter in the creaming step. Fold in chopped Reese’s cups instead of chocolate chips!
- Salted Caramel Swirl: After spreading dough in pan, dollop 1/3 cup thick salted caramel sauce on top. Swirl gently with a knife before adding candies.
- Candy Corn Craze (For the Brave!): Swap M&Ms for candy corn and white chocolate chips. Add orange food gel to the dough for a neon twist!
- Mint Chocolate Mummy: Use Andes mints or chopped mint chocolate instead of chips. After baking and cooling, drizzle with white chocolate “bandages.”
- Breakfast Monster (Shh!): Fold in 1/2 cup crispy rice cereal and 1/4 cup mini pretzels for salty crunch. Hey, it’s got an egg… kinda breakfast?
Isla’s Monster Musings & Kitchen Confessions
Okay, real talk: The first time I tested these, I got SO excited pressing in the eyeballs that I accidentally used the whole bag INSIDE the dough. The result? Bars that looked like they had a serious case of the chickenpox when cut! Hilarious, but maybe not the vibe. Lesson learned: Reserve those eyeballs for the top! This recipe is incredibly forgiving though. Short on time? Melt the butter slightly (cool it a bit first!) for a denser, fudgier bar – still amazing. Overmix the flour? They’ll be a bit cakier, but still packed with flavor and candy. The magic is in the spirit! These bars have become my kids’ annual Halloween tradition – they design the top décor now. Seeing their candy placement “strategies” (usually involving maximum eyeball coverage) brings back that same floor-sitting, candy-coveting joy from Nonna’s kitchen. That’s the real BiteTide magic.
Monster Mash FAQ: Taming Your Treats
Q: My bars are rock-hard! What happened?
A: Overbaking is the usual culprit! Ovens vary wildly. Start checking early (18 mins!) and remember the center will look soft but set. Also, did you pack the flour? Spoon flour into the measuring cup and level it off – packing adds extra, drying out the bars.
Q: Why did my candy eyeballs melt/disappear?
A: Not all eyeballs are created equal! Some brands are pure sugar and melt easily. Look for ones labeled “non-melting” or designed for baking. Pressing them firmly ON TOP (not mixed in) helps. If they still vanish? They’re hiding inside as yummy surprises!
Q: Can I double this recipe?
A: Absolutely! Double all ingredients and bake in a 9×13-inch pan. Baking time might be slightly longer (start checking at 25 mins). The parchment sling is even MORE crucial here!
Q: How do I store these? Do they freeze?
A: Store cooled bars airtight at room temp for 3-4 days. They freeze beautifully! Layer them between parchment paper in an airtight container for up to 2 months. Thaw at room temp – they’ll taste fresh-baked.
Monster Mash Munching (The Numbers)
Let’s be real – these are a treat! Per bar (based on 12 bars):
- Calories: ~240 kcal
- Carbs: 30g
- Fat: 12g
- Sugar: 18g
- Protein: 2g
Enjoy them as a joyful part of your spooky celebrations!
These Monster Mash Cookie Bars are everything Halloween desserts should be—fun, colorful, and ridiculously easy! With gooey chocolate, crunchy candies, and those silly candy eyeballs staring back at you, they’re guaranteed to bring smiles to kids and adults alike. Whether you’re baking them for a party, a classroom surprise, or just a cozy family night, they’ll disappear faster than a haunted house ghost. Enjoy them as a joyful part of your spooky celebrations! 🎃👀🍪